Updated: November 30, 2014 with new SIP trunk provider, Lync 2013 Standard Edition, Lync Servers running on Windows 2012 R2 and TMG disclaimer.
An enterprise voice deployment of a Lync 2013 environment means you have to connect to some sort of PBX solution and a (direct) SIP trunk is such a solution. The Lync server connects to the servers (SBC) of your provider, making it possible to make calls and receive calls from every phone line in the world.
To support this another Lync 2013 server role needs to be installed, the so called Mediation server. The mediation server is connected to the internal network (to connect to the Lync 2013 Front-End server) and to the external network (i.e. the internet) to connect to the SIP trunk provider network.
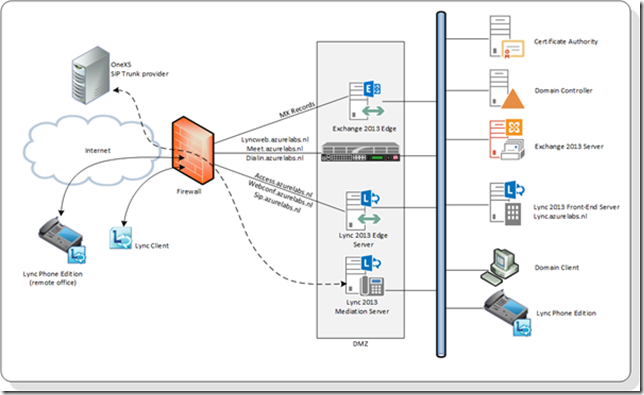
Not all SIP trunk providers are supported to work with Lync Server 2013 (or 2010). For an overview you can check the Infrastructure qualified for Microsoft Lync pages (check the services tab) on the Microsoft website. In my lab environment I will use a SIP trunk from OneXS, based out of Amsterdam, The Netherlands. I have one Lync 2013 Standard Edition Front-End server, one Lync 2013 Edge server and a dedicated Lync 2013 Mediation server as shown in the following figure:
The first step is to configure the Lync 2013 mediation server. This is a normal domain joined server connected to the internal network. A 2nd NIC is configured with direct internet connectivity so it has a public IP address.
| Note. My Mediation server is connected directly to the Internet, behind a Juniper firewall. This firewall has IP based restrictions and only the necessary ports are open. I have been trying to get the SIP trunk to work via TMG2010 but wasn’t successful and I don’t know a lot of consultants that got this configuration working properly. Therefore I do not recommend using a TMG2010 server between the Mediation Server and the SIP trunk provider. |
The following prerequisite software needs to be installed on the Lync 2013 Mediation Server:
- Windows Management Foundation 3.0 need to be installed on the server (includes Powershell 3.0). WMF 3.0 is part of Windows 2012, on Windows Server 2008 R2 SP1 it is a separate download: http://www.microsoft.com/en-us/download/details.aspx?id=34595
- The second prerequisite is .NET Framework 4.5 (part of Windows Server 2012) which can be downloaded here: http://msdn.microsoft.com/en-us/library/5a4x27ek(VS.110).aspx.
- Lync Server 2013 also requires the installation of Windows Identity Foundation in order to support server to server authentication scenarios. When using Windows 2012 R2 you can use the Add/Remove Features in Server manager, otherwise you can download the Identity Foundation here: http://go.microsoft.com/fwlink/p/?linkId=204657.
Installing and configuring the mediation server
Before installing the Lync 2013 mediation server it has to be created in the Lync Topology. On the Lync Front-End server open the Topology Builder, download the topology from existing deployment and save the topology file on the local hard disk.
In the Topology Builder navigate to the Mediation pools under Lync Server 2013, right click Mediation pools and select New Mediation Pool.
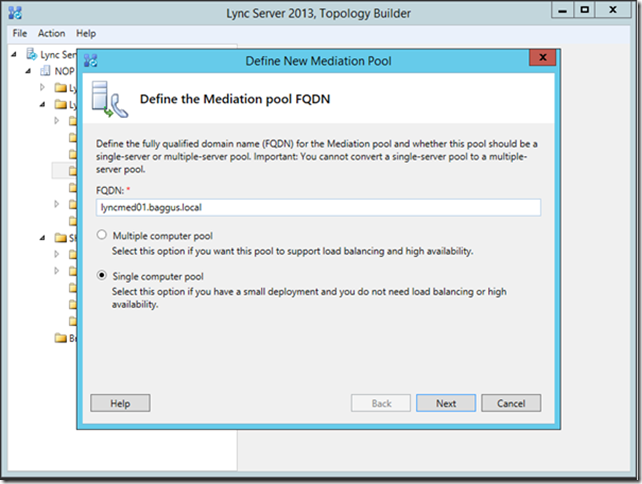
Enter the name of the Pool FQDN (in case of Lync 2013 Standard Edition this should be the FQDN of the Mediation server) and select the Single computer pool radio button.
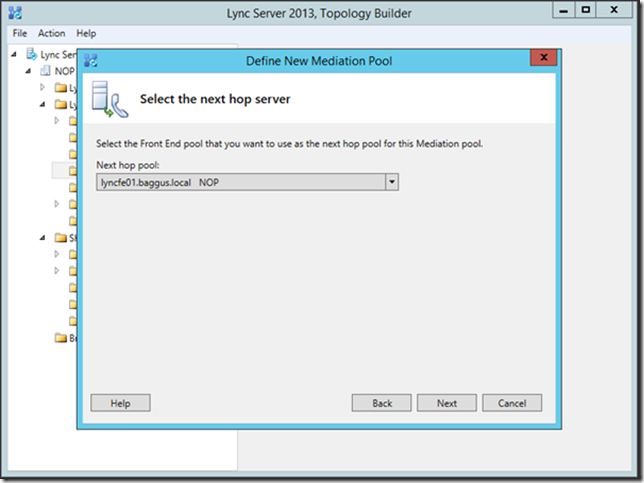
The Mediation pool is uses the lyncpool we’ve created earlier as the next hop server, so select this pool in the Next hop pool drop down box.
Select the Edge pool we’ve created earlier in the Edge pool drop-down box:
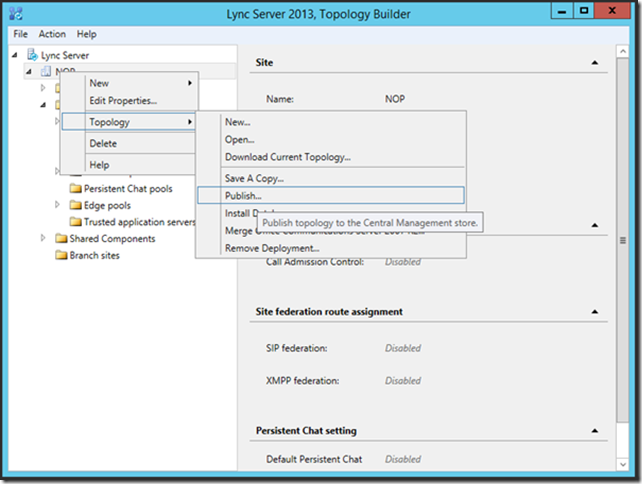
Click Finish to end the New Edge Pool wizard and to save all information in the local file. The configuration is now ready to be published into the CMS:
The mediation pool with the mediation server is now stored in the configuration database and we can continue installing the actual Lync 2013 mediation server.
The installation of the Lync 2013 mediation server is not very different than other Lync server roles. Install the Lync 2013 core components from the DVD and once installed start the Deployment Wizard. In the Deployment Wizard select Install or Update Lync Server System.
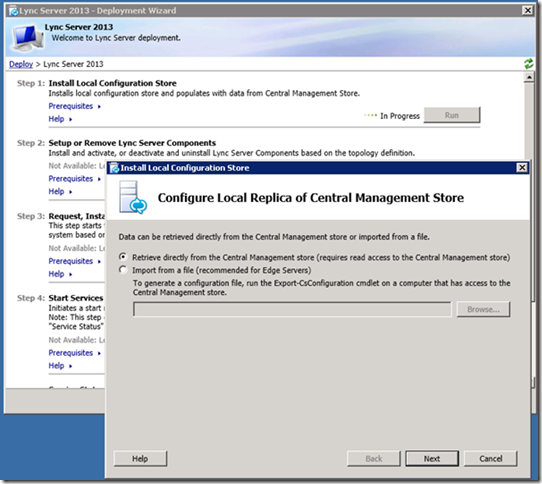
Step 1: install Local Configuration Store and select Retrieve directly from the Central Management Store will install an instance of SQL Express on the mediation server and the contents of the CMS database will be copied into this SQL Express instance.
Step 2: Setup or Remove Lync Server Components will install the actual Lync server 2013 Mediation Server based on the configuration found in the CMS.
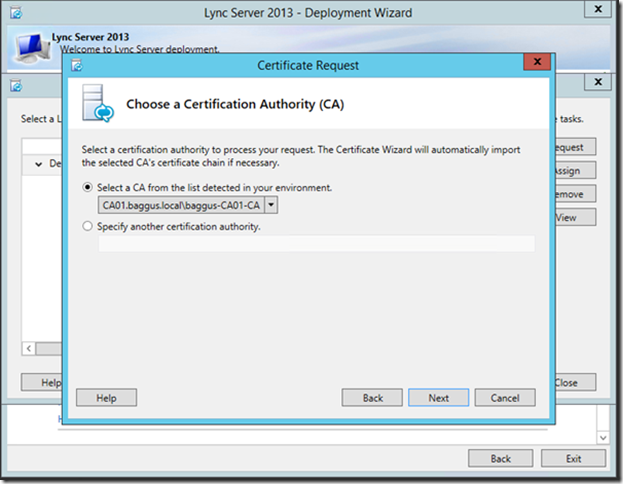
Step 3: Request, Install or Assign Certificates will let you request an internal SSL certificate using the Active Directory Certificate Authority. Click Run and on the certificate wizard click Request. The certificate wizard is started, select Send the request immediately to an online certification authority (this is the default) and select the CA that will issue the certificate (it will find the CA in Active Directory):
Follow the wizard, enter a friendly name (something like Lync Mediation Certificate), enter the name of the organization and the department and enter the country, state/province and city/locality information. The wizard will automatically come up with the name of the mediation pool (FQDN of the Lync Front End server). If needed you can add additional names for the Subject Alternative Names field.
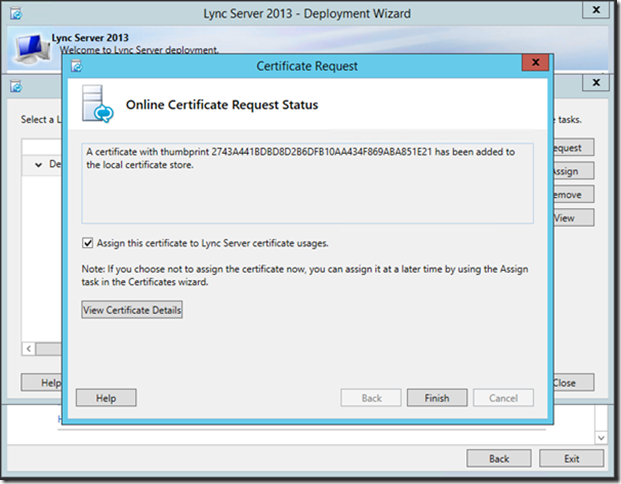
When the wizard is finished an SSL certificate is automatically requested at the internal Active Directory Certificate Authority, issued and downloaded to the local certificate store of the mediation server.
When you click Finish the Certificate Assignment wizard is automatically started. Nothing to configure here, just informational windows. Finish the wizard and close the certificate wizard.
Note. The SSL Certificate is only used for internal network communication. Communications with the SIP Trunk provider is typically not encrypted and thus no SSL certificate is used for external communications.
Select Step 4: Start Services to start the Lync 2013 mediation services on this server and use Service Status (Optional) to check if the services are running. There are only three services:
- Lync Server Mediation;
- Lync Server Centralized Logging Service;
- Lync Server Replica Replicator Agent;
Note. Make sure you got your name resolution right so all servers can find each other, especially when using both external names and internal names. For example, have a look at this blog post: A call to a PSTN number failed due to non availability of gateways in Lync 2013. Also check the binding order of the network interfaces. If set in the wrong order the mediation server will look for the front-end pool via the external interface instead of the internal network interface!
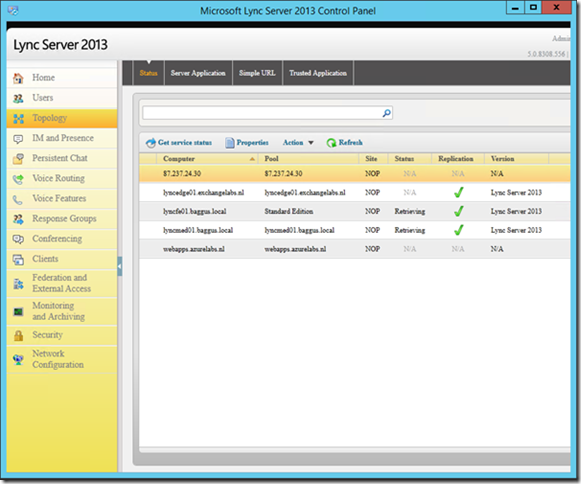
When you logon to the Front-End server and open the Lync Control Panel you’ll that the Mediation Server is up-and-running and that replication is running fine.
So far the installation and configuration hasn’t been that different from other Lync server roles. Now it’s time to connect the Mediation Server to the SIP trunk!
Configuring the SIP trunk
The SIP trunk I will use is from OneXS, based out of Amsterdam, The Netherlands. After signing up for a subscription you get more details, including access to their management portal.
The Mediation Server sets up multiple connections to the SIP trunk provider. The SIP trunk at the provider listens on port TCP/5060, please note that mediation server is listening on port TCP/5068. Besides these ports the Mediation Server uses port 60.000~65.536 (UDP) for the audio stream. You have to open these firewall ports between the Mediation Server and the server of the SIP trunk provider.
To configure the SIP trunk, logon to the Front-End Server and open the Topology Builder. Download the latest topology from the CMS and store it on the local hard disk.
In the Topology Builder, expand the Mediation pools and select the properties on the mediation pool. In the PSTN Gateway properties, check the Enable TCP port and make sure the TCP port is on 5068, but remember, this depends on the settings of your provider!
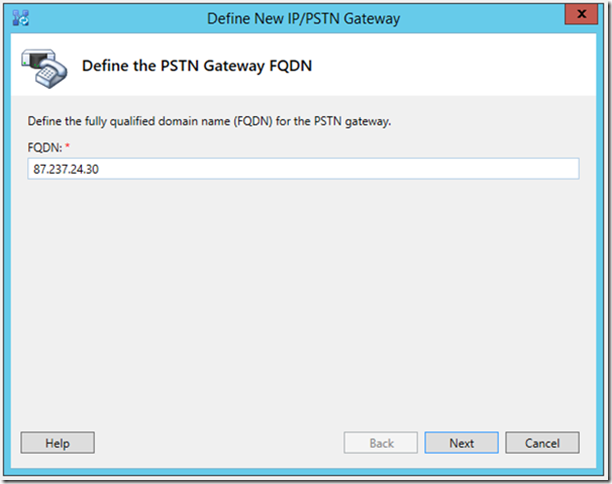
Click OK to continue. In the Topology Builder, expand the Shared Components, right-click PSTN gateways and select New IP/PSTN Gateway. In the Define New IP/PSTN Gateway enter the IP address of the PSTN Gateway, this is the IP address of the server (or Session Border Controller, SBC) at the SIP trunk provider. This is provided to you by the provider when you signed up for the service.
For the communication between the mediation server and the SIP trunk provider I limit the service usage to the external network interface of the mediation server.
When the PSTN Gateway is created in the topology a SIP trunk is automatically created in the Topology Builder. Depending of your SIP trunk provider you may have to change the SIP Transport Protocol from TLS to TCP. In our environment the listening port also has to be changed from 5066 to 5060.
The wizard is now finished and when you click OK you will return to the Topology Builder and you can publish the topology to the CMS.
Configure voice routing
Wait a minute or two to have the configuration replicated from the CMS to the various servers, and when you open the Lync 2013 Control Panel the new configuration is clearly visible:
The last steps are configuring the voice routing and creating a dial plan.
In the left hand menu click Voice Routing, select the Route tab and delete the default LocalRoute and create a new Route. Give the new route an appropriate name and scroll down. In the associated trunks section click Add and select the trunk that was created in the previous steps.
Click OK and scroll down, in Associated PSTN Usages click Select and select Long Distance.
Click OK twice, click Commit, select Commit All and in the Uncommitted Voice Configuration Settings dialog box click OK. On the confirmation dialog box click Close.
A dial plan in Lync is how dialed numbers are converted to E.164 numbers. For example, you can enter a local number like 555-1234 and this will automatically be translated to +12125551234 or when you dial 206-222-1234 it will automatically be translated to +12062221234. Here in The Netherlands I would enter a number of 020-1234567 which would be translated to +31201234567.
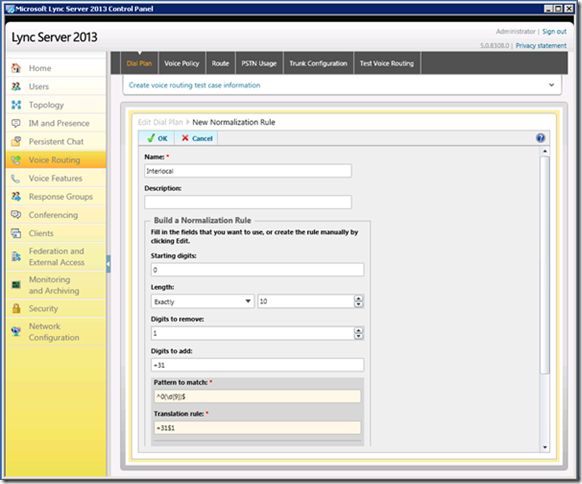
In the voice routing menu click the dial plan tab and open the global plan. By default there’s one normalization rule available. Scroll down to the associated normalization rules section, click New and fill in the properties.
Scroll a bit down to the dialed number to test field and enter a phone number. When you enter a local phone number it should be translated to the corresponding E.164 number:
Click OK twice, click commit, select commit all and click OK. In the Successfully published voice routing configuration pop-up window click close.
The last step is configure a voice policy. In the Voice Routing menu click the Voice Policy tab and open the Global Policy. In the associated PSTN usages click select and select the Long Distance PSTN Usage Record that was configured in the previous steps.
Click OK, click Commit, select Commit All, click OK and on the Successfully published voice routing configuration pop-up click Close.
The Lync enterprise voice configuration is now complete and we can enterprise voice enable users in the Lync 2013 control panel. In the Lync control panel select a user and open its properties. In the Telephony drop down box select Enterprise Voice and in the Line URI enter a telephone number (in the SIP trunk range of course). This phone number should be in the tel:+31201234567 format.
When you logon with the Lync client (works with Lync 2010 and Lync 2013 clients) you’ll see a new phone button in the menu ribbon with a dial pad. You should now be able to make phone calls via the SIP trunk.
In the previous posting I explained how to setup a Lync front-end server, and edge server and how to configure a SIP trunk using a mediation server. One more option remains, the Exchange Unified Messaging role to have voicemail functionality. This is the topic of this blog: Lync 2013 and Exchange 2013 Unified Messaging.
On the Lync team blog there’s also an excellent blog post written by Brian Ricks on how to configure a IntelePeer SIP trunk on Lync Server 2010, including more detailed information on create multiple (US based) normalization rules: http://blogs.technet.com/b/drrez/archive/2011/04/21/configuring-an-intelepeer-sip-trunk-solution-in-lync-server-2010.aspx









Hi Jaap
Thank you for this blog entry.
As we had troubles with RGS I opened a case with Microsoft. After months and a lot of tests they told me that we have misconfiguration, because mediation server in Lync 2013 must be single homed NIC. At the moment we use Collocated mediation server on the FE Server with 2 NIC, 1 for internal communication and 1 for PSTN. This might be wrong when I will listen to Microsoft.
Do you know something about this?
I think about to cancel Collocation and set up a stand alone mediation server with single homed NIC and route internal traffic to the PSTN IP, routed by the firewall.
As I understand your blog, you have a dedicated mediation server with dual homed NIC… What do you thin about use only 1 NIC?
Thanks
Best wishes
LikeLike
Hi,
It should be possible running this with only one NIC, but this seems to cause conflicts due to NAT’ting and stuff, so I never recommend doing this.
SIP trunk and Mediation server is very sensitive for routing issues, so you should be very sure everything is configured correctly.
Thanks,
Jaap
LikeLike
Hi Jaap
Thank you for reply so fast to my questions.
For me it does not make sense what Microsoft recommends, but we have issues with correct addressing of call agents in RGS, sometimes it does not ring on every agents phone/client.
I think we have to try if it works with only 1 NIC and if this issue is solved after the changes. MS said, that this will solve our problem.
I do not quite and have some fear… We will see if call quality is fine after change.
Anyway, thanks again
Cheers
LikeLike
Hi Jaap and Romano,
At this moment I’m building a Lync environment. I use a standalone mediation server with two NIC’s. Incoming calls are working fine, but with outgoing calls I have one-way audio. The person who I’m calling cannot hear me though I can hear the person I’m calling.
I logged a call at Microsoft and they cannot help me further because I’m not compliant to their best practices. The mediation server must have one NIC. Do you have any suggestions in these or do you recognize this problem?
Kind regards,
Dave
LikeLike
Hi,
My first reaction would be ‘routing’. Most likely inbound media traffic is routed the wrong way and ends up nowhere, or at least not on the right server. Check name resolution and routing on the Mediation server and Edge server.
A Mediation server with two NICs might not be the recommended approach, but it works fine (i have it running since the early Lync 2010 days).
LikeLike
Hi Jaap,
Did you come across a TechNote or have some of your own notes on how to configure the Juniper to work with Lync and Intelepeer?
Thanks,
John Miller
Enabling Technologies
LikeLike
Hi John,
I’m afraid I don’t have any such specific information. There’s an article about intelepeer on the Microsoft website (at least there was some time ago), have you seen that?
Maybe you can take this information and ask for more info at your Juniper vendor. I’m sorry I cannot help you further here.
LikeLike