Ok, I couldn’t resist it… In my previous blog I wrote about publishing Lync services using a Kemp Load Master. Since I’m not married to Kemp (although you might think differently, and so does Marco 😉 I also have an F5 LTM up-and-running in my lab. Time to have a closer look at the F5 when it comes to reverse proxy with Lync 2013.
Lync Configuration
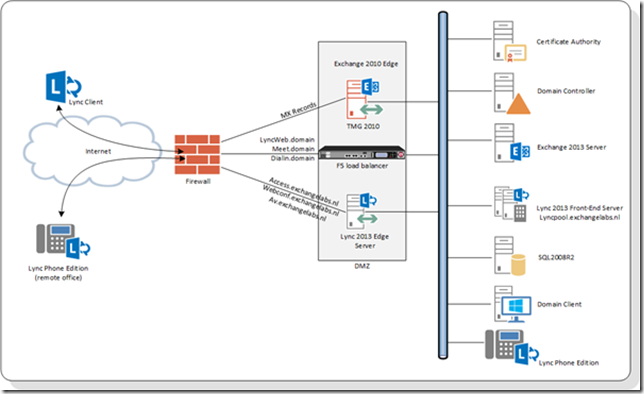
Again, in my lab I have a Lync 2013 Enterprise Edition, in the perimeter network I have a Lync 2013 Edge Server, but I will use an F5 LTM load balancer.
The following FQDN’s are web services internally running on port 4443 and port 8080, so they need Port Translation to publish them to the internet using port 443 and port 80 on the Internet:
- Meet.exchangelabs.nl
- Dialin.exchangelabs.nl
- Lyncweb.exchangelabs.nl
Note. The internal name of the Lync Front-End pool is lyncpool.exchangelabs.nl but the external name is lyncweb.exchangelabs.nl. This can be configured using the Topology Builder.
The load balancer will be running on Layer 4 so the SSL connection is terminated on the Load Balancer. Therefore you need to import the SSL certificate that’s on the Lync 2013 Front-End server into the Load Balancer. To import this, open the F5 Management Console and navigate to System | File Management | SSL Certificate List. Click the Import button, select the PKCS12 (IIS) option, give the SSL Certificate an identifyable name, browse to the certificate and enter the certificate’s password and click the Import button.
To configure the F5 you can best use a template file. This has all the necessary settings predefined and is a lot less prone to error. You can download the latest iApp template for Lync 2010/2013 on the F5 DevCentral website: https://devcentral.f5.com/wiki/iapp.Microsoft-Lync-Server-2010-Updated-iApp.ashx
Download the template file and store it on your local hard disk. In the F5 Management Console navigate to iApp | Templates and click the Import button. Use the Browse button to select the template file that was downloaded in the previous step and click the Upload button.
To create a new VIP open the F5 Management Console and navigate to iApp | Application Services and click the + icon. Enter a name for the VIP and select the iApp template we just installed, in this case f5.microsoft_lync_server_2010_2013.v1.2.1 as shown in the following figure:
The template will be loaded and you can start configuring the VIP which is nothing more than answering a couple of questions. In this blog we’re only looking at the reverse proxy, so only the first question (the version of Lync Server) and the last question are important.
In the last question select Yes, deploy this BIG-IP system for a reverse proxy virtual server. A couple of more question appear. Enter the IP address of the VIP (this is the external IP address), select the SSL certificate we uploaded in the first step, enter the IP address of the internal Lync 2013 Front-End server and enter the three FQDN’s we’re going to publish, i.e. lyncweb.exchangelabs.nl, meet.exchangelabs.nl and dialin.exchangelabs.nl.
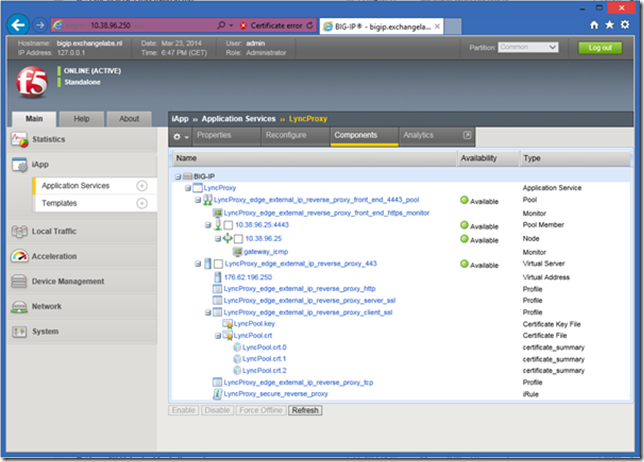
When done click Finished and the new VIP will be shown in the console:
Note. It can some time before the availability shows “Available”.
Maybe you’ve noticed that there’s only one member added to the iApp and that there was no option to add another one. The reason behind this is that you should have a load balancer in the DMZ (doing the reverse proxy) and another load balancer in the internal network. Check the F5 Deployment Guide (page 21) for more info. In this scenario the reverse proxy VIP points to the VIP of the second load balancer.
If you don’t have a second load balancer you can add another member to the pool manually. To do this you have to disable strict updates on the iApp. Naviate to iApp | Application Services and select the reverse proxy VIP we just created. Click on Properties and select Advanced in the Application Service drop down box as shown in the following figure:
Uncheck the Strict Updates check box and click Update.
Select Local Traffic | Pools | Pool List, you’ll see the pool we just created. Click on this pool and click the Members option. Only one entry is listed, click Add to add another member to the pool. Enter a Node Name (the IP address of the node is typically used here), enter its IP address and add the Service Port (4443) as shown in the following figure:
Click Finished when done. We now have added a second Lync Front-End server to the Reverse Proxy VIP. You can navigate to the following URL’s to test the Reverse Proxy:
- https://meet.exchangelabs.nl/Reach/Client/WebPages/ReachClient.aspx (you need Silverlight on your client to do this)
- https://dialin.exchangelabs.nl/dialin/conference.aspx
- https://lyncweb.exchangelabs.nl/Scheduler/Default.aspx
And you’ll see the following figure (for the dialin URL):
Summary
You can use the F5 LTM for reverse proxy functionality with Lync 2013. It is recommended to use the iApp template for this. This iApp template contains the optimal settings for the LTM. According to the F5 Deployment Guide you should have an LTM in the DMZ for reverse proxy and another LTM in the internal network for load balancing the Lync 2013 Front-End servers. If you don’t have load balancer in the internal network (of don’t want to use it) you can disable strict updates on the iApp and add a second member to the Reverse Proxy VIP. At this moment that’s still manual but this will be added to the Reverse Proxy iApp in the future.


Can this be used for Lync mobility services? I mentioned this to a MS Partner Advisor and was told I also need IIS ARR.
LikeLike
I haven’t tried this with a hardware load balancer, but I wonder why this shouldn’t be possible. I would definitely give it a try.
Thanks Jaap
LikeLike
Nice post Jaap. Do you know if you need a specific Big-IP module to do this or is the reverse proxying part of the basic license?
Thanks Cor
LikeLike
Hey Cor, this reverse proxy is basic functionality, so no additional modules are needed.
Cheers, Jaap
LikeLike
FYI, v1.3.0 of the Lync iApp lets you send reverse proxy traffic directly to the Front End servers instead of another BIG-IP, so you don’t need to disable strictness. It’s on downloads.f5.com.
LikeLike