Updated: November 11, 2015,
Updated: April 20, 2018
In an earlier blog I explained the differences between Cloud Identities, Linked Identities and Federated Identities. The source of authority (i.e. where the accounts are managed) for Cloud Identities is Microsoft Online and for Linked and Federated Identities the source of authority is your on-premises Active Directory. To get these accounts in Azure Active Directory (Office 365) you have to setup a directory synchronization between Active Directory and Azure Active Directory.
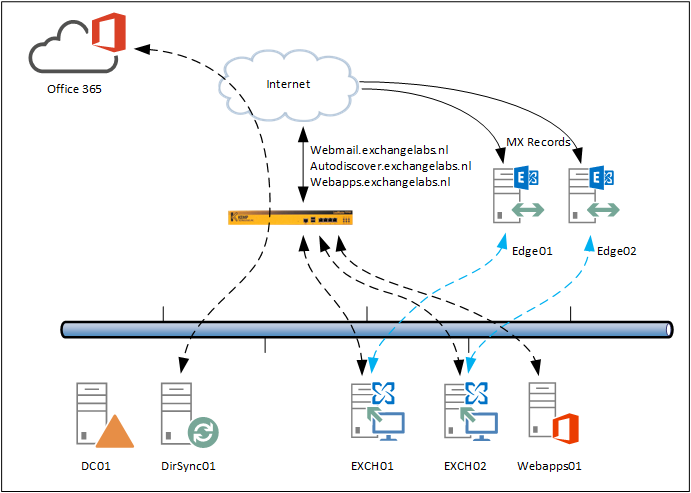
As explained earlier I prefer to use a dedicated DirSync server instead of installing DirSync on your Domain Controller (which is possible and supported). When using a dedicated DirSync server, you can keep your Domain Controllers identical and work on your Domain Controllers while not affecting your DirSync server. We now will build a configuration like this:
There are two options when setting up Directory Synchronization between your on-premises Active Directory and Windows Azure Active Directory:
- DirSync as a tool that can be downloaded from the Microsoft Online Portal. This is the ‘original’ DirSync tool which can be installed on a Domain Controller or on a dedicated DirSync server. This tool will be decommissioned somewhere in the (near) future.
- Microsoft Azure Active Directory (WAAD) Sync Services, the new DirSync tool that can be downloaded from http://www.microsoft.com/en-us/download/details.aspx?id=44225. This tool has the option to synchronize a multi-forest topology with one tenant in Office 365.
Note. On June 24, 2015 Microsoft has released the Azure AD Connect & Connect Health. Azure AD Connect is the latest version of the Directory Synchronization. This blog is based on the previous Azure AD Sync, but I strongly recommend you look into the Azure AD Connect tool (there are a lot of similarities) which you can download from the Download center.
Added note on April 20, 2018. Azure AD Connect is now the only supported version for implementing directory synchronization. It is updated on a regular basis and available via the Azure AD Connect download. If you perform a default installation, Azure AD Connect will automatically update itself when a new version is available.
All versions are derivatives of Forefront Identity Manager (FIM) and when you do some in-depth research on these tool you’ll definitively see similarities with FIM like the Metaverse and the Management Agents.
An interesting overview of all Directory Integration Tools with all available features can be found on https://msdn.microsoft.com/library/azure/dn757582.aspx.
Setting up Active Directory synchronization consists of seven steps:
- Prepare for Active Directory synchronization
- Verify domains
- Activate Active Directory synchronization (no longer needed)
- Install and run IdFix DirSync Error Remediation tool
- Install and configure the Directory Synchronization tool
- Verify Directory Synchronization
- Activate synchronized users
These steps will be discussed in more details in the following sections.
1. Prepare for Active Directory Synchronization
Preparing for Active Directory Synchronization is all about prerequisites, like the version of Windows, Forest and Domain Function Level (FFL and DFL), object limits, PowerShell and .NET Framework. The complete list of prerequisites and preparation can be found on the following TechNet article: http://technet.microsoft.com/en-us/library/jj151831.
One requirement I’d like to point out is the requirement for a proper User Principal Name or UPN. The on-premises UPN suffix must match the Office 365 domain and the domain name must be fully routable to your on-premises environment.
If your Active Directory domain is named contoso.local the UPN of your users will be <username>@contoso.local and as such it’s a non-routable domain. If this is the case you have to add a UPN Suffix to your Active Directory. So, if your external (SMTP) domainname is contoso.com and you are using this domain in your Office 365 tenants as well you have to add this to your Active Directory using the Active Directory Domains and Trusts MMC snap-in.
Another pitfall related to this is the <username> used in Active Directory. It happens quite often that I’m working with a customer that has a space character in the username, for example “john smith@contoso.local”. In this case not only the UPN Suffix needs to be changed, but the username needs to be changed as well. This is only true for the UPN, the SamAccountName can continue to be used with a space character in it, although I personally think this is not a best practice.
Whenever possible I recommend to use the user’s email address for the user’s UPN to make is easier for the users. As an IT Pro we know what’s going on and what this all means, the average end-user does not. More information regarding naming conventions can be used on the following TechNet article: http://technet.microsoft.com/en-us/library/jj151831
2. Verify domains
The second step is to verify the domains in your Office 365 and check if they are configured correctly. This is shown in the Microsoft Online Portal as can be seen in the following figure:

3. Activate Active Directory synchronization (no longer needed)
Note. This step is no longer needed as it is now automatically activated by Azure AD Connect.
This step is where the Active Directory synchronization is enabled in your tenant. In the third step, Activate Active directory Synchronization click on Activate. A warning pop-up is shown and if you really want to activate Active Directory synchronization click Activate again.

When successful it is shown on the portal as well as can be seen in the following figure:

4. Install and run IdFix DirSync Error Remediation tool
The IdFix tool is a tool that will find issues in your local Active Directory that might cause issues with replication or with linked identities after you start Active Directory replication. The tool will find issues and show them on screen. When needed you can store the results in a CSV or TXT file. Click Download and store the file to your local hard disk, from there run the application using the Run as Administrator option. There’s no need to install the tool, just extract it to a directory and run it. When you click Query the results are shown:

As you can see in the screenshot above there are some issues with the Top Level Domain which is .local in my test environment. After you have fixed these issues, or make sure you only replicate accounts that are properly configured you can continue with the next step.
You can also continue without fixing anything, but you shouldn’t be surprised when unexpected issues occur in your Office 365 tenant with respect to user accounts. I’ll get back on these issues in a future blog post.
5. Install and configure the Directory Synchronization tool
Note. Windows Azure Active Directory Sync Services (what a name) is no longer supported and replaced by Azure AD Connect. There’s overlap between the two, therefore I’ve decided to leave this here. For a more recent blogs on Azure AD Connect on my site you can follow the Azure AD Connect tag here….
As explained in the beginning of this article you should use the Windows Azure Active Directory Sync Services instead of the DirSync. You can download the WAAD Sync Services here: http://www.microsoft.com/en-us/download/details.aspx?id=44225
Please note that you need to install the .NET Framework 3.5. SP1 and .NET Framework 4.5 (installed by default on Windows 2012 R2) before continuing the installation. If you fail to install this you will see the following error message.

Download the tool (MicrosoftAzureADConnectionTool.exe) and start it with elevated privileges. You’ll see an icon appear on the desktop of the DirSync server and after a few seconds the wizard will appear. Select an installation path, check the I agree to the license terms checkbox and click Install to continue.

SQL Express will be automatically installed. This is where the metaverse data is stored.

At one point you have to enter credentials that are used to connect to Windows Azure Active Directory. This can be the default tenant administrator, but you can also create a dedicated account for this. This account needs to be a member of the Global Administrator, and make sure that the password for this account never expires.

To set the password to never expire for this service account you have to logon to Azure Active Directory using PowerShell and enter the following command:
Set-MsolUser -UserPrincipalName SA_DirSync@contoso.com -PasswordNeverExpires $true
You also need to connect to the on-premises Active Directory. Admin credentials are only needed when installing the tool, these credentials are removed after configuration. During installation a local user account (on the DirSync server) is created and configured for running the WAADSync service, but a domain user account (MSOL_<random number> is also created.
Enter forest name, username and password and click Add Forest.

Click Next to continue.
If you have a complex environment there are multiple options to match (existing) Cloud Identities and Active Directory accounts but for a typical environment you can use the default settings:

AADSync Services has multiple, optional features that can be configured, for example for an Exchange hybrid deployment or Password synchronization. The Password write-back feature is an Azure Active Directory Premium feature (I’ll get back on this in a later blog post). In this blog post we’ll only select the first two options:

For a complete overview of the optional features you can visit the following article: https://msdn.microsoft.com/en-us/library/azure/dn757602.aspx#BKMK_OptionalFeatures
When you click Next the wizard is almost finished and an overview is shown:

Click Configure to start configuring the Directory Synchronization. Once finished make sure you uncheck the Synchronize now option before you click Finish.

At this point you have to logoff and logon again because of group membership changes. These are applied only after logging on….
By default the DirSync tool wants to synchronize the entire Active Directory with Azure Active Directory. The last thing you want in Azure Active Directory is all your Active Directory service account, accounts for Exchange system mailboxes etc. It is possible to synchronize only selected OUs in your on-premises Active Directory. To achieve this you have to start the Synchronization Service Manager which can be found on C:\Program Files\Microsoft Azure AD Sync\UIShell\MIISClient.exe. When started select the tab Connectors.

Right click Active Directory Connector, select properties and select Configure Directory Partitions:

Click Containers and enter credentials of the DirSync service account (or a domain administrator):

This is NOT what you want, all OUs in Active Directory are selected for replication:

Uncheck the domain and all containers will be unchecked. Check the OU you want to synchronize:

Click OK twice to finish the configuration and store the configuration. You can wait for three hours or manually start the replication. To do this open a command prompt with elevated privileges and start the DirectorySyncClientCmd tool from C:\Program Files\Microsoft Azure AD Sync\Bin:

Note. The DirectorySyncClientCmd tool is no longer available. Directory synchronization commands are now available via PowerShell as explained in my blog Force Directory Synchronization.
When you logon to the Microsoft Online Portal and select Active Users you’ll see the accounts that are replicated from your local Active Directory.

Note. In the beginning of this blog post I explained you have to set the UPN Suffix of the user accounts in Active Directory properly. I you fail to do so and start Directory Synchronization you’ll see something similar to this:

User accounts are replicated to Azure Active Directory, but since AAD does not know how to handle a .local TLD the username is automatically set to the tenant domain name.
6. Verify Directory Synchronization
To verify Active Directory synchronization you can check the Microsoft Online Portal as shown in the previous section. The Directory Sync tool also writes entries in the server’s eventlog. When the sync cycle completes a series of eventID 904 (DirectorySyncClientCmd) is logged in the Application Event Log, each saying Completed, Finished or something like that, depending of the part of the cycle that’s completed.

7. Activate synchronized users
The last part is to activate synchronized users. The DirSync tool only takes care about the synchronization of the user account, but it does not assign any licenses so you have to take care of this manually, either through the Microsoft Online Portal or via PowerShell.
Summary
You can use the Azure Active Directory Sync Services tool to setup directory synchronization between your local Active Directory and Office 365. Before you implement directory synchronization you have to make sure you got all prerequisites correctly, especially the UPN Suffix and the username.
Installing the tool is relatively easy and simple and once it runs you can keep it running without too much sysadmin interaction, basically a ‘set and forget’ configuration.
Updated: June 27, 2015 and April 20, 2018

Very clear article, thanks for publishing 🙂
LikeLike