Exchange 2016 is the latest version of Exchange, and it’s not very different compared to Exchange 2013. When it comes to requirements, there are some differences though:
- Domain Controllers need to be at Windows 2008 level;
- Domain Functional Level (DFL) and Forest Functional level need to be at Windows 2008 level;
- The Exchange servers themselves need to be running Windows 2012 or Windows 2012 R2. At the time of release Windows Server 10 is not supported.
There’s also something like Simplified Architecture. This is the Exchange 2013 Preferred Architecture, enforced on Exchange 2016. This means that there will be only one Exchange 2016 server role on the internal network, the Exchange 2016 Mailbox server. This is the same as the old Exchange 2013 multi-role server, but at this moment there’s no choice left. You have to install the Exchange 2016 Mailbox server, and you cannot opt to install a dedicated Client Access server anymore.
Installing the Exchange 2016 Mailbox server is pretty straight forward and consists of a number of steps and best practices:
- Use the Exchange 2013 Requirements Calculator (http://bit.ly/ExCalculator) to design a proper Exchange 2016 server, especially when it comes to the storage solution. At this moment you can still use the Exchange 2013 Requirements Calculator as long as the Exchange 2016 version is not available;
- Use the Exchange 2013 Jetstress version to stresstest your storage solution. Continue to use the Exchange 2013 version as long as the Exchange 2016 version is not available.
Once the environment is designed and properly tested you can build the actual Exchange servers. This is very similar to Exchange 2013 and consists of the following steps:
- Install a Windows 2012 R2 server (I prefer to use this one because of the lifecycle and more efficient protocol stacks) and bring it up-to-date with Windows Update;
- Make sure .NET Framework 4.5.2 is installed (reboot the server);
- Install the Remote Server Administration Tools (RSAT) by entering the following command in Exchange Management Shell:
Install-WindowsFeature RSAT-ADDS
When requested reboot the server;
- Install the Windows Desktop Experience, you can use the PowerShell command
Install-WindowsFeature Desktop-Experience
to do this. Again a reboot is needed;
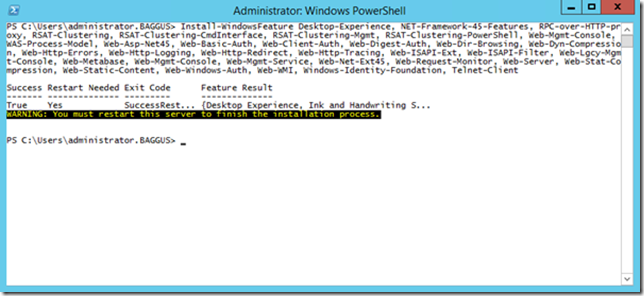
Note. Instead of just installing only the Desktop Experience feature, you can also install all prerequisite software by using the following PowerShell command:
Install-WindowsFeature Desktop-Experience, NET-Framework-45-Features, RPC-over-HTTP-proxy, RSAT-Clustering, RSAT-Clustering-CmdInterface, RSAT-Clustering-Mgmt, RSAT-Clustering-PowerShell, Web-Mgmt-Console, WAS-Process-Model, Web-Asp-Net45, Web-Basic-Auth, Web-Client-Auth, Web-Digest-Auth, Web-Dir-Browsing, Web-Dyn-Compression, Web-Http-Errors, Web-Http-Logging, Web-Http-Redirect, Web-Http-Tracing, Web-ISAPI-Ext, Web-ISAPI-Filter, Web-Lgcy-Mgmt-Console, Web-Metabase, Web-Mgmt-Console, Web-Mgmt-Service, Web-Net-Ext45, Web-Request-Monitor, Web-Server, Web-Stat-Compression, Web-Static-Content, Web-Windows-Auth, Web-WMI, Windows-Identity-Foundation, Telnet-Client
- The Telnet-Client is optional, but I prefer to install this for troubleshooting purposes later on.
- Install the Unified Communications Managed API (UCMA) 4.0. I prefer to use the command
Start-BitsTransfer -Source http://download.microsoft.com/download/2/C/4/2C47A5C1-A1F3-4843-B9FE-84C0032C61EC/UcmaRuntimeSetup.exe -Destination c:\Download
This will download the UCMA file directly into the C:\Download directory. It’s getting boring, reboot the server;
Before Exchange 2016 is installed it’s time to prepare Active Directory for the installation of Exchange 2016. The Active Directory Schema, Configuration and Domain need to be prepared using the following commands:
Setup.exe /PrepareSchema /IAcceptExchangeServerLicenseTerms
Setup.exe /PrepareAD /OrganizationName /IAcceptExchangeServerLicenseTerms
Setup.exe /PrepareDomain /IAcceptExchangeServerLicenseTerms

Figure 2. The second step, preparing the Active Directory configuration partition.
- When one step is performed you have to wait until all changes are replicated between all Domain Controllers before you continue with the following step.
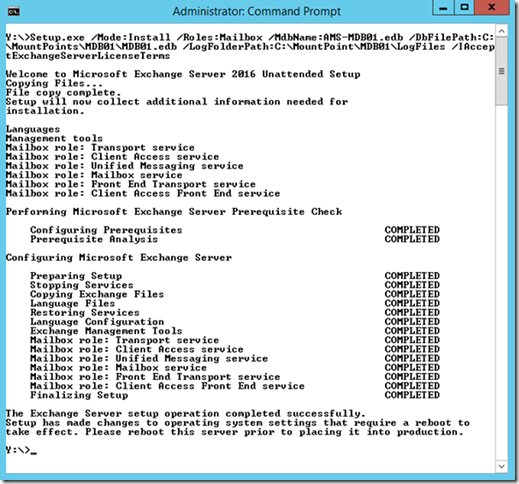
- When Active Directory is fully prepared you can install the actual Exchange 2016 Mailbox server and personally I prefer to do this using the command line interface. This gives you the opportunity to control the installation, but without any interaction, thus creating a consistent set of servers. To install an Exchange 2016 server with a new Mailbox database called MDB01 in a location C:\ExDb\MDB01 you can use the following command:
Setup.exe /mode:install /Roles:Mailbox /MdbName:MDB01 /DbFilePath:C:\ExDb\MDB01\MDB01.edb /LogFolderPath:C:\ExDb\MDB01\LogFiles /IAcceptExchangeServerLicenseTerms
if you only installed the Desktop Experience feature in the previous step, you should setup let install the prerequisite software as well by adding the /InstallWindowsComponents switch to the previous command.
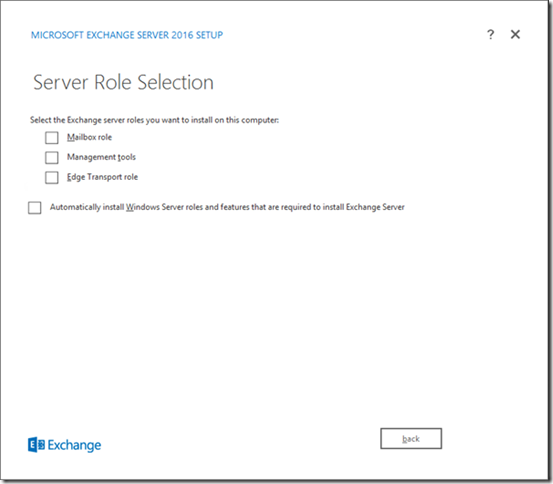
It is also possible to install Exchange using the graphical setup application by just starting setup.exe without any switches. This will open the installation wizard, and at one point the following screen is shown:
Figure 3. The Server Role selection in the graphical setup, including automatic installation of prerequisite software.
In the window as shown in Figure 3, check the checkbox next to Mailbox role, and check the checkbox for Automatically install Windows Server roles and features that are required to install Exchange Server.
When the Exchange 2016 sever is installed, reboot the server and continue with the Post Installation Configuration.
Figure 3. After installing the Exchange 2016 server reboot the box.
Exchange 2016 Post Installation Configuration
When the server is installed you can continue with the post installation configuration. In these steps you have to follow these steps:
- Configure an Accepted Domain
- Configure Email Address Policies
- Create a Send Connector to send messages to the Internet
- Create a new SSL Certificate
- Configure Virtual Directories
- Configure Outlook Anywhere
These steps will be described in the following sections. Since PowerShell (and thus the Exchange Management Console) is the primary means of managing your Exchange environment I’ll discuss all options using PowerShell instead of the GUI.
Configure Accepted Domain
An Accepted Domain is a domain your Exchange 2016 is responsible for. An Accepted Domain can be one of the following:
- Authoritative – This Exchange 2016 environment is the only environment responsible for this particular SMTP domain;
- Internal Relay – This Exchange 2016 environment has recipients for this SMTP domain, but there are more messaging platforms responsible. When mail cannot be delivered on your Exchange 2016 platform, it should be forwarded to this other platform;
- External Relay – This Exchange 2016 environment will accept SMTP messages, but will forward these messages directly to another messaging platform.
To create a new Accepted Domain for a domain called Exchangelabs.nl, open the Exchange Management Shell and enter the following command:
New-AcceptedDomain –Name Exchangelabs –DomainName Exchangelabs.nl –DomainType Authoritative
Configure Email Address Policy
When you have created an AcceptedDomain you can create an Email Address Policy. All Mailboxes will be configured with the email address you specify in this Email Address Policy. If you specify some sort of filter in your Email Address Policy only those users that are filtered will have the Email addresses applied.
To create a new Email Address Policy that will create an @Exchangelabs.nl address for all users with the value ExchangeLabs in their Company property, you can enter the following command in the Exchange Management Shell:
New-EmailAddressPolicy -Name ExchangeLabs -IncludedRecipients AllRecipients –ConditionalCompany "ExchangeLabs" -EnabledEmailAddressTemplates "SMTP:%l@Exchangelabs.nl"
This will create the Email Address Policy, but it will not be applied to Mailboxes unless you apply it manually using the following command in Exchange Management Shell:
Update-EmailAddressPolicy -Identity ExchangeLabs
Create a Send Connector
To create a new Send Connector that will send out email messages to the Internet you can use the following command in Exchange Management Shell:
New-SendConnector -Internet –Name "To Internet" –AddressSpaces "*" –DNSRoutingEnabled:$TRUE –SourceTransportServers "EXCH01"
Where EXCH01 is the Exchange 2016 server we just installed.
If you want to use a Smart Host to send email to the previous command should be changed slightly:
New-SendConnector -Internet –Name "To Internet" –AddressSpaces "*" –DNSRoutingEnabled:$FALSE –SourceTransportServers "EXCH01" –SmartHosts "IP Address of smart host"
If you already have a Send Connector and installed two additional Exchange 2016 servers, for example EXCH03 and EXCH04 you can use the following command:
Get-SendConnector –Identity "To Internet" | Set-SendConnector –SourceTransportServers @{Add="EXCH03","EXCH04"}
Create new SSL Certificate
You need a 3rd party UC certificate for your Exchange 2016 environment, just like Exchange 2010 and Exchange 2013. Check out the Unified Communications certificate partners (KB929395) knowledge base article for a list of supported UC vendors.
To create an SSL certificate request file, execute the following commands in the Exchange Management Shell:
$RequestData = New-ExchangeCertificate -GenerateRequest -Server EXCH01 -SubjectName "c=NL, S=Noord-Holland, L=Amsterdam, O=Contoso, OU=RND, CN=webmail.contoso.com" -DomainName webmail.contoso.com,autodiscover.contoso.com -PrivateKeyExportable $true
Set-Content -path \\Exch01\c$\download\ssl-request.req -value $RequestData
This will create a TXT file located in C:\Download on the Exchange server. Open the file and use its contents to request a certificate at your own preferred CA (I typically use DigiCert for SSL certificates). Once you receive the certificate, typically called webmail-contoso-com.cer, store in C:\Download on your Exchange server and execute the following commands:
$Data = [Byte[]]$(Get-Content -Path "\\Exch01\c$\download\webmail_contoso_com.cer" -Encoding byte -ReadCount 0)
Import-ExchangeCertificate –Server EXCH01 -FileData $Data | Enable-ExchangeCertificate -Server EXCH01 -Services IIS
Configure Virtual Directories
The following Virtual Directories should be configured on your Exchange 2016 server:
- OWA Virtual Directory
- ECP Virtual Directory
- EWS Virtual Directory
- ActiveSync Virtual Directory
- PowerShell Virtual Directory
- MAPI Virtual Directory
- OAB Virtual Directory
Microsoft recommends to use a split-DNS scenario where you use the same FQDN internally and externally, i.e. webmail.contoso.com. You can use the following commands to configure the Virtual Directories:
Get-OWAVirtualDirectory –Server EXCH01 | Set-OWAVirtualDirectory –InternalURL https://webmail.contoso.com/owa -ExternalURL https://webmail.contoso.com
Get-ECPVirtualDirectory –Server EXCH01 | Set-ECPVirtualDirectory –InternalURL https://webmail.contoso.com/ecp -ExternalURL https://webmail.contoso.com/ecp
Get-WebServicesVirtualDirectory –Server EXCH01 | Set-WebServicesVirtualDirectory –InternalURL https://webmail.contoso.com/ews/exchange.asmx -ExternalURL https://webmail.contoso.com/ews/exchange.asmx
Get-ActiveSyncVirtualDirectory –Server EXCH01 | Set-ActiveSyncVirtualDirectory –InternalURL https://webmail.contoso.com/Microsoft-Server-ActiveSync -ExternalURL https://webmail.contoso.com/Microsoft-Server-ActiveSync
Get-PowerShellVirtualDirectory –Server EXCH01 | Set-PowerShellVirtualDirectory –InternalURL https://webmail.contoso.com/PowerShell -ExternalURL https://webmail.contoso.com/PowerShell
Get-MAPIVirtualDirectory –Server EXCH01 | Set-MAPIVirtualDirectory –InternalURL https://webmail.contoso.com/mapi -ExternalURL https://webmail.contoso.com/mapi
Get-OabVirtualDirectory –Server EXCH01 | Set-OabVirtualDirectory –InternalURL https://webmail.contoso.com/oab -ExternalURL https://webmail.contoso.com/oab
The Service Connection Point (SCP) for internal Outlook clients should be configured using the following command:
Set-ClientAccessServer –Name EXCH01 – </b><b>AutoDiscoverServiceInternalUri https://autodiscover.contoso.com/autodiscover/autodiscover.xml
Configure Outlook Anywhere
Outlook Anywhere is enabled by default, but it needs to be configured according to you own internal standards. For our demo environment we use webmail.contoso.com as the internal and external hostname, and authentication is set to Basic (don’t forget the SSL!). Enter the following command in Exchange Management Shell:
Get-OutlookAnywhere -Server EXCH01 | Set-OutlookAnywhere -ExternalHostname webmail.contoso.com -ExternalClientsRequireSsl:$true -ExternalClientAuthenticationMethod:Basic -InternalHostName webmail.contoso.com -InternalClientsRequireSsl:$true -InternalClientAuthenticationMethod:Basic
When all settings have been applied to the new Exchange 2016 server, just reboot another time, just in case….
Summary
In this blogpost I explained how to deploy an Exchange 2016 server, including the prerequisite software and the post installation configuration. Since the majority of the Exchange server can be (and needs to be) configured with PowerShell I didn’t explain how to use the GUI but use PowerShell instead. When configured properly you can start testing your Exchange 2016 externally (using https://www.testexchangeconnectivity.com) or internally with Outlook clients. Please keep in mind that you need Exchange 2010 with all recent patches, but Outlook 2013/2016 will give better results.


Excellent post
LikeLike
Install-WindowsFeature RSAT-ADD must be RSAT-ADDS not ADD
LikeLike
Thanks, just changed it.
LikeLike
Hey. I have followed your tutorials and created exchange MBX but what can I change from your tutorials so I can add a second mailbox into the system?
LikeLike
Like New-MailboxDatabase -Name MDB02 you mean? 🙂
LikeLike
ah thanks man. btw did you also do a guide on high availability exchange?
LikeLike