In contrast to SharePoint Online and OneDrive for Business there’s no recycle bin for Azure Files available. Data is Azure is stored redundant and you can even opt for a multi-geo redundancy, but when (accidentally) deleting files they are gone.
To prevent unwanted deletion of data you can use Azure Backup to make sure your data is always safe, and that you can restore data.
To implement backups in Azure, you must create an Azure Recovery Services Vault. To do this, go to the Azure Portal and type Recovery Services Vault in the All services search box and click Create Recovery Services Vault. When entering the details make sure you use the same region as where your file share is located (West Europe in my example) as shown in the following screenshot:

Click Review + Create and click Create.
In the All Resources blade click on the newly created Vault to see all properties for the new Vault. To create a backup of the Azure Files, click + Backup and in the What do you want to backup drop down box select Azure FileShare (Preview) and click Backup. It can take a couple of seconds before the correct Storage Account appears:

Select the Storage Account and click OK. It can take a minute before the Storage Account is validated. The file shares that can be backed up will also be automatically discovered, this can also take some time. Select the file share and click OK.
The last step is to configure an Azure backup policy as shown in the following screenshot:
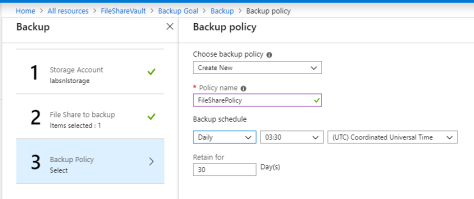
Create your own policy, pay attention to the retention time which is 30 days by default, click OK and click Enable backup.
The Azure Recovery Services Vault and backup policy will now be created. After some time the backup is created, and an initial backup will be performed.
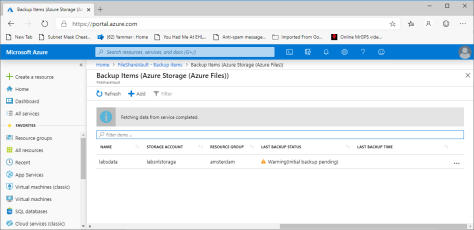
You can open the backup items and click backup now or you can wait until the next backup has automatically run (3:30 AM in my example).
Restore files from Azure Backup
Backing up files is nice and important, but even more important is the ability to restore files from backup. And restoring files from Azure backup is pretty simple.
Open the Azure Portal and navigate to the Recovery Services Vault that was created previously. In the details of the Vault, click on backup items under Protected items. You will see several backup management types, select the Azure Storage (Azure Files) option. There should be one or more Backup items available. Select one of the backup items and click on the context menu (the three dots on the right of the backup item) and select File Recovery as shown in the following screenshot:

Click on the date and time restore point and click OK. Click on Select File and browse through the directory structure that’s in the backup set, until you’ve found the file or directory you want to restore. Select this item and click Select. Select Original location or Alternate location and in the drop down box determine what action should be taken in case of conflicts (Overwrite, Skip or Create Copy). Click OK and click Restore to start the restore of your deleted item(s). After a short amount of time (depending of the size and amount of files) the data should be restored, and visible again the Windows Explorer.
Summary
In Azure Files there’s no recycle bin for restoring (accidentally) deleted files, so you have to rely on backup and restore. To achieve this, you can implement the Azure Recovery Services Vault. You can implement a Vault (in the same region as where your data is stored) and create a backup policy to store backup files in the Vault. Once backed up, you can restore files easily from the Vault using the Azure Portal. It depends on your own retention policy how long the data should be kept in the Vault, but your data should be safe now.
