Category Archives: Azure AD

Upgrade Azure AD Connect from 1.x to 2.x

Last week a bug in Azure AD Connect version 2.0.88.0 was discovered where disabled accounts were no longer synced to Azure AD. In a hybrid Exchange environment that can be disastrous since shared Mailboxes depend on a disabled account. The result was that these shared Mailboxes in Exchange Online were deleted, or that user mailboxes in Exchange Online could no longer see and access shared Mailboxes that were still on-premises. This is solved in Azure AD Connect version 2.0.89.0. Luckily this was a download upgrade, and not an automatic upgrade!

But this led me to check my own Azure AD Connect server, and I found out that I am still running Azure AD Connect version 1.6.16.0. While still supported (until August 31, 2022) it is a good idea to upgrade to the latest Azure AD Connect 2.x version. At the same time, it’s a good moment to upgrade to Operating System to Windows Server 2019.

To achieve this, you can export the existing Azure AD Connect configuration into an JSON file and use this JSON file as input for the installation of the new Azure AD Connect version. To export the existing configuration, open Azure AD Connect, click Configure and select the View or export current configuration option and click Next to continue. On the Review Your Solution windows click Export Settings and store the export file somewhere.

The next step is to copy the JSON file to the new Windows 2019 server, download the latest Azure AD Connect version and start the setup. DO NOT USE the Express Setup but select Customize. On the Install required components, check the Import synchronization settings checkbox, and select the JSON file that was copied from the old server. Click Install to continue.

Azure AD Connect will now be install with the settings of the old Azure AD Connect server. In the following windows select the sign-in option, enter the (global) admin credentials, enter the domain admin credentials and in the Ready to configure window click Install.

Please note that the Enable staging mode is automatically selected. This means that after installation, Azure AD Connect will start to collect information from Active Directory and Azure AD and store this in its local database, but it will not start synchronizing. The old Azure AD Connect server will continue to synchronize.
After a couple of minutes, the installation will finish and it will show a message that the configuration settings are successfully imported.

It can take some time before the new server’s database is fully filled with information. For large organizations I’ve seen up to 4 hours to achieve this. When synchronized you can switch between the two. This is a matter of placing the old server in staging mode, en take the new server out of staging mode.
To do this, start Azure AD Connect and select Configure staging mode. Enter your (global) admin credentials and check Enable staging mode (old server) or uncheck Enable staging mode (new server), click Next and click Configure. Make sure that you have only one active Azure AD Connect server running at a given moment!

The new server is now operational and synchronizing data.

Please note that if you have any additional services running on the Azure AD Connect server like Password protection proxy or Self-Service Password Reset (SSPR) you have to install and configure these on the new server as well!

In my environment I had the password protection proxy running. Upgrading is just a matter of installing the new proxy on the new Azure AD Connect server. Before decommissioning the old server, make sure you remove the correct Service Connection Point (SCP) from Active Directory.

You can use the following commands to retrieve a list of SCPs for the password proxy:

$SCP = "serviceConnectionPoint"
$Keywords = "{ebefb703-6113-413d-9167-9f8dd4d24468}*"
Get-ADObject -SearchScope Subtree -Filter {objectClass -eq $SCP -and keywords -like $Keywords }

You will see both SCPs in Active Directory and you can use the Remove-ADObject command to delete the old SCP as shown in the following screenshot:

At this moment the old Azure AD Connect server can be decommissioned. Don’t forget to remove the old Azure AD Connect server from the Azure AD Portal as well.

Azure AD Connect Incorrect version of TLS

So, I installed a brand-new Windows 2019 server where I wanted to install Azure AD Connect version 2.x. Or better, I wanted to upgrade an existing Azure AD Connect version 1.x server to version 2.x. After starting I got the following error message:

This installation requires TLS 1.2, but it was not enabled on the server. Please refer to this document to learn more about the steps you need to take to enable TLS 1.2 on your server. After configuring TLS 1.2, please run AADConnect Wizard to continue with installation and configuration.

Luckily it’s not that difficult to enable TLS 1.2 on a Windows 2019 server (although I am wondering why this is not enabled by default) by using the following registry keys:

[HKEY_LOCAL_MACHINE\SOFTWARE\WOW6432Node\Microsoft\.NETFramework\v4.0.30319]
"SystemDefaultTlsVersions"=dword:00000001
"SchUseStrongCrypto"=dword:0000001

[HKEY_LOCAL_MACHINE\SOFTWARE\Microsoft\.NETFramework\v4.0.30319]
"SystemDefaultTlsVersions"=dword:00000001
"SchUseStrongCrypto"=dword:00000001

[HKEY_LOCAL_MACHINE\SYSTEM\CurrentControlSet\Control\SecurityProviders\SCHANNEL\Protocols\TLS 1.2\Server]
"Enabled"=dword:00000001

[HKEY_LOCAL_MACHINE\SYSTEM\CurrentControlSet\Control\SecurityProviders\SCHANNEL\Protocols\TLS 1.2\Server]
"DisabledByDefault"=dword:00000000

[HKEY_LOCAL_MACHINE\SYSTEM\CurrentControlSet\Control\SecurityProviders\SCHANNEL\Protocols\TLS 1.2\Client]
"Enabled"=dword:00000001

[HKEY_LOCAL_MACHINE\SYSTEM\CurrentControlSet\Control\SecurityProviders\SCHANNEL\Protocols\TLS 1.2\Client]
"DisabledByDefault"=dword:00000000

To easiest way to get these on your server is by using the following PowerShell commands:

New-Item 'HKLM:\SOFTWARE\WOW6432Node\Microsoft\.NETFramework\v4.0.30319' -Force

New-ItemProperty -path 'HKLM:\SOFTWARE\WOW6432Node\Microsoft\.NETFramework\v4.0.30319' -name 'SystemDefaultTlsVersions' -value '1' -PropertyType 'DWord' -Force

New-ItemProperty -path 'HKLM:\SOFTWARE\WOW6432Node\Microsoft\.NETFramework\v4.0.30319' -name 'SchUseStrongCrypto' -value '1' -PropertyType 'DWord' -Force

New-Item 'HKLM:\SOFTWARE\Microsoft\.NETFramework\v4.0.30319' -Force

New-ItemProperty -path 'HKLM:\SOFTWARE\Microsoft\.NETFramework\v4.0.30319' -name 'SystemDefaultTlsVersions' -value '1' -PropertyType 'DWord' -Force

New-ItemProperty -path 'HKLM:\SOFTWARE\Microsoft\.NETFramework\v4.0.30319' -name 'SchUseStrongCrypto' -value '1' -PropertyType 'DWord' -Force

New-Item 'HKLM:\SYSTEM\CurrentControlSet\Control\SecurityProviders\SCHANNEL\Protocols\TLS 1.2\Server' -Force

New-ItemProperty -path 'HKLM:\SYSTEM\CurrentControlSet\Control\SecurityProviders\SCHANNEL\Protocols\TLS 1.2\Server' -name 'Enabled' -value '1' -PropertyType 'DWord'

New-ItemProperty -path 'HKLM:\SYSTEM\CurrentControlSet\Control\SecurityProviders\SCHANNEL\Protocols\TLS 1.2\Server' -name 'DisabledByDefault' -value 0 -PropertyType 'DWord' -Force

New-Item 'HKLM:\SYSTEM\CurrentControlSet\Control\SecurityProviders\SCHANNEL\Protocols\TLS 1.2\Client' -Force

New-ItemProperty -path 'HKLM:\SYSTEM\CurrentControlSet\Control\SecurityProviders\SCHANNEL\Protocols\TLS 1.2\Client' -name 'Enabled' -value '1' -PropertyType 'DWord' -Force

New-ItemProperty -path 'HKLM:\SYSTEM\CurrentControlSet\Control\SecurityProviders\SCHANNEL\Protocols\TLS 1.2\Client' -name 'DisabledByDefault' -value 0 -PropertyType 'DWord' -Force

Note. You can add | out-null to each command to suppress the console output

After running these commands, Azure AD Connect was installed as expected.

Azure AD Connect versions

Be honest, how often do you check the software versions on your Azure AD connect server? I have to admit, Exchange is not an issue, this is updated regularly, but Azure AD Connect is a different story. At the moment of writing my Azure AD Connect version is running 1.4.38.0 (installed on December 31, 2019 so more than 6 months ago) while version 1.5.30.0 is already available for some time now (source: Azure AD Connect: Version release history). And although Azure AD Connect supports auto upgrade (Check with the Get-ADSyncAutoUpgrade cmdlet), not all updates of Azure AD Connect support auto upgrade and thus need to be upgraded manually.

Azure AD Connect older versions

It is important to have a look at the versions of Azure AD Connect, I was bit surprised (but can totally understand) to read the following on the Microsoft site:

“Starting on November 1st, 2020, we will begin implementing a deprecation process whereby versions of Azure AD Connect that were released more than 18 months ago will be deprecated. At that time we will begin this process by deprecating all releases of Azure AD Connect with version 1.3.20.0 (which was released on 4/24/2019) and older, and we will proceed to evaluate the deprecation of older versions of Azure AD Connect every time a new version releases.”

You can download the latest versions of Azure AD Connect from https://www.microsoft.com/en-us/download/details.aspx?id=47594. After starting the Azure AD Connect package, enter the global tenant admin credentials and follow the wizard.

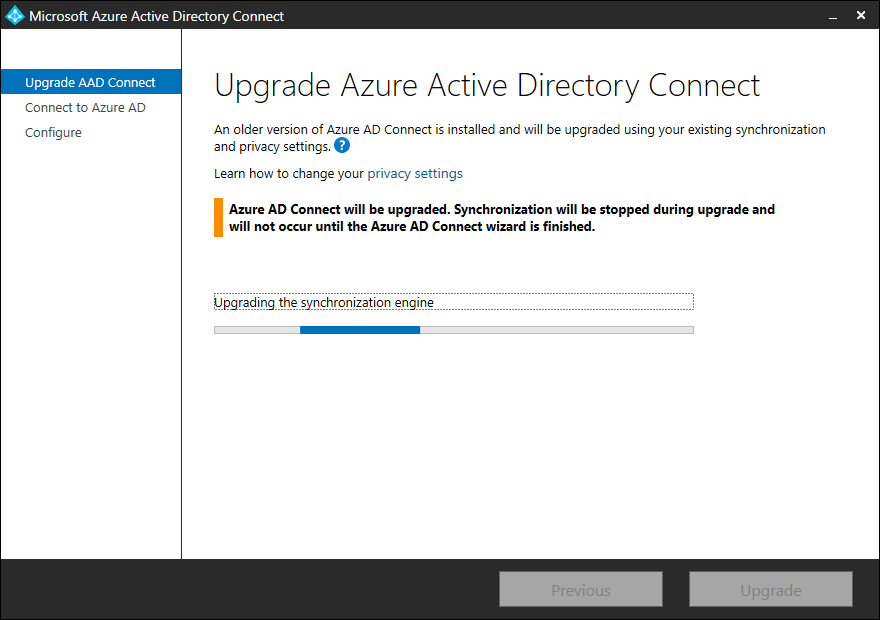
Upgrade Azure AD Connect

The upgrade should be finished in a minute or two.

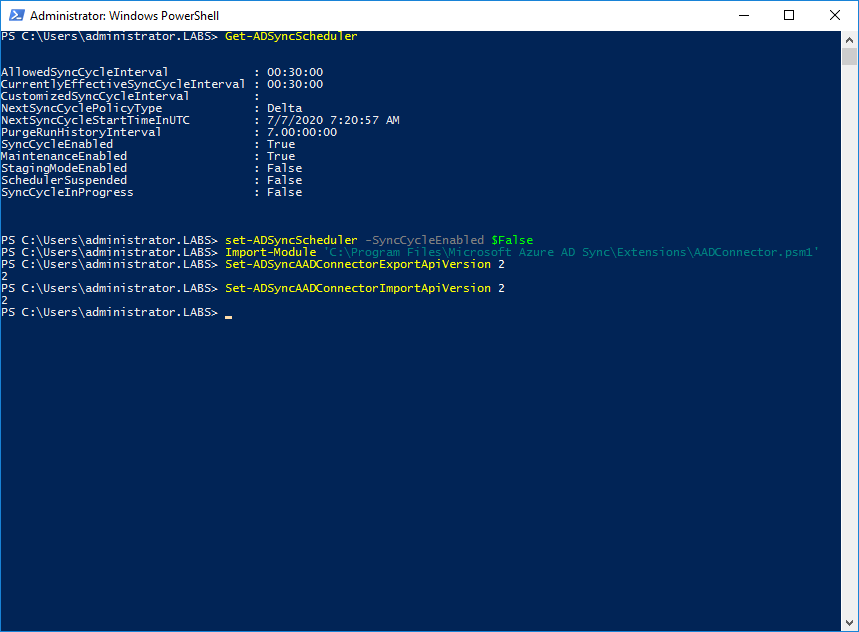
Starting with Azure AD Connect version 1.5.30.0 Microsoft implemented the Azure AD Connect sync V2 endpoint API (public preview) which will improve performance to Azure AD synchronization. You can enable the new endpoint using the following commands in a PowerShell window on the Azure AD Connect server (elevated permissions):

Set-ADSyncScheduler -SyncCycleEnabled $false
Import-Module 'C:\Program Files\Microsoft Azure AD Sync\Extensions\AADConnector.psm1'
Set-ADSyncAADConnectorExportApiVersion 2
Set-ADSyncAADConnectorImportApiVersion 2
set-ADSyncScheduler -SyncCycleEnabled $True

Azure AD Connect v2 endpoint

In the first screenshot you can also see the Azure AD Password Protection proxy. This was installed on December 17, 2019 and the version installed is 1.2.125.0. This is also the latest version, which you can check on Azure AD Password Protection agent version history.

The Azure AD Password Protection proxy also supports auto upgrade, you can check the settings using the Get-AzureADPasswordProtectionProxyConfiguration cmdlet on the Azure AD Connect server.

More information

Install-Module MSOnline fails with unable to download from URI

When installing the MSOnline module using the Install-Module MSOnline command in PowerShell it fails with a cryptic error like:

WARNING: Unable to download from URI ‘https://go.microsoft.com/fwlink/?LinkID=627338&clcid=0x409’ to ”.
WARNING: Unable to download the list of available providers. Check your internet connection.
PackageManagement\Install-PackageProvider : No match was found for the specified search criteria for the provider ‘NuGet’. The package provider requires ‘PackageManagement’ and ‘Provider’ tags. Please check if the specified package has the tags.

And

WARNING: Unable to download from URI ‘https://go.microsoft.com/fwlink/?LinkID=627338&clcid=0x409’ to ”.
WARNING: Unable to download the list of available providers. Check your internet connection.
PackageManagement\Get-PackageProvider : Unable to find package provider ‘NuGet’. It may not be imported yet. Try ‘Get-PackageProvider -ListAvailable’.
Install-Module : NuGet provider is required to interact with NuGet-based repositories. Please ensure that ‘2.8.5.201’ or newer version of NuGet provider is installed.

As shown in the following screenshot:

Install-PackageProvider

It turns out that this is a TLS issue, PowerShell does not use TLS 1.2 by default, while Microsoft requires TLS 1.2 from clients. To set TLS 1.2 usage for PowerShell, you can use the following command:

[Net.ServicePointManager]::SecurityProtocol = [Net.SecurityProtocolType]::Tls12

Now if you try again, it will install the MSOnline module:

Install-Module MSOnline

This is a per session setting, if you want to enable it for all sessions, add the previous command to the Microsoft.PowerShell_profile.ps1 and Microsoft.PowerShellISE_profile.ps1 profiles (use Notepad $Profile for this.

More information

Azure ActiveDirectory (MSOnline) – https://docs.microsoft.com/en-us/powershell/azure/active-directory/install-msonlinev1?view=azureadps-1.0

Configure OAuth authentication in Exchange 2016

As long as I can remember the Hybrid Configuration Wizard finishes successfully, and itgenerates the error about the OAuth portion of the hybrid configuration.

Configure Intra-Organization Connector

HCW8064 – The HCW has completed, but was not able to perform the OAuth portion of your Hybrid configuration. If you need features that rely on OAuth, you can try running the HCW again or manually configure OAuth using these manual steps.

The Learn more option redirects to the Microsoft page Configure OAuth authentication between Exchange and Exchange Online organizations. I used that article for the PowerShell commands in this blogpost.

OAuth is used cross-premises to logon to other services, on behalf of the user. So, if you are logged on to some Microsoft service, this service can use OAuth to access services in Exchange on-premises and vice versa.

Example of these cross-premises services are:

  • Message Records Management (MRM).
  • Exchange in-place eDiscovery.
  • Exchange in-place Archiving.
  • Teams calendaring.

The HCW can configure Azure Active Directory for OAuth authentication, it can create the IntraOrganizationConnectors, but it cannot export and import the (self-signed) certificate on the Exchange server, nor can it (or does it) create the authorization server objects in Active Directory. So, time to test, guided by the Microsoft article and write down my experiences.

Note. This only works for Exchange 2013 and higher, I have been working on this in a mixed Exchange 2016 and Exchange 2019 environment.

Configuring OAuth between Office 365 and Exchange Online involve a number of steps.

Create Authorization server objects in Exchange on-premises

To create the authorization server objects in your on-premises environment enter the following commands in the Exchange Management Shell.

New-AuthServer -Name "WindowsAzureACS" -AuthMetadataUrl "https://accounts.accesscontrol.windows.net/contoso.com/metadata/json/1"
New-AuthServer -Name "evoSTS" -Type AzureAD -AuthMetadataUrl https://login.windows.net/contoso.com/federationmetadata/2007-06/federationmetadata.xml

Your verified domain contoso.com (in the command) should be something like exchangelabs.nl, and not <your tenant name> as outlined in the Microsoft article.

New-AuthServer

Enable the partner application for use with Exchange Online

The partner application was created in the previous step (the first command) and this should be enabled. Do this using the following command in Exchange Management Shell (on-premises):

Get-PartnerApplication | ?{$_.ApplicationIdentifier -eq "00000002-0000-0ff1-ce00-000000000000" -and $_.Realm -eq ""} | Set-PartnerApplication -Enabled $true

Export the Exchange authorization certificate

Authentication cross-premises is using certificates, so the on-premises certificate needs to be exported to Azure Active Directory. In case you were wondering where the CN=Microsoft Exchange Server Auth Certificate certificate was coming from when running the Get-ExchangeCertificate command in Exchange Management Shell, here you go.

Use the following PowerShell commands and store them in a PowerShell script called ExportAuthCert.ps1 or something and run it. This should export the OAuth certificate to a file called OAuthCert.cer.

$ThumbPrint = (Get-AuthConfig).CurrentCertificateThumbprint
If((Test-Path $ENV:SYSTEMDRIVE\OAuthConfig) -eq $false)
{
md $ENV:SYSTEMDRIVE\OAuthConfig
}
CD $ENV:SYSTEMDRIVE\OAuthConfig
$oAuthCert = (dir Cert:\LocalMachine\My) | ?{$_.ThumbPrint -Match $ThumbPrint}
$CertType = [System.Security.Cryptography.X509Certificates.X509ContentType]::Cert
$CertBytes = $oAuthCert.Export($CertType)
$CertFile = "$env:SYSTEMDRIVE\OAuthConfig\OAuthCert.cer"
[System.IO.File]::WriteAllBytes($CertFile, $CertBytes)

ExportAuthCert

Note. The Export-ExchangeCertificate command doesn’t work in this scenario since the self-signed certificate isn’t exportable.

Import the Exchange authorization certificate into Azure AD

The next step is to import the OAuthCert.cer certificate into Azure AD. Connect to the Microsoft Online service (Connect-MSOLService, if you don’t have this installed you can use the Install-Module MSOnline command) and run the following commands when connected:

$Cred = Get-Credential
Connect-MSOLService -Credential $Cred
$CertFile = "$ENV:SYSTEMDRIVE\OAuthConfig\OAuthCert.cer"
$objFSO = New-Object -ComObject Scripting.FileSystemObject
$CertFile = $objFSO.GetAbsolutePathName($CertFile)
$CER = New-Object System.Security.Cryptography.X509Certificates.X509Certificate
$CER.Import($CertFile)
$binCert = $cer.GetRawCertData()
$CredValue = [System.Convert]::ToBase64String($binCert)
$ServiceName = "00000002-0000-0ff1-ce00-000000000000"
$P = Get-MsolServicePrincipal -ServicePrincipalName $ServiceName
New-MsolServicePrincipalCredential -AppPrincipalId $P.AppPrincipalId -Type asymmetric -Usage Verify -Value $credValue

This will import the self-signed certificate from the Exchange server into Azure AD so it can be used for mutual authentication.

I did not run the commands mentioned above on my Exchange server but on my Azure AD Connect server since the MSOL module was loaded on that server. For importing the certificate file I had to use the following command accessing the certificate file (instead of the $ENV:System variable):

$CertFile = "\\AMS-EXCH01\C$\OAuthConfig\OAuthCert.cer"

Register endpoints in Azure Active Directory

The last step is to register the endpoints of your on-premises Exchange environment into Azure Active Directory. You can use the following commands to register the endpoints:

$ServiceName = "00000002-0000-0ff1-ce00-000000000000";
$x = Get-MsolServicePrincipal -AppPrincipalId $ServiceName;
$x.ServicePrincipalnames.Add("https://webmail.exchangeserver.com/");
$x.ServicePrincipalnames.Add("https://autodiscover.exchangeserver.com/");
Set-MSOLServicePrincipal -AppPrincipalId $ServiceName -ServicePrincipalNames $x.ServicePrincipalNames;

Instead of webmail.exchangeserver.com and Autodiscover.exchangeserver.com you must use your own local FQDNs of the Exchange server (shown below in the verification screenshot).

You can use the the following command to check if this was configured correctly.

Get-MsolServicePrincipal -AppPrincipalId 00000002-0000-0ff1-ce00-000000000000 | select -ExpandProperty ServicePrincipalNames

As shown in the following screenshot:

Register Endpoints

Note. Over the years I have run the HCW several times. Domains have been added, but not (automatically) deleted in Azure Active Directory.

IntraOrganizationConnectors and AvailabilityAddressSpace

The Hybrid Configuration Wizard created the IntraOrganizationConnectors (both in Exchange 2016 as well as Exchange Online) and configured the AvailabilityAddressSpace. There’s no need to create these, but you have to check them using the Get-IntraOrganizationConnector and the Get-AvailabilityAddressSpace commands)

Verify the OAuth configuration

To verify the OAuth configuration you can use the Test-OAuthConnectivity command. You must do this on the on-premises Exchange server and in Exchange Online.

On the on-premises Exchange server use the Exchange Online Uri and a mailbox on-premises:

Test-OAuthConnectivity -Service EWS -TargetUri https://outlook.office365.com/ews/exchange.asmx -Mailbox onprem-user@exchangeserver.com -Verbose | Format-List

In Exchange Online, use the Exchange on-premises Uri with a mailbox in Exchange Online:

Test-OAuthConnectivity -Service EWS -TargetUri https://webmail.exchangeserver.com/metadata/json/1 -Mailbox Online-User@exchangeserver.com -Verbose | Format-List

The output is an extended list, but in the end you should see ResultType: Success and IsValid:True on your console:

Test-OAuthConnectivity

You have now configured the OAuth between Exchange Online and Exchange On-Premises.