Category Archives: Azure

Exchange Server in Azure – Part III

In two previous post I blogged about a site-to-site VPN connection to Azure and about installing a Domain Controller (and Azure AD Connect) in Azure. In this blog I will discuss that last server, the Exchange 2019 server in Azure.

The last in most interesting part (in my opinion) is installing an Exchange 2019 server in Azure. This can be your last Exchange server for management purposes, or maybe an Exchange server still hosting (some) mailboxes or performing SMTP Relay. It can be quite expensive to host mailboxes on an Exchange server in Azure, moving Mailboxes to Exchange Online is much cheaper. But then…. If you are already decommissioning your own datacenter… All business requirements are different of course 🙂

Exchange in Azure Setup

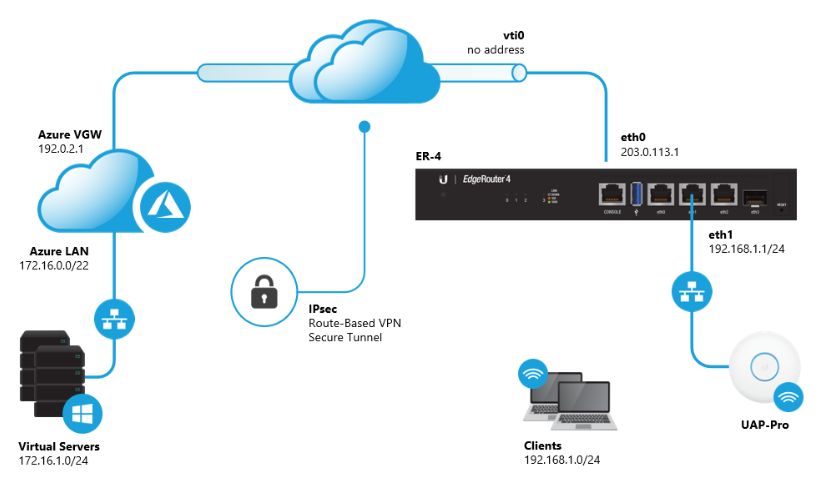
Currently Exchange server are located on-premises in a hybrid scenario. There’s already a Domain Controller in Azure, and the Azure AD Connect is running in Azure too. Now I want to install an Exchange 2019 server in Azure and run the Hybrid Configuration Wizard to create a hybrid configuration with the Exchange 2019 server in Azure. Webmail and Autodiscover will point to the Exchange server in Azure as well. In short, the configuration will look something like this:

Inbound mail will be sent to Exchange Online Protection and delivered to mailboxes in Exchange Online. When a mailbox is located on-premises, it will be routed to the Exchange server in Azure and when needed, routed to the Exchange server on-premises.

But first we have to think about sizing the Exchange server in Azure.

Sizing Exchange in Azure

The first question about Exchange server in Azure is sizing the Exchange server. First of all, deploying Exchange on Microsoft Azure virtual machines is supported if all storage volumes used for Exchange databases and database transaction logs (including transport databases) are configured for Azure Premium Storage (please see the Exchange Server Virtualization article on Microsoft Learn.

When you are planning to host active mailboxes on the Exchange server running in Azure then you should use the Exchange 2019 storage requirements calculator to figure out the correct size for the Exchange server. You can find the storage calculator on the Exchange 2019 ISO images in the \Support directory.

If you are planning to install an Exchange server in Azure just for management purposes, or for lab purposes, I would recommend using a ‘Standard d8s v3’ VM. This is a VM with 8 vCPU, 32 GB memory and a maximum of 16 additional disks.
When you create a new VM in the Azure Portal and select ‘see all sizes’ it will show a list of most used virtual machines by Azure users as shown below:

For my own lab environment I selected the DS3_V2 VM. Not the fastest VM, but for my own test- and management purposes it is sufficient, but your mileage may vary of course. Attached to my VM are two SSD disks of each 1TB. Be aware that the disks can be a costly thing, especially in a lab environment! The network interface is connected to the internal VNET that was created earlier, and it is connected to the Microsoft network using a public IP address. I also created a DNS name (exchlabsnl.westeurope.cloudapp.azure.com which can be used as a CNAME record for some other DNS name) but that’s not really needed since I can use the public IP address in a regular DNS A record.

Installing and Configuring Exchange in Azure

When you have the VM up and running in Azure and you have configured the storage as required, you can install the Exchange server. This is not different from a regular Exchange server. Install the prerequisite software, patch the machine, install the latest Exchange 2019 Cumulative Update and install the latest security update for this CU.

Configuring the Exchange server in Azure is similar to configuring the Exchange server on-premises. Install a proper certificate, configure the virtual directories (hopefully needless to say, but use a different FQDN in Azure since it is a different site in Active Directory) and configure the transport database on a different disk.

Configure the Network Security Group (NSG) to allow access on port 443 and port 25 from the Internet. Depending on your security requirements, you can configure the NSG of the Exchange server with the IP ranges of Exchange Online (https://learn.microsoft.com/en-gb/microsoft-365/enterprise/urls-and-ip-address-ranges) so only Microsoft can fully access your Exchange server in Azure. If you have clients that need to connect to the Exchange server, they can use a VPN connection (that’s what I typically recommend to customers these days, and what I do in my lab environment).

If you are planning an Exchange server just for management purposes, I would recommend not using a public IP at all and only connect to the Exchange server using the private Vnet. In this scenario there’s no need to publish the Exchange server to the Internet, and all changes to recipients are replicated to Exchange Online using Azure AD Connect. No Internet connection is less prone to external attacks of course. And another interesting thing when using a management server only, you can turn it off when not in use. This can save you quite some money.

The next step is to run the Hybrid Configuration Wizard which you can download from https://aka.ms/hybridwizard. When going through the wizard, select the Exchange server in Azure for the Receive Connector configuration and for the Send Connector configuration.

When finished, add the public IP address of your Exchange server in Azure to your SPF record for outbound mail, or configure the SMTP connector to Exchange Online to route all outbound mail via Exchange Online, that’s up to your requirements of course.

What happened in my scenario, my public IP address was assigned by Microsoft and you never know what happened previously with this IP address, but I had to delist it from SpamHaus before I was able to send out email from my Exchange server.

Then move your resources from the on-premises Exchange server to the Exchange server in Azure and decommission your Exchange server on-premises when needed.

Summary

In the past three blogpost I explained what it takes to install an Exchange server in Microsoft Azure and it contains of the following steps:

  • Create a site-to-site connection between your on-premises network and a Vnet in Azure.
  • Install a Domain Controller in Azure, connected to the Vnet. Optionally you can install an Azure AD Connect server in Azure as well.
  • Install and configure an Exchange server in Azure, connected to the Vnet (and to the Internet when needed)

An Exchange server in Azure is fully supported, as long as the Mailbox database and transaction logfiles are located on premium storage, that should be no problem.

Sizing your Exchange server in Azure is like an on-premises Exchange server. Use the storage calculator to determine the size of your Exchange server, and look for a VM that matches these requirements.

When installing an Exchange server in Azure just for management purposes it’s much easier. You can use a relatively lightweight Exchange server, there’s no need to publish it to the Internet (much safer) and you can turn it off when not in use.

Exchange Server in Azure – Part II

In my previous blog I wrote about creating a virtual network in Microsoft Azure and a site-to-site VPN connection to connect your on-premises network to the virtual network in Azure. The next step is to create a Domain Controller and (optional) an Azure AD Connect server in Microsoft Azure.

On a Domain Controller on-premises, create a new site in Active Directory and a new subnet and assign it to the new site. In my environment, the new site is called ‘Azure’ and the new subnet is ‘172.16.1.0/24’ as shown in the following screenshot:

Adding a new VM to Azure is not too difficult, but you must be careful with change the network properties. Do not change the DNS setting on the NIC inside the VM, but change it on the properties of the networking interface object in Azure.

Open the properties of the Virtual Machine in Azure, scroll down to Networking (under Settings) and click on the Network Interface. Select DNS Servers (under Settings) and add the (AD Integrated) DNS server on-premises shown in the following screenshot:

It takes some time before the new settings are active. Once active, you should be able to resolve other machines on the on-premises network and more important, join the new VM to Active Directory. And once joined, install the ADDS components on the new VM and promote it to a new Domain Controller, running in Azure.

Another thing I have changed in Azure is the DNS setting of the virtual network. Open the virtual network properties and scroll down to DNS Servers (again under settings). Open the DNS servers properties, select the ‘custom’ radio button and add the IP address of the new Domain Controller (with Integrated DNS of course). All VM’s on this virtual network now use the new Domain Controller for name resolution.

For external recurring DNS queries, and the Azure forwarder with IP address 168.63.129.16 on the forwarders tab of the DNS server as shown in the following screenshot:

The next step is to create a VM that will host the Azure AD Connect server. It still is my test environment so VMs don’t have to be that big, so for the Azure AD Connect server I’m using the Standard DS1 v2 (1 vcpu, 3.5 GiB memory) as well. You can also install Azure AD Connect on the Domain Controller in Azure, but personally I’m not a big fan of installing other services on Domain Controllers.

Make sure the new VM is connected to the Virtual Network that was created earlier, it will automatically get an IP address in the correct range.

Once installed, logon to the new server, join it to the domain and reboot again, just you would do with a server on-premises.
Since we are working post migration to Exchange Online we do have an Azure AD Connect server running on-premises. Moving this server to Azure is just like upgrading an Azure AD Connect server. Export the configuration of the existing server to a JSON file, and import this JSON file using the Azure AD Connect setup application. I have blogged about this process in an earlier upgrade blog: https://jaapwesselius.com/2021/12/24/upgrade-azure-ad-connect-from-1-x-to-2-x/ but it’s similar to moving to Azure.

When using this method, the new server will automatically be in ‘staging mode’, so it will fill its database with information, but it won’t sync anything with Azure AD. When you are ready, set the old server in staging mode and get the new server out of staging mode. At this point you are synchronizing using Azure AD Connect in Azure instead of on-premises.

Exchange server in Azure Part I

As an Exchange consultant I still do a lot of work with Exchange server on-premises, like migrations to Exchange 2019 and hybrid migrations to Exchange Online. In a typical Exchange hybrid environment 99% of all mailboxes are in Exchange Online, and only a handful of mailboxes are in Exchange on-premises. As a result, only one or two Exchange servers are left on-premises; for management purposes, for SMTP routing purposes and host these leftover mailboxes. A logical follow-up question is “why not put them in Azure?”.

Placing the last Exchange server in Azure can be costly, but a lot of customers are working hard to decommission their on-premises server room, so from that point of view it’s a valid question.

Before going into detail about this Exchange server in Azure, a couple of other things need to be in place:

  1. Site-to-Site VPN connection between on-premises and Azure.
  2. Domain Controller in Azure (optional: Azure AD Connect in Azure).
  3. Exchange server in Azure.

These make a couple of interesting blogs 🙂

Site-to-Site VPN with Ubiquity EdgeRouter

The first step is to create a site-to-site VPN connection between the internal network and Microsoft Azure, and we begin with a virtual network in Microsoft Azure.

The internal network is 10.83.4.0/24 and the Azure Virtual Network is 172.16.0.0/22, separated in a gateway subnet (172.16.0.0/24) and a server network (172.16.1.0/24).

My configuration looks like this (but my external IP addresses are different):

These are the steps I executed in the Microsoft Azure Portal:

  1. Create a new Azure Virtual Network:
    • Name: ServerNetwork
    • Address Space: 172.16.0.0/22
    • Subnet name: Default
    • Subnet Address Space: 172.16.1.0/24
    • Resource Group: MyTestRG
  2. Create a Gateway Subnet (under Virtual Networks, select Subnets and click +Gateway Subnet. The properties of the Gateway Subnet are automatically populated.
    • Name: GatewaySubnet
    • Address space: 172.16.0.0/24
  3. Create a new Azure Virtual Network Gateway:
    • Name: VirtualGateway
    • Gateway type: VPN
    • VPN type: Route-Based
    • SKU: Basic
    • Basic is using a dynamic external IP address. Static IP Address is only available in better (ie more expensive) versions. More info on https://learn.microsoft.com/en-us/azure/vpn-gateway/vpn-gateway-about-vpngateways
    • Virtual Network: ServerNetwork
    • Public IP Address: Create new during creation of VirtualGateway
    • Public IP Name: ..cloudapp.azure.com
    • Public IP Address SKU (dynamic)
    • The creation of the VirtualGateway can take quite some time, so be patient…
  4. Create a local network gateway
    • Name: LocalGateway
    • IP Address:
    • Address Space: 10.83.4.0/24 (your own internal IP address space)
    • Create the VPN Connection (under VirtualGateway  Connections)
    • Name: IPsecER
    • Connection type: Site-to-Site (IPSec)
    • Virtual Network Gateway: VirtualGateway
    • Local Network Gateway: LocalGateway
    • Shared Key: <secret>

For testing purposes, I created a new Virtual Machine in Azure (Standard DS1 v2 (1 vcpu, 3.5 GiB memory). This is automatically connected to the newly created Virtual Network. Using the external IP address, you can use RDP for the initial connection. For security purposes, use the Network Security Group (NSG) to restrict RDP only to your own IP address. After connecting, enable the ‘File and Printer Shared (Echo request – ICMPv4-In) Inbound Rule in Windows Defender Firewall. This makes connectivity testing a lot easier.

The Ubiquite EdgeRouter supports site-to-site VPN solutions, including site-to-site to Microsoft Azure which is documented in the EdgeRouter Route Based Site-to-Site VPN to Azure article. Not all devices are supported by Microsoft as documented in the Microsoft article About VPN devices and IPsec/IKE parameters for Site-to-Site VPN Gateway connections. Keep in mind though that not tested by Microsoft means ‘not supported by Microsoft’ but that does not automatically include ‘does not work’. If the vendor (Ubiquity in my case) supports it, you’re good to go.

When the router is configured correctly the site-to-site connection is automatically setup and the VPN Connection status should change to ‘Connected’ as shown in the following screenshot:

At this point you should be able to ping the VM in Azure (that’s connected to the virtual network that we created earlier) from a machine in your local network and vice versa.

In my next blog I will discuss installing a Domain Controller in Azure.

Azure Files Backup and Restore

In contrast to SharePoint Online and OneDrive for Business there’s no recycle bin for Azure Files available. Data is Azure is stored redundant and you can even opt for a multi-geo redundancy, but when (accidentally) deleting files they are gone.

To prevent unwanted deletion of data you can use Azure Backup to make sure your data is always safe, and that you can restore data.

To implement backups in Azure, you must create an Azure Recovery Services Vault. To do this, go to the Azure Portal and type Recovery Services Vault in the All services search box and click Create Recovery Services Vault. When entering the details make sure you use the same region as where your file share is located (West Europe in my example) as shown in the following screenshot:

Create Recovery Services Vault

Click Review + Create and click Create.

In the All Resources blade click on the newly created Vault to see all properties for the new Vault. To create a backup of the Azure Files, click + Backup and in the What do you want to backup drop down box select Azure FileShare (Preview) and click Backup. It can take a couple of seconds before the correct Storage Account appears:

Select Storage Account

Select the Storage Account and click OK. It can take a minute before the Storage Account is validated. The file shares that can be backed up will also be automatically discovered, this can also take some time. Select the file share and click OK.

The last step is to configure an Azure backup policy as shown in the following screenshot:

Azure Backup Policy

Create your own policy, pay attention to the retention time which is 30 days by default, click OK and click Enable backup.

The Azure Recovery Services Vault and backup policy will now be created. After some time the backup is created, and an initial backup will be performed.

Initial backup pending

You can open the backup items and click backup now or you can wait until the next backup has automatically run (3:30 AM in my example).

Restore files from Azure Backup

Backing up files is nice and important, but even more important is the ability to restore files from backup. And restoring files from Azure backup is pretty simple.

Open the Azure Portal and navigate to the Recovery Services Vault that was created previously. In the details of the Vault, click on backup items under Protected items. You will see several backup management types, select the Azure Storage (Azure Files) option. There should be one or more Backup items available. Select one of the backup items and click on the context menu (the three dots on the right of the backup item) and select File Recovery as shown in the following screenshot:

Backup Items

Click on the date and time restore point and click OK. Click on Select File and browse through the directory structure that’s in the backup set, until you’ve found the file or directory you want to restore. Select this item and click Select. Select Original location or Alternate location and in the drop down box determine what action should be taken in case of conflicts (Overwrite, Skip or Create Copy). Click OK and click Restore to start the restore of your deleted item(s). After a short amount of time (depending of the size and amount of files) the data should be restored, and visible again the Windows Explorer.

Summary

In Azure Files there’s no recycle bin for restoring (accidentally) deleted files, so you have to rely on backup and restore. To achieve this, you can implement the Azure Recovery Services Vault. You can implement a Vault (in the same region as where your data is stored) and create a backup policy to store backup files in the Vault. Once backed up, you can restore files easily from the Vault using the Azure Portal. It depends on your own retention policy how long the data should be kept in the Vault, but your data should be safe now.