Many organizations struggle with that Last Exchange Server (LES) in the organization. All their mailboxes are in Exchange Online, but an on-premises Exchange server is still needed for managing the mailboxes in Exchange Online since the Source of Authority (SOA) is still the local Active Directory.
On August 21, 2025 Microsoft announced the Cloud-managed remote mailboxes. Mailboxes in Exchange Online with an on-premises Active Directory and Exchange server can now be fully managed in the Exchange Online Admin Center (or Exchange Online PowerShell) and an on-premises Exchange server is no longer needed for management purposes.
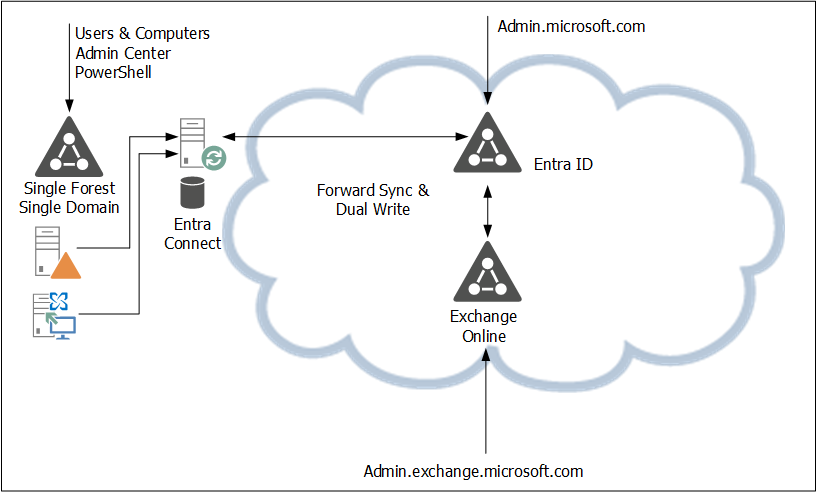
In the current situation the SOA is on-premises. A user object or mailbox is edited on-premises, and the complete object is synchronized with EntraID. From there, a forward sync mechanism sends the Exchange specific attributes to Exchange Online. Be aware that the forward sync normally takes only a few seconds, but occasionally it can take hours. This is shown in the following figure:
In the new situation, the user object is still in Active Directory and the remote mailbox in Exchange Online. Microsoft introduced a new property in EntraID called IsExchangeCloudManaged. Simply put, this breaks the synchronization of Exchange attributes and the user object in Entra ID, and the mailbox in Exchange Online can now be managed online. This is shown in the following figure:

There are a few gotchas, though:
- The solution is available, but it is in Public Preview. This means that Microsoft can change it at any time, or even withdraw it at any time (I don’t expect this to happen, unless serious problems arise).
- It is on a per-user basis, so the IsExchangeCloudManaged property must be set on every mailbox. This can lead to organizational chaos if you have mailboxes in both environments.
- The Exchange properties still exist in Active Directory. They can be edited in Active Directory, but they are not synchronized with EntraID. As such, Exchange Online and Exchange Server can become out of sync, resulting in strange issues, especially when it comes to cross-premises mail flow.
- An organization-level setting to make all newly synced users’ Exchange attributes cloud-managed is expected soon (September 2025).
- This is an attribute-level SOA change. This means you can only edit Exchange-specific attributes in the online Admin Centers, but you cannot delete a synchronized account, for example.
Phase two of the IsExchangeCloudManaged implementation will contain write-back support for specific Exchange attributes from Exchange Online to Exchange server. It is unknown yet when phase 2 will be released and what specific attributes will be synced back.
A gotcha in phase 2 is that this will only be available in EntraID CloudSync, and not in EntraID Connect. Please note that phase 1 does support EntraID Connect, so there’s no immediate need to move to EntraID CloudSync because of this new feature.
As mentioned before, this is an attribute-level SOA change. Microsoft is also working on an object-level SOA change, where an entire object SOA is moved to the cloud. Microsoft recently released this for Groups, but for contacts and users this is still in the planning.
Enable the IsExchangeCloudManaged feature
To enable this new feature, you must use EntraID Cloud Sync version 2.5.76.0 or higher, see my previous blog about upgrading to this version. This version will prevent error when trying to sync Exchange attributes to EntraID when the IsExchangeCloudManaged attribute is set to $True.
Logon to Exchange Online PowerShell and request a list of mailboxes in Exchange Online with the IsExchangeCloudManaged attribute, as shown in the following example:
PS C:\> get-mailbox | select Name,IsExchangeCloudManaged

Name                                                         IsExchangeCloudManaged
----                                          ----------
jaap                                          False
DiscoverySearchMailbox{D919BA05-46A6-...}     False
Labs | TLSReports                             False
Jan Aart Wesselius                            False
Labs | Dmarc Reports                          False
Labs | Jaap Wesselius                         False
Labs | Errol Brown                            False
DMARC Reports Exchangelabs.nl                 False
The user Errol Brown is created as a regular user with a (remote) mailbox, so the Exchange properties are not populated in Active Directory. It is synchronized using EntraID Connect and has an Office 365 E5 license assigned to it.
Use the following example to set the IsExchangeCloudManaged attribute to true to enable the EAC in Exchange Online to manage this mailbox:
Set-Mailbox -Identity e.brown@exchangelabs.nl -IsExchangeCloudManaged:$TRUEAfter some time, you can use Exchange Online PowerShell or the Exchange Online Admin Center to add for example, an e-mail address to this user:
Set-Mailbox -Identity E.Brown@Exchangelabs.nl -EmailAddresses @{add="Errol.MyMan.Brown@Exchangelabs.nl"}This only relates to Exchange Online properties. When you want to change identity properties, for example, a first name or last name, it will generate an error. This must still be managed on-premises and is something that will be fixed in a future update.
More Information
- Introducing Cloud-Managed Remote Mailboxes: a Step to Last Exchange Server Retirement – https://techcommunity.microsoft.com/blog/exchange/introducing-cloud-managed-remote-mailboxes-a-step-to-last-exchange-server-retire/4446042
- Cloud-based management of Exchange attributes for Remote Mailboxes in hybrid environments (Preview) – https://learn.microsoft.com/en-us/exchange/hybrid-deployment/enable-exchange-attributes-cloud-management
- Embrace cloud-first posture: Convert Group Source of Authority to the cloud (Preview) – https://techcommunity.microsoft.com/blog/exchange/introducing-cloud-managed-remote-mailboxes-a-step-to-last-exchange-server-retire/4446042


You must be logged in to post a comment.