Microsoft is offering two directory synchronization solutions for synchronizing identities from Active Directory to Entra ID:
- Entra Connect Sync.
- Entra Cloud Sync.
The first one is available since the beginning of directory synchronization (with different names over the years), Cloud Sync was introduced in January 2019 as the successor of the Entra Connect server.
With the introduction of Cloud-Managed Remote Mailboxes, Microsoft also announced that subsequent phases of this solution will run on Entra Cloud Sync. Therefore, it is time to consider migrating from Connect Sync to Cloud Sync.
Entra Cloud Sync
Entra Connect sync is using an on-premises server where the synchronization server is installed. This synchronization server utilizes a SQL Database (SQL Express for smaller deployments, or a SQL server/cluster for larger deployments), where all information is stored. This is called the metaverse. All aggregated data from Active Directory and Entra ID is synchronized with Entra ID.

Entra Cloud Sync is using a Sync Service in Microsoft Azure. This is where all the logic and processing take place. There’s a lightweight agent on a server on-premises that communicates with the sync service in Azure.
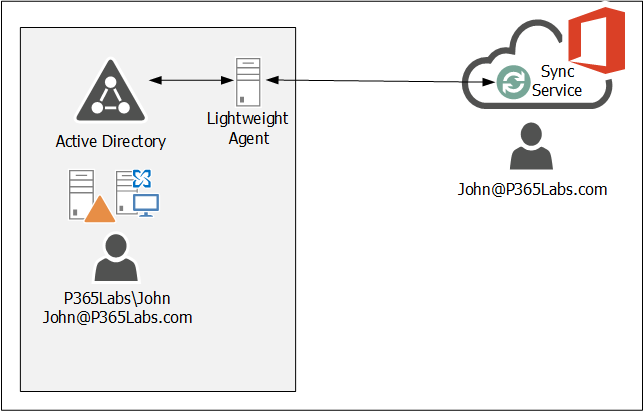
For available purposes, multiple of these lightweight agents can be installed on multiple servers (as long as they have internet connectivity, of course).
The features and functionality are similar; you can filter recipients by Organizational Unit, and you can create your own rules (in the rules editor) in the sync service.
Upgrade to Entra Cloud Sync
Installing the cloud sync agent is similar to installing the connect sync server. The following prerequisites apply to installing the cloud sync agent:
- The admin account that installs the cloud sync agent and configures the cloud sync service needs an Entra ID P1 license.
- The installation account must be a Domain Administrator or Enterprise Administrator. During the installation, a group managed service account (gMSA) is created to run the agent.
- The minimum requirement to configure the cloud sync service is to use a Hybrid Identity Administrator in Entra ID.
- The server where the agent is installed must run Windows 2016 or higher.
To install and configure the cloud sync agent/service, use the following steps:
- Create a backup of your Entra Connect sync.
- Download the cloud sync agent from the Microsoft Entra portal (https://entra.microsoft.com –> Entra ID –> Entra Connect –> Cloud Sync –> Agents as shown in the following screenshot:

- Installing the Agent is straightforward; open the downloaded agent and follow the wizard. And for the provisioning agent extension, select HR-driven provisioning.
- Follow the wizard and use your (cloud) admin credentials to logon to EntraID and the on-premises Active Directory and select the create gMSA option. It takes one or two minutes for the agent installation to complete, and when finished click Exit.
- To configure the cloud sync engine, go to the Entra portal and select Entra ID –> Entra Connect –> Cloud Sync. Click +New Configuration to start the wizard.
- In the New cloud sync configuration window you will see the Active Directory domain where the agents are installed. This does not have to be a regular TLD, but can also be a .local domain as shown in the following screenshot:

- If you don’t see the local Active Directory domain, restart the server where the agent is installed (not sure if a reboot is mandatory, but it did help in my environment). Click Create to start the process.
- There are multiple step you must or can do:
- Add scoping filter (mandatory)
- Add attribute mapping (optional)
- Synchronization test (recommended)
- Scoping is mandatory; this is where the agent selects the identities that need to be synchronized to Entra ID. My Entra Connect server was scoped on an Organizational Unit, so in Cloud Sync the same OU must be selected. The OU must be entered with its distinguished name, and there’s no AD browse button as shown in the following screenshot:

- When the DN of the OU is entered, click Add, and click Save to continue.
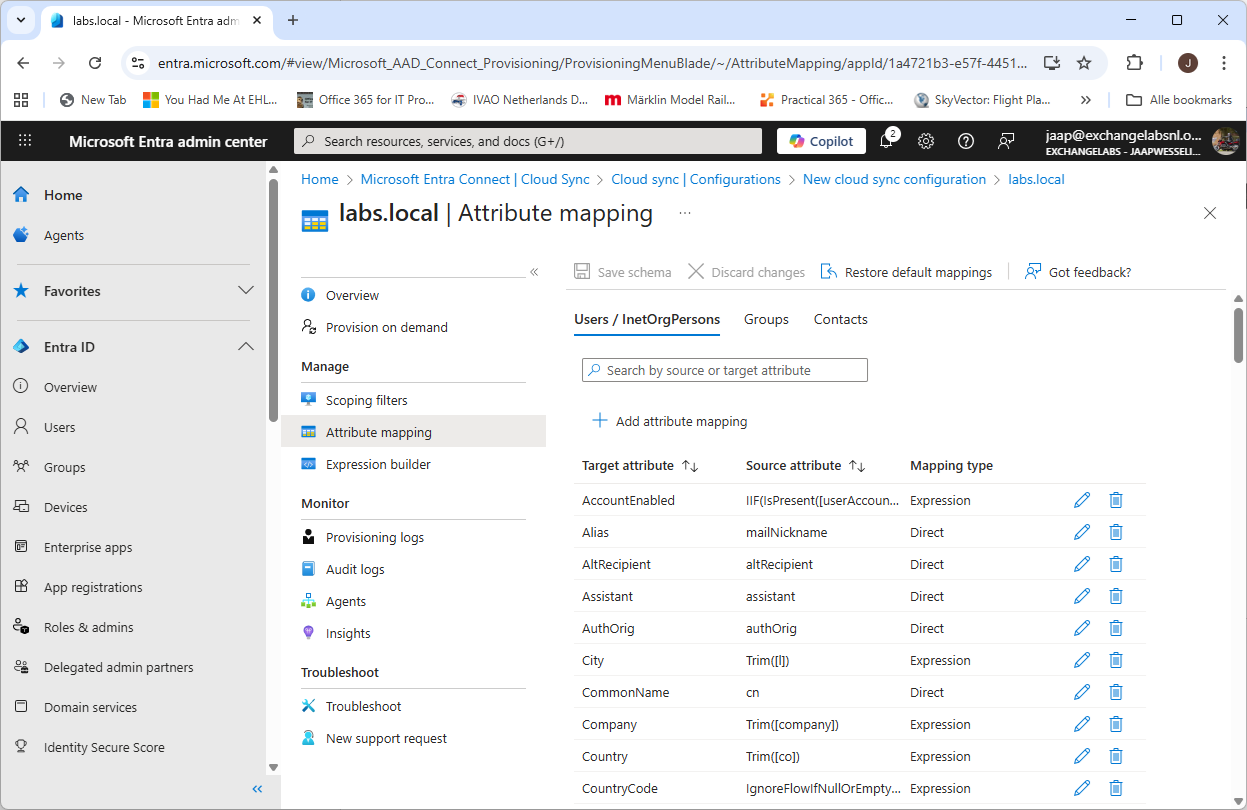
- The attribute mapping is optional, this is where the attributes in Active Directory are mapped to attributes in Entra ID. In a typical environment there’s no need to change this, but your environment can be different of course. Change this when needed.
- When everything is ok, select the Provision on Demand option. Here you can test the cloud sync configuration. Create a user account in Active Directory and select this user in the Provision on demand window. Again, no browse button so you must enter the distinguished name of this user as shown in the following screenshot:

- When everything is ok and the user account is successful created in Entra ID, click Overview, select Review and Enable and click Enable Configuration. This will finalize the wizard and cloud sync will continue to synchronize accounts with Entra ID.
- You can now uninstall Entra Connect Sync and continue synchronizing with Entra Cloud Sync.
Manage Entra Cloud Sync
Entra Cloud Sync can be managed using the Entra Portal (https://entra.microsoft.com). Login with your administrator account and navigate to Entra Connect –> Cloud Sync. Here, you can view the cloud configuration (created in the previous step) and check provisioning logs and audit logs.
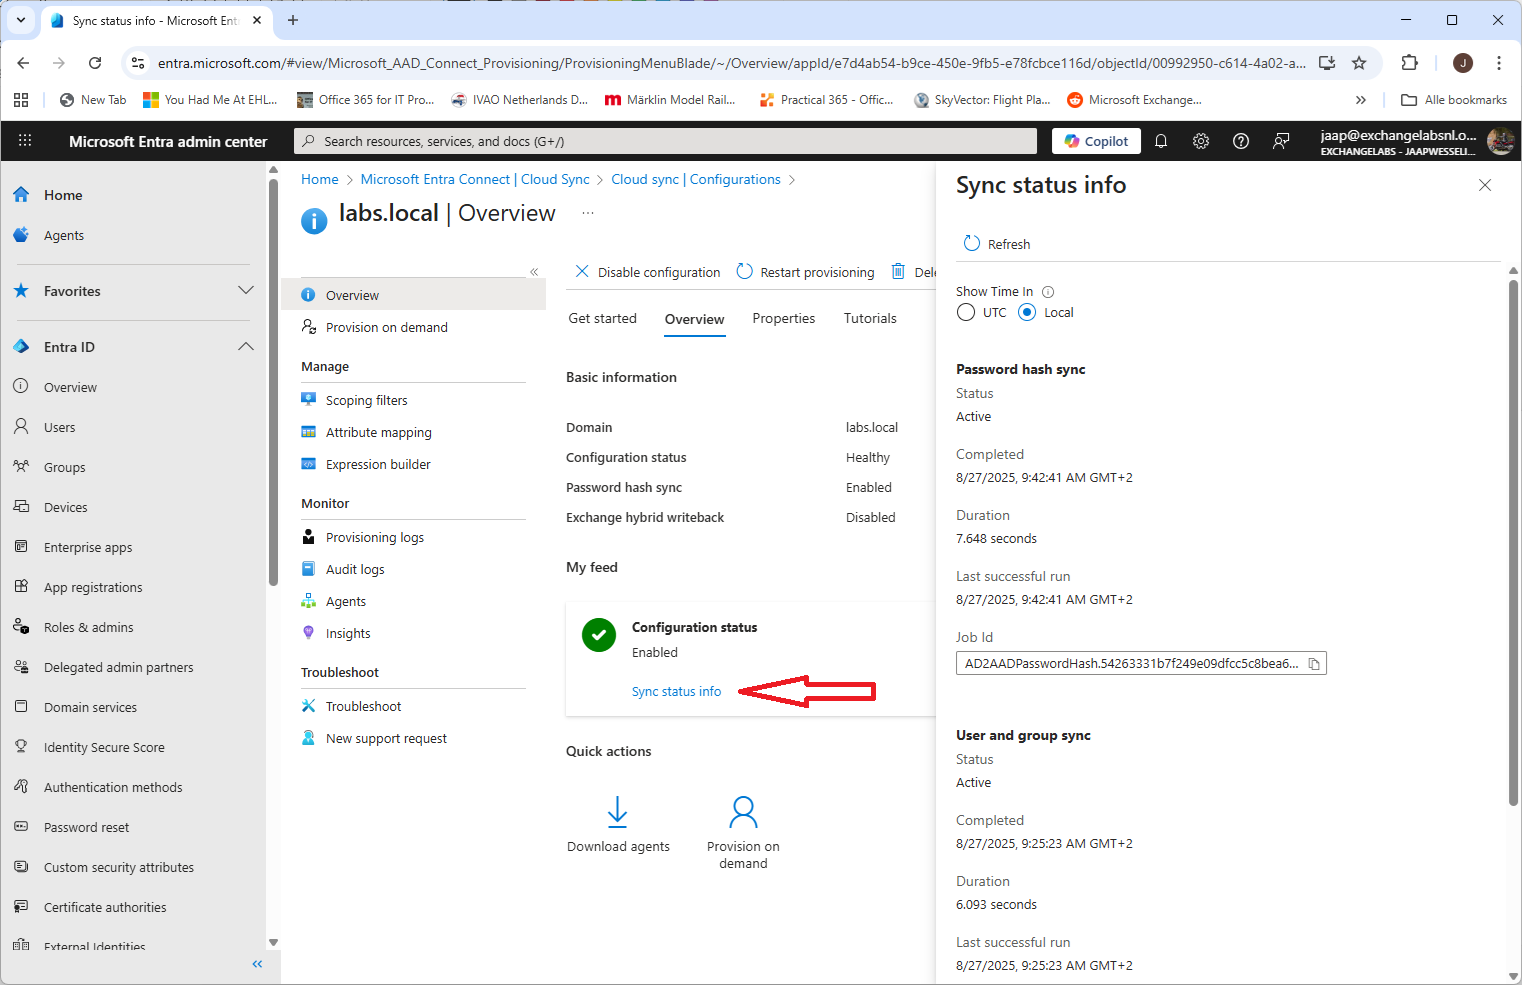
When you open the configuration for your environment, you can change it, but you can also check the properties and check the sync status info, as shown in the following screenshot:
It is also possible to manage Entra cloud sync using PowerShell. To do this, you have to install the AADCloudSyncTools PowerShell module. To install the prerequisites for this PowerShell module, execute the following commands on the server where the connect sync agent is installed:
[PS] C:\> Import-module -Name "C:\Program Files\Microsoft Azure AD Connect Provisioning Agent\Utility\ AADCloudSyncTools"
Azure AD Cloud Sync Agent configured with TenantId '54263331-b7f2-49e0-9dfc-c5c8bea6ff8b'
Please start with 'Connect-AADCloudSyncTools [-LoginHint <UserPrincipalName>]' before calling any other cmdlets.

PS C:\> Install-AADCloudSyncToolsPrerequisites
Installing 'PowerShellGet' Module. Please wait...
WARNING: 'PowerShellGet' Module installed successfully. Close this PowerShell window and run 'Install-AADCloudSyncToolsPrerequisites' again.
Close the PowerShell window and rerun both commands.
PS C:\> Import-module -Name "C:\Program Files\Microsoft Azure AD Connect Provisioning Agent\Utility\AADCloudSyncTools"
Azure AD Cloud Sync Agent configured with TenantId '54263331-b7f2-49e0-9dfc-c5c8bea6ff8b'
Please start with 'Connect-AADCloudSyncTools [-LoginHint <UserPrincipalName>]' before calling any other cmdlets.

PS C:\> Install-AADCloudSyncToolsPrerequisites
Installing 'MSAL.PS' Module. Please wait...
Installing 'AzureAD' Module. Please wait...
All AADCloudSyncTools prerequisites installed successfully.
No dedicated PowerShell cloud sync is created, so every time you want to use this PowerShell module, you must load it in a regular PowerShell window using the following command:
PS C:\> Import-module "C:\Program Files\Microsoft Azure AD Connect Provisioning Agent\Utility\AADCloudSyncTools"To manage Entra cloud sync, execute the Connect-AADCloudSyncTools command and login to your tenant with your admin credentials. Use the Get-Command CloudSync command to get a list of all CloudSync related PowerShell commands:
PS C:\> Get-Command *CloudSync*
CommandType Name
----------- ----
Function    Connect-AADCloudSyncTools
Function    Disable-AADCloudSyncToolsDirSyncAccidentalDeletionPrevention
Function    Export-AADCloudSyncToolsLogs
Function    Get-AADCloudSyncToolsInfo
Function    Get-AADCloudSyncToolsJob
Function    Get-AADCloudSyncToolsJobSchedule
Function    Get-AADCloudSyncToolsJobSchema
Function    Get-AADCloudSyncToolsJobScope
Function    Get-AADCloudSyncToolsJobSettings
Function    Get-AADCloudSyncToolsJobStatus
Function    Get-AADCloudSyncToolsServiceAccount
Function    Get-AADCloudSyncToolsServicePrincipal
Function    Install-AADCloudSyncToolsPrerequisites
Function    Invoke-AADCloudSyncToolsGraphQuery
Function    Remove-AADCloudSyncToolsGroupMembers
Function    Repair-AADCloudSyncToolsAccount
Function    Restart-AADCloudSyncToolsJob
Function    Resume-AADCloudSyncToolsJob
Function    Set-AADCloudSyncToolsJobSchema
Function    Set-AADCloudSyncToolsTenantId
Function    Start-AADCloudSyncToolsVerboseLogs
Function    Stop-AADCloudSyncToolsVerboseLogs
Function    Suspend-AADCloudSyncToolsJob
For example, use the Get-AADCloudSyncToolsJobStatus command to view information about the most recent synchronization run between the agent and the sync service. If you need to restart a synchronization or force an interim synchronization for any reason, you can use the Restart-AADCloudSyncToolsJob command.
The Microsoft documentation on the various commands is poor (to say the least…) but you can also use the Get-Help command in PowerShell. For example, to get more information about restarting a synchronization job, execute the following command:
PS C:\> Get-Help Restart-AADCloudSyncToolsJob -DetailedSummary
Microsoft Entra Cloud Sync is the successor to the well-known and widely used Entra Connect Server, a directory synchronization tool. Over time, you will see Microsoft move towards cloud sync, which is becoming visible with the recently announced Cloud-Managed Remote Mailboxes.
If you are still running Entra Connect Sync it time is here to start thinking about moving to cloud sync.


You must be logged in to post a comment.