Tag Archives: Directory Synchronization

HCW8001 – Unable to determine the tenant routing domain

As a consultant in messaging and collaboration I have created dozens of Exchange hybrid configurations that last years, ranging from Exchange 2010 to Exchange 2019.
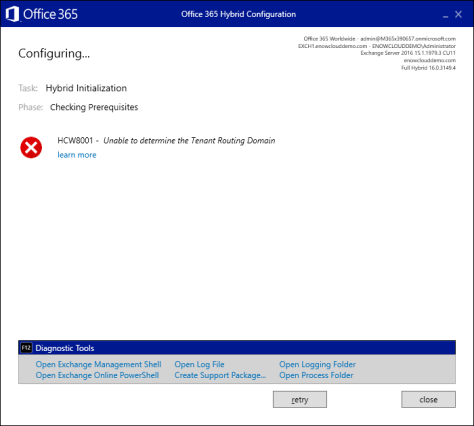
Today we’ve run into an issue I have not seen before, the HCW8001 – Unable to determine the Tenant Routing Domain error:

Unable to determine the tenant routing domain

Note. In one of my earlier blogs Moving from Exchange 2010 to Office 365 somebody mentioned this specific error in the comments in September 2018.

When you click Learn more you are redirected to the following Microsoft page:
https://support.microsoft.com/en-us/help/3068010/unable-to-determine-the-routing-domain-for-the-cloud-organization-erro which states you have to enable Directory Synchronization using the following command:

Set-MsolDirSyncEnabled -EnableDirsync $true

Which of course we did, but no success.

Azure AD Connect was running fine, I checked the configuration (optional features) and found nothing strange and no errors were logged.

Optional Features

When checking the Microsoft Portal I could see Directory Synchronization was running:

Azure AD Connect

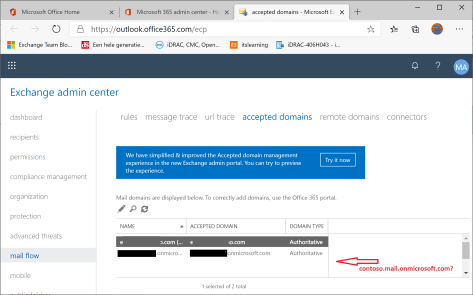
The tenant routing domain is typically something like <tenantname>.mail.onmicrosoft.com and this is set in Office 365 when installing Azure AD Connect. But when checking the Accepted Domains (in Exchange Online) this domain is not available:

Accepted Domains

There’s no way you can add this <tenantname>.mail.onmicrosoft.com domain manually (also not via the Microsoft Online Portal) so you are out of luck (I tried the Azure AD Connect server multiple times, but it didn’t work).

You can open a ticket with Microsoft Support or see if you can create a new tenant and start over again. Since this happens rarely I would be surprised you run into this again with a new tenant.


set-msoldirsyncenabled not available

Now with Microsoft moving from the old MSOL to AzureAD PowerShell commands (see my blogpost on Azure Active Directory PowerShell v2), you get new features but (unfortunately) things are starting to disappear as well.

In the past you could use Azure AD PowerShell to enable or disable directory synchronization using the Set-MsolDirSyncEnabled cmdlet. During a recent lab deployment, I found out that this cmdlet is no longer available. In fact, not a single Msol cmdlet is available anymore, try Get-Command *msol* and nothing is returned.

To get more information regarding Azure AD you can use Get-Command *Set-AzureAD*. This reveals enough information, but nothing that points to directory synchronization.

image

When logging on to the Azure Portal (of the newly created Office 365 tenant) it is obvious that Azure AD Connect sync is not enabled, as shown in the following screen shot:

image

When you dive deeper into the Azure Active Directory section of the Azure Portal, you can see that synchronization has never run, and that password sync is disabled (which makes sense at this point):

image

Nowhere can an option be found to enable directory synchronization, as you had to do previously before configuring directory synchronization. The only option you have is to download Azure AD Connect, using the following link: http://www.microsoft.com/en-us/download/details.aspx?id=47594

So, let’s give it a try….

Logon to the new Azure AD Connect server, download Azure AD Connect and start the wizard. The Express installation will perform the following steps:

  • Configure synchronization of identities in the current AD forest of <your domain>
  • Configure password synchronization from on-premises AD to Azure AD
  • Start an initial synchronization (I’ll get back on this later in this blogpost)
  • Synchronize all attributes
  • Enable auto upgrade

image

Enter the administrator credentials of your Office 365 tenant and your on-premises Active Directory and you’re ready to go:

image

One remark: I unchecked the Start the synchronization process when configuration completes option, and checked the Exchange hybrid deployment checkbox.

The reason I unchecked the synchronization process is that I do not want to synchronize all objects from my on-premises Active Directory to Azure Active Directory, but I only want to synchronize objects from the OU=Accounts container in my Active Directory domain.

If you want more information regarding the Exchange hybrid deployment and the write-back of properties from Azure AD to your on-premises Active Directory, you can visit the following Microsoft article:

Exchange Server Hybrid Deployments – https://technet.microsoft.com/en-us/library/jj200581(v=exchg.150).aspx

When the configuration is complete you can click the Exit button and you’re good. Please note that at this point no synchronization has taken place yet.

image

To make a selection based on Organizational Unit for synchronization you can start the Synchronization Service Manager (miisclient.exe) which can be found in the C:\Program Files\Microsoft Azure AD Sync\UIShell directory.

image

Click on the Connectors tab, and select the Connector (sometimes referred to as Management Agent) for your on-premises Active Directory. Click properties and select Configure Directory Partitions. Here you can select which containers should be used for synchronization to Azure Active Directory, as can be seen in the following screenshot:

image

Start the initial Azure AD synchronization using the Start-ADSyncSyncCycle -Policytype Initial command and wait for the results:

image

This will trigger the initial synchronization to Azure Active Directory, but won’t do any subsequent sychronizations. Use the Set-ADSyncScheduler -SyncCycleEnabled $true command to run periodic synchronizations.

When checking the Azure Portal, you can see that user objects are now synchronized from the on-premises Active Directory to Azure Active Directory, as shown in the following screenshot:

image

Summary

So, in short, previously you had to enable directory synchronization manually using the Set-MsolDirSyncEnabled command (or using the wizard in Office 365), but this is no longer the case. When running Azure AD Connect, directory synchronization in your tenant will automatically be enabled.
create Shared Mailbox in Exchange Hybrid

Every now and then I get a question regarding creation of Room- or Shared Mailboxes in Office 365 when Exchange Hybrid is in place.There are multiple solutions available, but at the same time there are some restrictions as well. In this blog post I’ll discuss Room Mailboxes, Equipment Mailboxes and Shared Mailboxes.

Room Mailbox

To create a room Mailbox in your hybrid environment create a user account for this room mailbox first. In this example I’m going to create a Room Mailbox called ‘conference room 1st floor’ and have it created directly in Office 365 (for your information, I’ve tested this with Exchange 2010 hybrid as well as Exchange 2016 hybrid).

image

To create the Mailbox in Exchange Online, you can use the Enable-RemoteMailbox cmdlet in Exchange PowerShell. This will mail-enable the account in your on-premises environment and will automatically create a mailbox in Exchange Online the next time Azure AD Connect runs. For the Enable-RemoteMailbox cmdlet you need to use the -RemoteRoutingAddress (which should point to the Mailbox in Exchange Online) and for a Room Mailbox you have to use the -Room option. If you want to create a Shared Mailbox you can use the -Shared option, the result will be the same.

To create the Room Mailbox in Exchange Online we can use the following command:

Get-User -Identity Conference1 | Enable-RemoteMailbox -Room -RemoteRoutingAddress conference1@inframan.mail.onmicrosoft.com

image

When Azure AD Connect has run, the account has been provisioned in Azure AD and the Room Mailbox has been created. It is visible in Exchange Online EAC and permissions can be granted to other users can manage the Room Mailbox.

image

Resource (Equipment) Mailbox

To create a Resource (aka Equipment) Mailbox the process is very similar. First create a user account for the Equipment Mailbox in Active Directory and fill the appropriate attributes, like this:

av

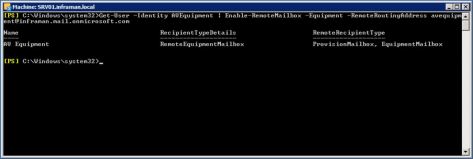
To create the Equipment Mailbox directly in Exchange Online, execute the following in PowerShell (on your on-premises Exchange server):

Get-User -Identity AVEquipment | Enable-RemoteMailbox -Equipment
-RemoteRoutingAddress avequipment@inframan.mail.onmicrosoft.com

equipment

Again, when Azure AD Connect has run, the account is provisioned in Azure AD and the Mailbox is created in Exchange Online:

mbx

Shared Mailboxes

Createing Shared Mailboxes is a bit problematic, after all these years there’s still no option like -Shared when using the Enable-RemoteMailbox cmdlet in Exchange PowerShell so we have to figure out another way to create a Shared Mailbox in Exchange Online when using Azure AD Connect and a Hybrid environment.

<more to come soon>


Moving from Exchange 2010 to Office 365

There are a lot of articles on the Internet on how to create a hybrid environment, where Exchange 2016 is connected to Office 365. Now that’s fine, but when you’re running Exchange 2016 you most like are NOT going to move to Office 365 anytime soon I guess. If you are running Exchange 2010 chances are that you will move to Office 365 (soon), but there aren’t that much articles about moving from Exchange 2010 to Office 365. And a lot of the articles available don’t have the right approach I’m afraid, and will result in you (the customer) having to pay way too much money to your system integrator.

In this article, I’ll try to outline the recommended approach when moving from Exchange 2010 to Office 365 in a hybrid scenario. With Azure AD Connect for synchronization purposes. Cliffhanger: I’m not going to install Exchange 2016 into the existing Exchange 2010 environment Smile

Existing Exchange environment

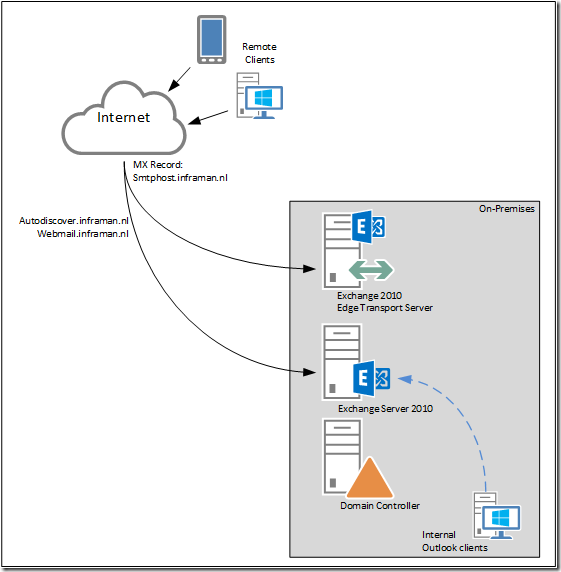
Our organization is called Inframan and they have their own on-premises Exchange 2010 environment which they have been running for 5 years now without too much issues. There are internal Outlook clients using Outlook 2010 and higher, and there are external clients using Outlook Anywhere. There are also mobile clients using ActiveSync to connect to their Mailboxes. Of course, there is Outlook Web Access, but POP3 and IMAP4 are not used.

image

Figure 1. Overview of the Inframan Exchange 2010 environment.

Continue reading Moving from Exchange 2010 to Office 365

Office 365 Directory Synchronization without Exchange server Part II

The question in my previous blog post was “Can we decommission our Exchange servers after moving to Office 365?” and the blunt answer was “No, you cannot decommission your last Exchange server on-premises”.

In this previous blog post I showed you what happens if you synchronize a user to Azure Active Directory from your on-premises Active Directory, and how to create a Mailbox in Exchange Online with a proper primary Email address. At the same time, it was only possible to set only one Email address, and there’s no possibility to add multiple Email addresses, nor is it possible to change any other Exchange related setting.

In this blog post I’ll discuss how to extend Active Directory with Exchange attributes to unleash more functionality and management options in Exchange Online. Please note that the solution in this blog works fine, but it is not recommended and not supported by Microsoft. Continue reading Office 365 Directory Synchronization without Exchange server Part II