Tag Archives: on-premises

Microsoft Teams and Exchange 2016

Microsoft Teams works best when your mailbox is in Exchange Online, and you have a license for SharePoint Online, and you have OneDrive for Business enabled.

When you have your mailbox in Exchange on-premises your options are limited, you have basic Teams functionality like audio/video and files, but that’s basically it. Not a trace of the calendar or the option to manage meetings in Teams. This is what ‘cloud partners’ have been telling me for a long time: “no, you must migrate your mailbox to Exchange Online” (and we can help you with that I was they were thinking…)

Teams with Exchange on-premises

But, if you have Exchange 2016 CU3 or higher things get better (I’m sorry if you are still running Exchange 2010). To enable the integration of Teams with on-premises Exchange 2016 you need to configure OAuth in your on-premises environment as outlined in my previous blog, and assuming you have Exchange hybrid configured of course.

When you have OAuth configured, Teams can access the on-premises mailbox on behalf of the user that’s logged on in Teams, making it possible to retrieve the user’s calendar. After configuring OAuth and without any additional configuration in Teams the user’s on-premises calendar (here in Exchange 2019) automagically appears:

Teams with Exchange on-premises OAuth

In the Teams client this is a view of your calendar, and using the new meeting option you can create new Teams meetings, invite people, set recurrence, select a channel etc. Invites are sent to other recipients using the regular Exchange process, and when accepted a response is sent (or not) back to your inbox. I never knew this was possible, but this is cool stuff.

Teams with Exchange on-premises new meeting

Integrating the calendar into Teams is a nice addition and it can help users with their daily productivity task. From a compliance perspective things are a bit different. Chats for example are not stored in the user’s mailbox, this is only possible for mailboxes in Exchange Online. The process responsible for copying Teams chat data from the Azure storage (outside of Office 365) simply cannot access the folder in the user’s mailbox.

But, for on-premises calendar integration in your Teams environment this is very nice.

More information

How Exchange and Microsoft Teams interact – https://docs.microsoft.com/en-us/microsoftteams/exchange-teams-interact

Configure OAuth authentication between Exchange and Exchange Online organizations – https://docs.microsoft.com/en-us/exchange/configure-oauth-authentication-between-exchange-and-exchange-online-organizations-exchange-2013-help


Implementing Exchange Online Protection for on-premises Exchange Part I

With the ongoing growing number of (successful) phishing attacks entering the organization via email, there’s an increasing demand for a rock-solid message hygiene solution. In my opinion there are very little on-premises solutions that do a great job, and very little cloud solutions. Google has a great message hygiene solution, but Microsoft’s Exchange Online Protection (EOP) is getting better and better each year. Not surprisingly since both Google and Microsoft can invest a tremendous amount of R&D money in their message hygiene solution.

A lot of my on-premises customers are currently looking at Exchange Online Protection (EOP) and are thinking about implementing EOP on a short term. In this blogpost I will focus on implementing EOP when using on-premises Exchange server (2010 or higher). An existing implementation can look something like this:

Exchange OnPremises

There’s an Exchange mailbox server on-premises, and in the organization’s DMZ there’s a mail relay server. In my environment this is an Exchange Edge Transport server, but this can be any SMTP server of course. MX records are pointing to the Edge Transport Server in the DMZ, the Internet Send Connector is using the Edge Transport Server as the source transport server. Between the Mailbox server and the Edge Transport server there’s an Edge Synchronization running to keep the Edge Transport server up-to-date with internal information.

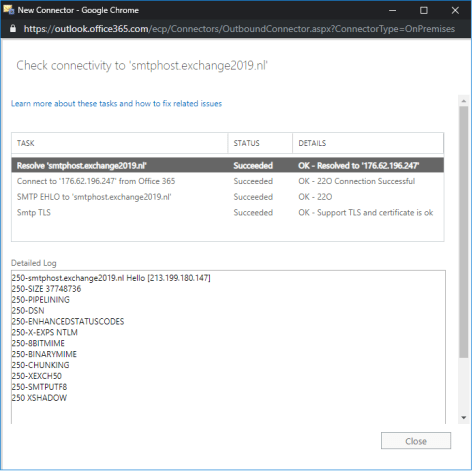
The MX record here is pointing to smtphost.exchange2019.nl and this is also the outbound server. The SPF record is pretty simple in this scenario since there’s only one egress point for my email, so the record is V=spf1 ip4:176.62.196.247 -all.

At this point there’s no DKIM signing or verification (not available in on-premises Exchange) and there’s also no DMARC record.

Exchange Online Protection

Exchange Online Protection is Microsoft message hygiene solution. Before EOP it was called Forefront Online Protection for Exchange (FOPE). The original version was created by FrontBridge, which was acquired by Microsoft in 2005.

You can get a separate EOP subscription, but EOP is automatically part of any Exchange Online subscription, so you must do the math to figure out the best value for money.

EOP can be used for inbound mail and for outbound mail. To implement EOP for inbound mail it’s just a matter of changing the MX records so that they point to EOP instead of your on-premises mail servers. For outbound mail you have to change the Internet Send Connector to use EOP as a smart host. All outbound email will then be forwarded to EOP and delivered to the intended recipients by EOP.

In my lab environment I have been working with Edge Transport servers since the beginning. From a message hygiene perspective, they do a great job when it comes to connection filtering, but other than that message hygiene is so-so.
The desired configuration with Exchange Online Protection is as follows:

Exchange 2019 EOP

After signing-up for Exchange Online Protection you must configure it. The first step is to configure a new domain in the Microsoft 365 Admin Center. When the domain is added and validated it will automatically appear in Exchange Online Protection as an Accepted Domain.

When you click on the domain in the Admin Center it will open another window with the appropriate DNS settings for this domain as shown in the following screenshot (click to enlarge):

eop_domain

Directory Synchronization

It is a Microsoft recommendation to implement directory synchronization using Azure AD Connect when implementing Exchange Online Protection. If you do, all mailboxes in the on-premises Exchange environment are known in EOP as contacts and can be individually managed in EOP.

Inbound mail flow

Before the MX record can be changed to EOP, a Send Connector should be created from EOP to the on-premises Exchange server. This connection is encrypted using TLS, so a 3rd party certificate is recommended.

To create Send Connector from EOP to your on-premises Exchange environment, open the Exchange Admin Center (in Office 365), select mail flow and click connectors. If this is a new EOP environment, you should see nothing.

Click the + icon to add a new connector and in the additional window select Office 365 in the From: dropdown box and select Your organization’s email server in the To: dropdown box as shown in the following screenshot (click to enlarge):

add-eop-send-connector

Click Next to continue. In the new Connector windows, give the new connector a name like “EOP to your organization” and click Next to continue. In the following window you have to select when to use this connector. Leave the default radio button on “For email messages sent to all accepted domains in your organization” and click Next to continue. In the next window, specify the name of the host where EOP should deliver all messages to. In my environment this is my Edge Transport server so I enter the FQDN smtphost.exchange2019.nl as shown in the following screenshot (click to enlarge):

EOP-Route

Click Next to continue. The following window is about TLS. The default is to enforce TLS and use certificates from a valid third-party CA. Accept the defaults and click Next to continue. The connector is now fully configured, review all settings and click Next to create the connector.

When the connector is created it should be validated. This is to ensure the connector is working as expected and you should do this before making the MX change. Use the + icon to add an email address in the on-premises Exchange environment and click Validate. If the connector is configured correctly, the validation should be successful and the email address you’ve entered will have received a validation message (click to enlarge)

EOP-Validate

The connector is now ready for use. After changing the MX record in public DNS to the FQDN as found in the Office 365 Admin Center (which is something like yourdomain-com.mail.protection.outlook.com) inbound mail will now be protected by Exchange Online Protection.

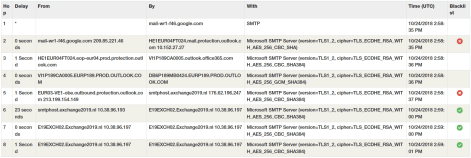
When sending an email from Gmail to my Exchange environment and checking the header of the received message it is clearly visible that mail flow is now via Exchange Online Protection (click to enlarge):

eop-headers

Summary

In this blogpost I’ve shown you how to implement Exchange Online Protection as a message hygiene solution in front of your on-premises Exchange environment. The process will be similar if you are using a different mail solution but want to implement EOP before your solution.
In part II I will explain the steps when you want to implement EOP for outbound messaging.

Source based routing in Exchange

In Exchange server Send Connectors are used to route messages from the Exchange organization to external recipients. Routing is based on the namespace of the recipient. You can create an Internet Send Connector with a namespace “*”, which means that all outbound messages are routed via this Send Connector.

You can also create a separate Send Connector with a namespace “fabrikam.com”. All messages with destination user@fabrikam.com are sent via this Send Connector, all other messages are sent via the other Send Connector. Routing via specific smart hosts or implementing domain security (i.e. Forced TLS) are good examples of using dedicated Send Connectors.

In Exchange unfortunately it is not possible to route message based on (properties of) the sender in Exchange. For example, users in a communications department should send all messages via a dedicated, high priority Send Connector, or members of the Sales Group should always send their messages via smarthosts in the DMZ, while other users send their messages via Exchange Online Protection. You can think of various examples, specific for your organization.

A customer wanted to implement source-based routing. Based on Active Directory Group membership or a property in Active Directory, outbound email should either be routed via the Symantec Messaging Gateway (SMG) or via Exchange Online Protection.

In Exchange you need a 3rd party solution, and one of the 3rd party solutions is the Transport Agent of Egress Software Technologies (www.egress.com). The Egress Transport Agents is a small software package that is installed on the Exchange 2010 Hub Transport server, of the Exchange 2013/2016 Mailbox server. It can also be installed on an Edge Transport server. It is installed in the C:\Program Files\Microsoft\Exchange Server\V15\TransportRoles\agents\SmtpAgents directory, and the Transport Agent is configured using a configuration file.

In my lab environment I’ve installed it on two Edge Transport servers (one Exchange 2013 and the other Exchange 2016). I can route messages via Trend Micro Hosted Email Security (HES) or directly via the Edge Transport servers. Of course, there are two Send Connectors to facilitate each route.

The Edge Transport servers make a routing decision based on a header in the email message. If the message contains a header ‘X-RoutethroughTM’ the message is routed via Trend Micro HES, if this x-header is not present it is routed via the regular Send Connector.

The X-RoutethroughTM header is added on the internal Mailbox server. When a user is a member of a Security Group called TrendUsers, then this X-header is added. This is achieved using a Transport Rule on the Mailbox servers:

image

When a message is sent from a mailbox which is a member of this Security Group, it is routed via Trend Micro. When sending to a Gmail mailbox it is visible in the message headers:

image

The Transport Agent does extensive logging, and the outbound messages including the trigger is visible in this logfile:

2018-04-19T10:25:05.9304327Z TID=24 ID=13306 [#016636d20b19] Event: [OnResolved]. Processing message
2018-04-19T10:25:05.9304327Z TID=24 ID=13306 ID=[]
2018-04-19T10:25:05.9304327Z TID=24 ID=13306 Details=[Interpersonal]
2018-04-19T10:25:05.9304327Z TID=24 ID=13306 Delivery=[Smtp/2018-04-19T10:25:05.8246623Z]
2018-04-19T10:25:05.9304327Z TID=24 ID=13306 Subject=[Routing via TM?]
2018-04-19T10:25:05.9304327Z TID=24 ID=13306 From=[jaap@Wesselius.info]
2018-04-19T10:25:05.9304327Z TID=24 ID=13306 To=[jaapwess@gmail.com]
2018-04-19T10:25:05.9304327Z TID=24 ID=13306 Attachments=[]
2018-04-19T10:25:05.9304328Z TID=24 ID=13307 [#016636d20b19] Event: [OnResolved]. Rule execution log:
2018-04-19T10:25:05.9304328Z TID=24 ID=13307 > Rule #1. Found header [x-routethroughtm: On]
2018-04-19T10:25:05.9304328Z TID=24 ID=13307 > Rule #1. Recipients: [jaapwess@gmail.com]
2018-04-19T10:25:05.9304328Z TID=24 ID=13307 > Rule #1. Recipient [jaapwess@gmail.com]. Rerouted to [trend.local] via [UseOverrideDomain].
2018-04-19T10:25:05.9304329Z TID=24 ID=13308 [#016636d20b19] Event: [OnResolved]. Message ID=[] processing completed. Result: [Routed].

This was added after the blog was published because of visibility/readability:

message based routing X-header

A message from a mailbox that’s not part of this Security Group shows different headers:

image

And the Transport Agent logfile:

2018-04-19T10:24:56.1352082Z TID=48 ID=13306 [#1f1e25edd0da] Event: [OnResolved]. Processing message
2018-04-19T10:24:56.1352082Z TID=48 ID=13306 ID=[]
2018-04-19T10:24:56.1352082Z TID=48 ID=13306 Details=[Interpersonal]
2018-04-19T10:24:56.1352082Z TID=48 ID=13306 Delivery=[Smtp/2018-04-19T10:24:56.0250359Z]
2018-04-19T10:24:56.1352082Z TID=48 ID=13306 Subject=[Routing via Edge?]
2018-04-19T10:24:56.1352082Z TID=48 ID=13306 From=[administratie@Wesselius.info]
2018-04-19T10:24:56.1352082Z TID=48 ID=13306 To=[jaapwess@gmail.com]
2018-04-19T10:24:56.1352082Z TID=48 ID=13306 Attachments=[]
2018-04-19T10:24:56.1352083Z TID=48 ID=13307 [#1f1e25edd0da] Event: [OnResolved]. Rule execution log:
2018-04-19T10:24:56.1352083Z TID=48 ID=13307 > Rule #1. Header [x-routethroughtm] was not found.
2018-04-19T10:24:56.1352084Z TID=48 ID=13308 [#1f1e25edd0da] Event: [OnResolved]. Message ID=[] processing completed. Result: [NoAction].

And again an added screenshot for readability:

Message based routing X-header

The config file is easy to configure. When using the X-header as shown above it would contain:

image

Note. Unfortunately I was not able to post the config info itself on my blog, as WordPress does not accept this.

The header rule can be configured extensively using a headerValuePattern or a headerValueNotPattern. These are regular expressions, like:

image

In this example, all messages with the X-RouteThroughTM header are routed to the trend.local connector. However, if the X-RouteThroughTM header has label “public”, do not route. Also, do not route for recipients in @secure.com and @secure.eu domains.

Summary

Source Based Routing is not possible in Exchange server and you need a 3rd party solution to achieve this. The Transport Agent solution from Egress Software is a highly customizable tool that can achieve this and the last couple of months it has been proven to be stable.

On general Exchange remark though, after upgrading to a newer CU you have to redeploy the Transport Agent. Not a big deal, only a matter of executing a setup.ps1 PowerShell script (but easy to forget)

SenderID, SPF, DKIM and DMARC in Exchange 2016 – Part III

In the previous two blog posts I have discussed SPF and DKIM as a way of validating the authenticity of email messages. SPF is using an SPF record in public DNS where all legitimate outbound SMTP servers for a domain are listed. A receiving SMTP server can check this DNS record to make sure the sending mail server is allowed to send email messages on behalf of the user or his organization.

DKIM is about signing and verifying header information in email messages. A sending mail server can digitally sign messages, using a private key that’s only available to the sending mail server. The receiving mail server checks the public key in DNS to verify the signed information in the email message. Since the private key is only available to the sending organization’s mail servers, the receiving mail server knows that it’s a legitimate mail server, and thus a legitimate email message.

As a reminder, my test environment is configured as follows:

image

There’s an Exchange 2016 CU2 Mailbox server hosting several Mailboxes, and there’s an Exchange 2016 CU2 Edge Transport server. Using Edge Synchronization all inbound and outbound SMTP traffic is handled by the Edge Transport server.

In the previous two blog posts an SPF record was created and implemented, and DKIM including a DKIM signing module on the Edge Transport server was implemented and functioning correctly.

This last blog in a series of three discusses DMARC, which is built on top of SPF and DKIM. Continue reading SenderID, SPF, DKIM and DMARC in Exchange 2016 – Part III

SenderID, SPF, DKIM and DMARC in Exchange 2016 – Part II

In the previous blogpost I have been discussing how SPF works and how it uses public DNS to validate the authenticity of the sending SMTP servers. When SPF is implemented correctly a receiving mail server can validate is the sending mail server is allowed to send email on behalf of the sender or his organization.

In this blogpost I will discuss DKIM signing as an additional (and more complicated, and more difficult to spoof) step in email validation.

As a quick reminder, here’s how my lab environment looks like:

image

There’s an Exchange 2016 CU2 Mailbox server hosting several Mailboxes, and there’s an Exchange 2016 CU2 Edge Transport server. An Edge synchronization will make sure that all inbound and outbound SMTP traffic is handled by the Edge Transport server.

In my previous blogpost an SPF record was created and implemented with the following value:

v=spf1 a:smtphost.exchangelabs.nl ~all

so receiving mail servers can validate that my Edge Transport server is allowed to send email on my behalf, and when mail is originating from another mail server it might well be a spoofed message.

But for now let’s continue with DKIM. Continue reading SenderID, SPF, DKIM and DMARC in Exchange 2016 – Part II