Tag Archives: Exchange Online Protection

Your message couldn’t be delivered because you weren’t recognized as a valid sender

Today a customer ran into an interesting issue. A user was not able to send out email to external recipients (this was already the case for a couple of weeks) but internal email, both in Office 365 as well as hybrid Exchange 2010 did work fine.

The NDR that was returned to the user said:

Delivery has failed to these recipients or groups:
jaapwess@gmail.com
Your message couldn’t be delivered because you weren’t recognized as a valid sender. The most common reason for this is that your email address is suspected of sending spam and it’s no longer allowed to send messages outside of your organization. Contact your email admin for assistance.

delivery-has-failed

At first, the only I read was “Your message couldn’t be delivered because you weren’t recognized as a valid sender” so it took me some time to figure out what was wrong.
It’s not a permission issue (was my first thought) but Exchange Online Protection is blocking the account because of spam.

Even in a hybrid scenario with centralized mail transport this can happen, because Exchange Online outbound mail (to Exchange 2010 on-premises) is still handled by Exchange Online Protection.

To check the outbound spam and the user that is blocked, open the Exchange Online Admin Center, select protection in the navigation bar and click the action center tab. Here you can see the user account that is blocked, including the reason and date for blocking as shown in the following screenshot:

eac-protection-action

For this specific user:

Reason:
OutboundSpamLast24Hours=122;OutboundMailLast24Hours=128;OutboundSpamPercent=953;Last Message MessagetraceId:4495783e-13af-483c-b8d2-08d643c0f46c

Date:
11/6/2018 8:22 AM

So, it was already blocked for 9 days and 122 outbound spam messages were detected the last 24 hours.

I asked the local IT guys to go to this specific workstation, perform an ant-virus run to clean-up the workstation so I can unlock the account.

Update. Some items from the protection and/or compliance center are moving to the Security & Compliance Admin Center (https://protection.microsoft.com). You can find the restricted users (i.e. users that are blocked from sending outbound email) under Threat Mangement | Review and Restricted Users.

Configuring message hygiene in Exchange Online Protection

In the previous three blogs I explained how to implement Exchange Online Protection for inbound and outbound mail flow, and how to configure SPF, DKIM and DMARC when using Exchange Online Protection. In this blog post I’ll go more into detail on the message hygiene processing itself.

For a correct understanding of Exchange Online Protection, it is good to have an overview of its internals. This is shown in the following figure, where the various steps in message hygiene processing are clearly visible:

EOP-Internals

By default, EOP does a great job for message hygiene, but it is possible to configure it for specific needs. It is possible to manually configure Connection Filtering (blacklisting and whitelisting), Anti-Mailware, Transport Rules and Content Filtering. I will discuss these in the following sections.

Connection Filtering

The first step in any message hygiene solution is connection filtering. Non-trustworthy mail servers are denied access based on their IP address, connection filtering filters out the majority of all malicious email.

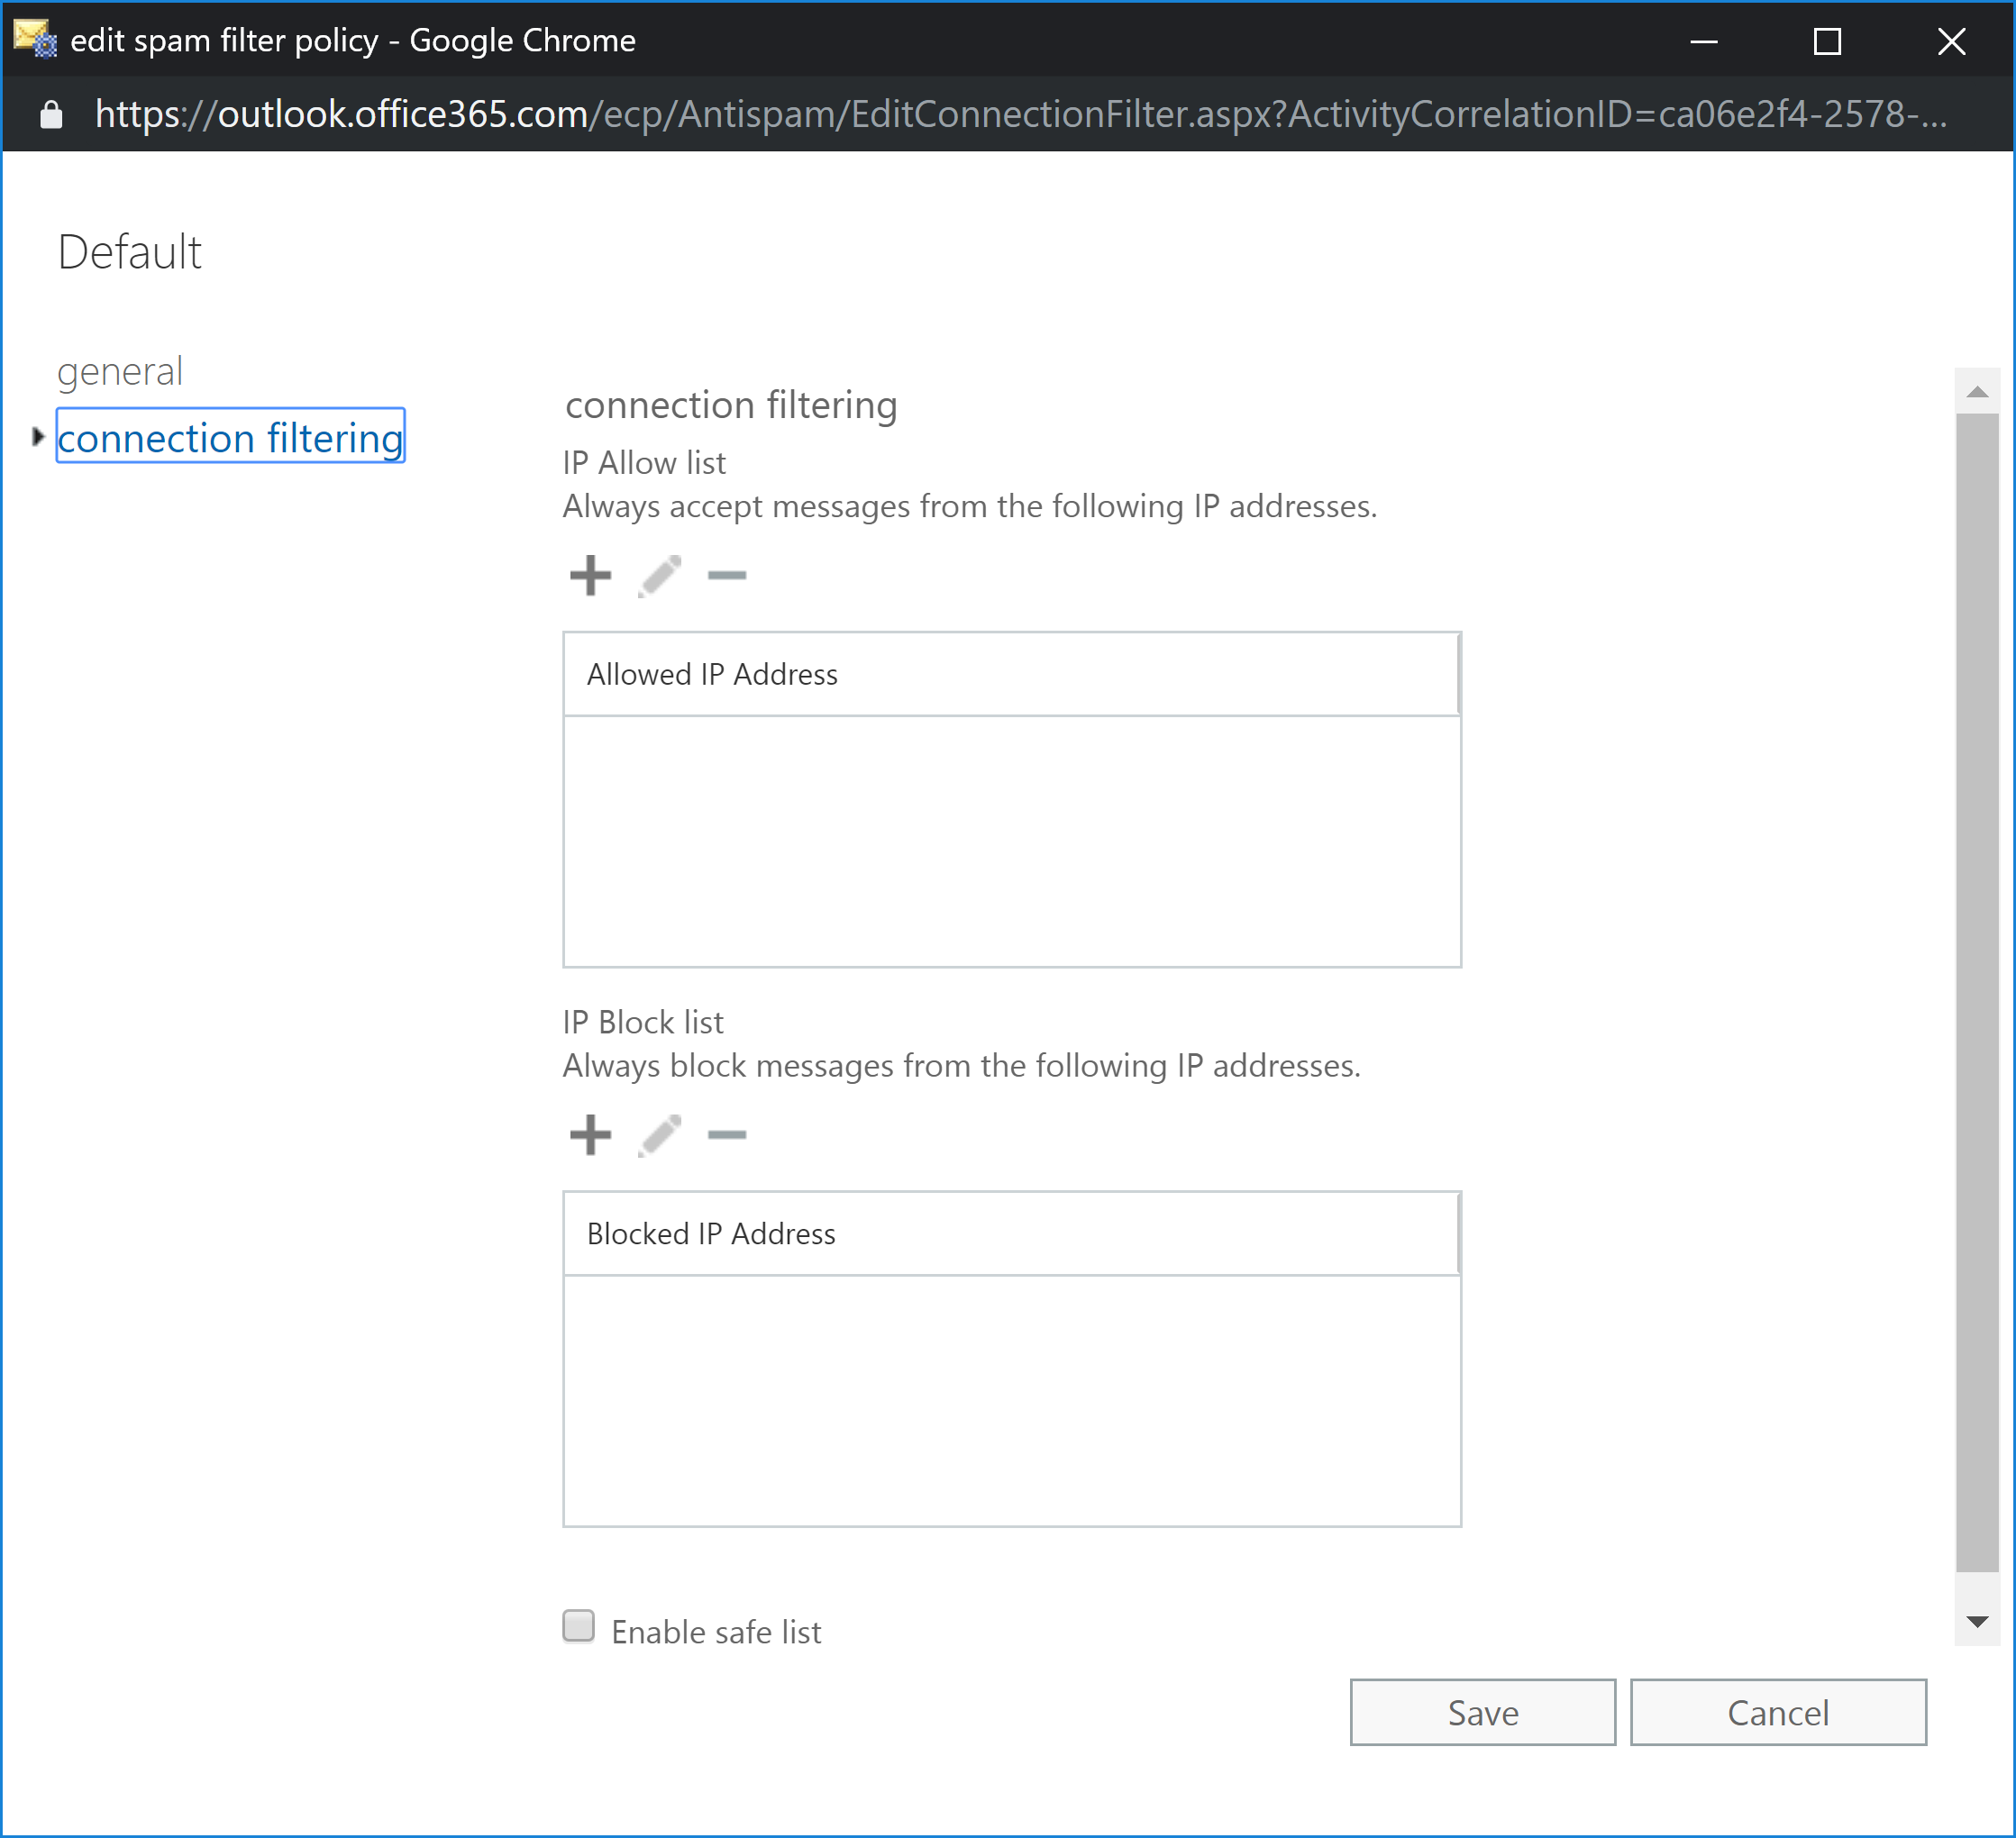
It can happen that you want to allow a particular mail server to deliver mail to your environment, even when its IP address is lists on block lists or denied access for some other reason. To allow this, you can add the IP address to the IP allow list. Vice versa, if there’s a mail server that sends malicious email that’s not blocked by the connection filter, you can add this IP address manually to the IP block list.

To do this, logon to the Exchange Admin Center, select protection and click on the connection filter tab. Click the pencil icon to edit the default connection filter policy. Use the + icon to add IP addresses to the IP allow list or the IP block list. You can add individual IP addresses with a /32 mask, or you can add ranges with a /24 mask or smaller. A total of 1273 entries can be added, one entry can be either an IP address or a range of addresses.

If you add an IP address to both lists, the allow list takes precedence.

edit-spam-filter-policy

Optionally you can select Enable safe lists. Microsoft subscribes to safe lists on the internet, publishing lists of IP addresses that are treated as safe. Using the safe lists you make sure that trusted senders are not treated as malicious senders, so it’s recommended to use the safe lists option.

Anti-Malware

The anti-malware policy in Exchange Online Protection is enabled by default, it can be viewed and edited by an Exchange administrator, but it cannot be deleted.

In the anti-malware policy, you can define the attachment filtering, detection response, internal and external notification, administrator notifications and you can customize notifications.

To access the default anti-malware policy, logon to the Exchange Admin Center, select protection in the navigation menu and click on the malware tab. Use the pencil icon to view or edit the default anti-malware policy, use the + icon to add a new malware policy. When you open a malware policy, click on settings and edit the settings according to your needs. This is shown in the following screenshot (click to enlarge):

anti-malware-policy

Click Save to store the new settings in Exchange Online Protection and activate them.

Mail flow rules

Mail flow rules, sometimes referred to as Transport Rules are rules in Exchange Online Protection that can take action on a message, based on certain criteria. Mail flow rules in Exchange Online Protection are similar to Transport Rules in Exchange server on-premises, and also similar to rules that you created in Outlook or OWA. Major difference is that Mail Flow rules work on messages in transit, while rules in Outlook only work on messages already delivered to the Mailbox.

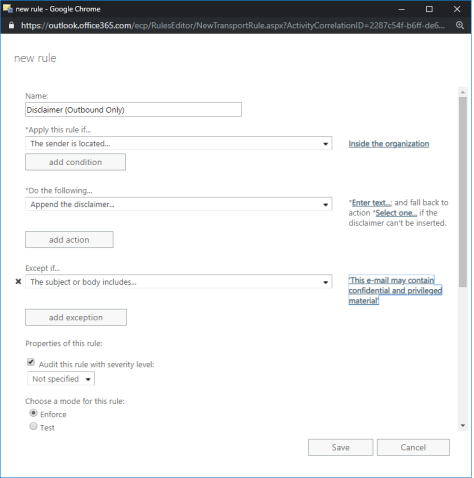
Using Mail flow rules it is possible to apply disclaimers, to bypass spam filtering (useful for an abuse mailbox for example), modify messages, check for sensitive information etc. as shown in the following screenshot (click to enlarge):

several-rules

To add a disclaimer to outbound messages select Apply disclaimers… and follow the wizard. Give the disclaimer an easy name like Disclaimer (Outbound Only), select the sender is located and select Inside the organization and click on Enter Text to add the disclaimer text.

I’ve used the following text in the disclaimer:

This e-mail may contain confidential and privileged material. You are requested not to disclose, copy or distribute any information thereof. If you are not the intended recipient (or have received this e-mail in error) please notify the sender immediately and delete this e-mail. We accept no liability for damage related to data and/or documents which are communicated by electronic mail.

To prevent a ton of identical disclaimers to email messages that are sent back and forth I’ve included an exception to the disclaimer. Wen the mail flow rule detects the string “This e-mail may contain confidential and privileged material” the disclaimer won’t be added again.

This is shown in the following screenshot (click to enlarge):

outbound-disclaimer

Click Save to store the mail flow rule. Send an email from an Exchange mailbox to an external recipient and you’ll see the disclaimer is added as shown in the following screenshot (click to enlarge):

disclaimer-added

Note. The remaining signature text in the screenshot above is set by Outlook on the Web directly from the Mailbox.

There are multiple options for using mail flow rules in Exchange Online Protection, but most of them are company specific, and targeted towards compliance management.

Spam Filtering

Like any other message hygiene solution, Exchange Online Protection filters out spam messages. Using machine learning in Office 365 and the billions of messages that are processed each day it does a pretty good job.

By default, email messages that are identified are sent to the user’s junk mail folder. It does this based on an X-header that is added by Exchange Online Protection called X-Forefront-Antispam-Report. When this X-header contains the value SFV:SPM it is identified as spam.

x-forefront-antispam-report

The Exchange server then knows it’s a spam message and will store the message in the user’s junk mail folder. However, this works fine in a hybrid environment since both parties trust each other, when using EOP in front of an Exchange on-premises environment this is not the case. To achieve the same results, two transport rules need to be created on the Exchange on-premises environment to process these messages accordingly.

To create these transport rules in your on-premises Exchange environment run the following three commands in Exchange Management Shell:

New-TransportRule EOPJunkContentFilteredMail -HeaderContainsMessageHeader "X-Forefront-Antispam-Report" -HeaderContainsWords "SFV:SPM" -SetSCL 6
New-TransportRule EOPJunkMailBeforeReachingContentFilter -HeaderContainsMessageHeader "X-Forefront-Antispam-Report" -HeaderContainsWords "SFV:SKS" -SetSCL 6
New-TransportRule EOPJunkMailInSenderBlockList -HeaderContainsMessageHeader "X-Forefront-Antispam-Report" -HeaderContainsWords "SFV:SKB" -SetSCL 6

When the transport rules are created, spam messages will be delivered into the junk mail folder.

How to test spam processing? Just like an Eicar ‘virus’ that you can use to test your anti-virus solution there’s a test spam message called GTube. GTube is a text string you can add to your email message, and mail servers will detect this string and mark it as spam. The GTube string is:

XJS*C4JDBQADN1.NSBN3*2IDNEN*GTUBE-STANDARD-ANTI-UBE-TEST-EMAIL*C.34X

After adding this string to an email message from Gmail to Exchange, EOP will mark it as spam, very useful.

So, Exchange Online Protection and Exchange will store spam messages in the user junk mail folder. It is also possible to store these messages in quarantine.
To enable the Quarantine option, logon to the Exchange Online Protection Admin Center, select protection in the navigation menu and click the spam filter tab. Use the pencil icon to open the default spam filter policy. In the spam and bulk action options select Quarantine message under the spam and high confidence spam drop-down box as shown in the following screenshot (click to enlarge):

spam-and-bulk-actions

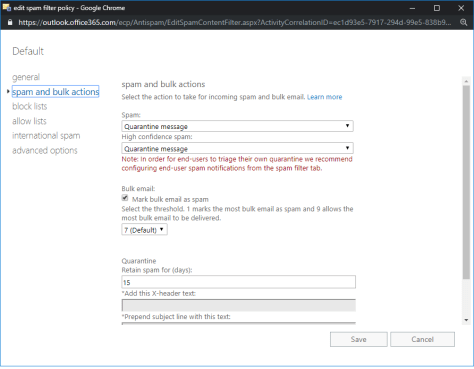
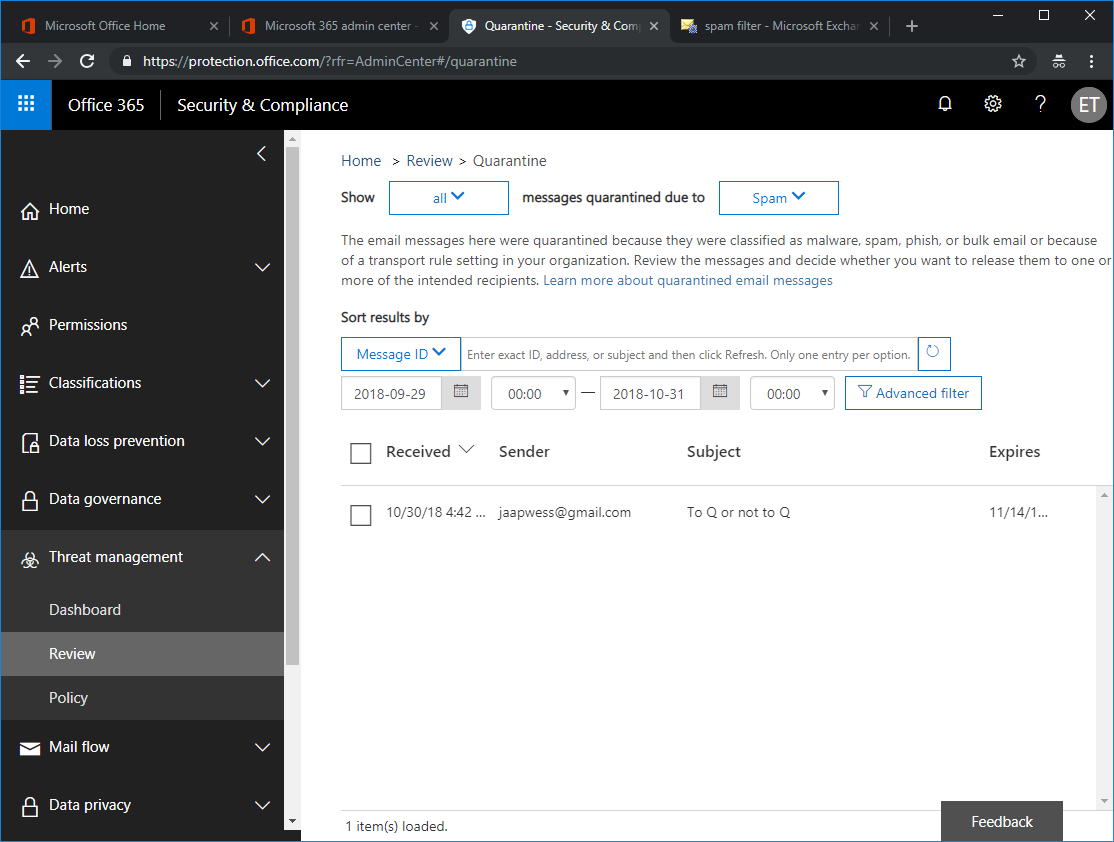
This is an organization wide quarantine environment that’s available only to the tenant administrator. Logon to the Office 365 portal and select Security and Compliance under Admin centers. It is also possible to navigate directly to the Security and Compliance admin center via https://protection.microsoft.com. You’ll find the Quarantine under Threat Management and Review. By default, quarantined message will be kept for 15 days before they are deleted. This can be extended under the spam and bulk actions of the spam filter policy.

Quarantine

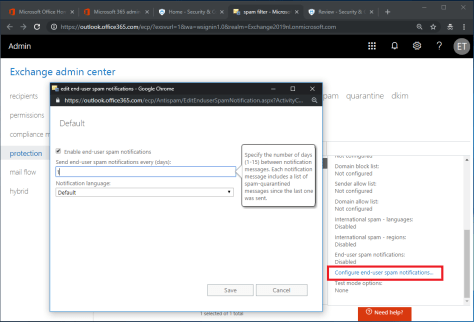
It is also possible to create a mailbox-based quarantine. Select the protection navigation option and click the spam filter tab. In the action pane on the right, scroll down and click the Configure end-user spam notifications option. In the pop-up box, check the enable end-user spam notifications checkbox, change the number of days (default is 3) a notification should be sent and the (default) language as shown in the following screenshot (click to enlarge):

end-user-notifications

When a user has messages in his quarantine a notification message is delivered to the mailbox with the quarantined messages. The messages can be released to the inbox and can be reported as not junk mail to Exchange Online Protection as shown in the following screenshot (click to enlarge):

quarantine-message

This way the users themselves can determine which messages are delivered to their inbox and which are not.

Blocked and Allowed Senders

It is possible to block or allow senders, this can be achieved on individual email addresses or on SMTP domains. To block or allow senders, in the Exchange Online Protection Admin Center select protection in the navigation menu and click the spam filter tab. Use the pencil icon to open the default spam filter policy and select block lists or allow lists. Here you can enter the email addresses or domains that should be blocked or allowed.

Summary

Exchange Online Protection is Microsoft’s cloud solution for message hygiene. It is automatically used in combination with any Office 365 subscription, but it can also be used in combination with an on-premises Exchange implementation or any other messaging environment.

In the first two blogs I showed you how to enable inbound and outbound message flow, in the third blog I showed you how to configure SPF, DKIM and DMARC to setup a secure message flow solution. When implemented correctly, the recipient’s mail server can validate the email messages and can identify which messages are spoofed and which are not (on behalf of your domain).

In this last blog post I showed you how to configure the message hygiene solution, how to fine-tune connection filtering, anti-malware settings, implement mail flow rules and how to configure quarantine on an individual user level.

SPF, DKIM and DMARC in Exchange Online Protection

In the previous two blog posts I’ve explained how to implement Exchange Online Protection as a message hygiene solution for your on-premises Exchange environment, both for inbound as well as outbound mail flow.

In this blog post I’ll go more into detail when configuring Exchange Online Protection

SPF, DKIM and DMARC

When Exchange Online Protection is fully up-and-running you can continue configuring SPF, DKIM and DMARC for message authentication purposes. This will make sure your email domain is much harder to spoof and receiving email systems know that the source of your email is a trusted source.

SPF

SPF has been around for years, and in my previous blog post I already mentioned the SPF record needed for use with Exchange Online Protection. If you want to read more about implementing SPF, please check my SenderID, SPF, DKIM and DMARC in Exchange 2016 – Part I blog post.

When only using Exchange Online Protection your SPF record will look like v=spf1 include:spf.protection.outlook.com -all.

DKIM

The good thing about Exchange Online Protection is that it supports DKIM signing and verification out of the box. The only thing you have to do is enable it in the Exchange Admin Center!

Logon to the Exchange (Online Protection) Admin Center, select protection in the navigation menu and click DKIM in the toolbar. When you click enable, an error message (in yellow) is shown that you need to create the appropriate DNS records first (click to enlarge).

EOP-DKIM

The error message reads (for search engine purposes):
CNAME record does not exist for this config. Please publish the following two CNAME records first.
selector1-domain-com._domainkey.tenantname.onmicrosoft.com
selector2-domain-com._domainkey.tenantname.onmicrosoft.com

The description isn’t that clear when you’re not a DKIM guru, but you need to create the following CNAME records:

Selector1._domainkey.domain.com CNAME selector1-domain-com._domainkey.tenant.onmicrosoft.com
Selector2._domainkey.domain.com CNAME selector2-domain-com._domainkey.tenant.onmicrosoft.com

When the DNS records are created you can use the MXToolbox to check if they are valid:MXToolbox-DKIM

If an email is sent from the on-premises Exchange server via Exchange Online Protection to for example Gmail, you can check the headers. If configured correctly you can see the SPF check passes, you can see the DKIM signature created by EOP and you can see the authentication results as well. It should read spf=pass and dkim=pass under Authentication Results as shown in the following screenshot (click to enlarge):

EOP-DKIM-Signed

For more information regarding DKIM and Exchange, please check my SenderID, SPF, DKIM and DMARC in Exchange 2016 – Part II blogpost.

DMARC

When DKIM and SPF are configured correctly you can create a DMARC record in public DNS. A DMARC policy will tell a receiving mail server what to do with email that does not comply with other settings. For example, if email is coming from a mail server that’s not listed in the SPF record it might well be spoofed. If the DKIM signature is missing it might be spoofed, if the DKIM signature is not valid, the message might be tempered with. If this is the case, you can define a policy that will reject such a message. The DNS record will be like this:

v=DMARC1;p=reject;sp=reject;pct=100;rua=mailto:dmarcreports@exchange2019.nl

The RUA is an email address where DMARC reports are sent to, so it’s a good thing to have such a mailbox on your Exchange server.

When sending an email from the Exchange server via EOP to Gmail when SPF, DKIM and DMARC are configured, you can see information like the following screenshot in the email headers (click to enlarge):

EOP-DKIM-Signed-DMARC

Everything is configured correctly now and spoofing is much harder to achieve for malicious users.

For more information regarding DMARC and Exchange, please check my SenderID, SPF, DKIM and DMARC in Exchange 2016 – Part III blog post.

Summary

In this blogpost I showed you how to configure SPF, DKIM and DMARC in Exchange Online Protection to prevent spoofing by malicious users.
In my next blog I’ll go more into detail about configuring the message hygiene options themselves in Exchange Online Protection.

Implementing Exchange Online Protection for on-premises Exchange Part II

In my previous blogpost I’ve explained how to implement Exchange Online Protection (EOP) for inbound messaging. In this blogpost I’ll explain what it takes to use EOP for outbound messaging.

As explained, the desired configuration should like this this:

Exchange 2019 EOP

Directory synchronization is in place (not explained in previous blog post), Send Connector from EOP to Exchange on-premises is created, MX record has changed to EOP and messages are delivered through EOP to the mailboxes on-premises.

Outbound mail flow

For outbound mail flow, two connectors need to be created:

  • One Send Connector on the on-premises Exchange server that will send all outbound messages to EOP. This send connector will most likely replace the existing Internet Send Connector that typically uses DNS to send external email to recipients.
  • One Receive Connector on EOP that accepts messages only from the Send Connector that was created on-premises.

For security purposes, TLS is enforced by default so a valid 3rd party certificate is required.

To create the Receive Connector in EOP, open the Exchange (Online Protection) Admin Center, select mail flow and click Connectors. Click the + icon just like when creating the connector in the previous blog post, but right now select Your organization’s email server in the From: dropdown box and Office 365 in the To: dropdown box as shown in the following screenshot (click to enlarge):

EOP-Route2

Click Next and follow the wizard. There are two ways for Exchange Online Protection to identify your outbound on-premises Exchange server. This can be either by its certificate or by its IP address. In the example below, I’ve selected the certificate and its FQDN for identification, but you can also enter and IP address (click to enlarge):

Receive-Connector-EOP

Click Next to continue and follow the wizard. Check the configuration and click Save to have the Receive Connector created in Exchange Online Protection.

The on-premises outbound connector was already in place (through the Edge subscription) and this connector need to be changed from DNS delivery to smarthost delivery. Logon to the on-premises Exchange Admin Center, select mail flow and click connectors. Open the outbound connector, click delivery and select the route mail through smart host radio button. In the smart hosts box, use the + icon to add your domain specific EOP FQDN, which is something like yourdomain-com.mail.protection.outlook.com as shown in the following screenshot (click to enlarge):

EdgeSync-SendConnector

When Edge synchronization has synchronized all information to the Edge Transport server it is possible to test the new configuration. When sending an email from Exchange on-premises to my Gmail account and check the header information after receiving, it is clearly visible that mail flows via the Edge Transport server through Exchange Online Protection to Gmail (click to enlarge):

EOP-headers-2

Note. Do not forget to update your SPF record! If your SPF record is not updated, organizations that do check for SPF (like Gmail) will detect an incorrect IP address or FQDN and possibly reject the message. You can find the correct SPF record in your Office 365 Admin Center (under Setup | Domains) and will look like “v=spf1 include:spf.protection.outlook.com -all

Summary

In the previous two blogposts I showed you how to implement Exchange Online Protection as a message hygiene solution in front of your on-premises Exchange solution. It can be configured for use with an Edge Transport server, but it can also be configured directly from the Mailbox server, or when using a 3rd party SMTP solution in your organization’s perimeter network.

In the next blog I’ll explain more about configuring and customizing Exchange Online Protection.


Implementing Exchange Online Protection for on-premises Exchange Part I

With the ongoing growing number of (successful) phishing attacks entering the organization via email, there’s an increasing demand for a rock-solid message hygiene solution. In my opinion there are very little on-premises solutions that do a great job, and very little cloud solutions. Google has a great message hygiene solution, but Microsoft’s Exchange Online Protection (EOP) is getting better and better each year. Not surprisingly since both Google and Microsoft can invest a tremendous amount of R&D money in their message hygiene solution.

A lot of my on-premises customers are currently looking at Exchange Online Protection (EOP) and are thinking about implementing EOP on a short term. In this blogpost I will focus on implementing EOP when using on-premises Exchange server (2010 or higher). An existing implementation can look something like this:

Exchange OnPremises

There’s an Exchange mailbox server on-premises, and in the organization’s DMZ there’s a mail relay server. In my environment this is an Exchange Edge Transport server, but this can be any SMTP server of course. MX records are pointing to the Edge Transport Server in the DMZ, the Internet Send Connector is using the Edge Transport Server as the source transport server. Between the Mailbox server and the Edge Transport server there’s an Edge Synchronization running to keep the Edge Transport server up-to-date with internal information.

The MX record here is pointing to smtphost.exchange2019.nl and this is also the outbound server. The SPF record is pretty simple in this scenario since there’s only one egress point for my email, so the record is V=spf1 ip4:176.62.196.247 -all.

At this point there’s no DKIM signing or verification (not available in on-premises Exchange) and there’s also no DMARC record.

Exchange Online Protection

Exchange Online Protection is Microsoft message hygiene solution. Before EOP it was called Forefront Online Protection for Exchange (FOPE). The original version was created by FrontBridge, which was acquired by Microsoft in 2005.

You can get a separate EOP subscription, but EOP is automatically part of any Exchange Online subscription, so you must do the math to figure out the best value for money.

EOP can be used for inbound mail and for outbound mail. To implement EOP for inbound mail it’s just a matter of changing the MX records so that they point to EOP instead of your on-premises mail servers. For outbound mail you have to change the Internet Send Connector to use EOP as a smart host. All outbound email will then be forwarded to EOP and delivered to the intended recipients by EOP.

In my lab environment I have been working with Edge Transport servers since the beginning. From a message hygiene perspective, they do a great job when it comes to connection filtering, but other than that message hygiene is so-so.
The desired configuration with Exchange Online Protection is as follows:

Exchange 2019 EOP

After signing-up for Exchange Online Protection you must configure it. The first step is to configure a new domain in the Microsoft 365 Admin Center. When the domain is added and validated it will automatically appear in Exchange Online Protection as an Accepted Domain.

When you click on the domain in the Admin Center it will open another window with the appropriate DNS settings for this domain as shown in the following screenshot (click to enlarge):

eop_domain

Directory Synchronization

It is a Microsoft recommendation to implement directory synchronization using Azure AD Connect when implementing Exchange Online Protection. If you do, all mailboxes in the on-premises Exchange environment are known in EOP as contacts and can be individually managed in EOP.

Inbound mail flow

Before the MX record can be changed to EOP, a Send Connector should be created from EOP to the on-premises Exchange server. This connection is encrypted using TLS, so a 3rd party certificate is recommended.

To create Send Connector from EOP to your on-premises Exchange environment, open the Exchange Admin Center (in Office 365), select mail flow and click connectors. If this is a new EOP environment, you should see nothing.

Click the + icon to add a new connector and in the additional window select Office 365 in the From: dropdown box and select Your organization’s email server in the To: dropdown box as shown in the following screenshot (click to enlarge):

add-eop-send-connector

Click Next to continue. In the new Connector windows, give the new connector a name like “EOP to your organization” and click Next to continue. In the following window you have to select when to use this connector. Leave the default radio button on “For email messages sent to all accepted domains in your organization” and click Next to continue. In the next window, specify the name of the host where EOP should deliver all messages to. In my environment this is my Edge Transport server so I enter the FQDN smtphost.exchange2019.nl as shown in the following screenshot (click to enlarge):

EOP-Route

Click Next to continue. The following window is about TLS. The default is to enforce TLS and use certificates from a valid third-party CA. Accept the defaults and click Next to continue. The connector is now fully configured, review all settings and click Next to create the connector.

When the connector is created it should be validated. This is to ensure the connector is working as expected and you should do this before making the MX change. Use the + icon to add an email address in the on-premises Exchange environment and click Validate. If the connector is configured correctly, the validation should be successful and the email address you’ve entered will have received a validation message (click to enlarge)

EOP-Validate

The connector is now ready for use. After changing the MX record in public DNS to the FQDN as found in the Office 365 Admin Center (which is something like yourdomain-com.mail.protection.outlook.com) inbound mail will now be protected by Exchange Online Protection.

When sending an email from Gmail to my Exchange environment and checking the header of the received message it is clearly visible that mail flow is now via Exchange Online Protection (click to enlarge):

eop-headers

Summary

In this blogpost I’ve shown you how to implement Exchange Online Protection as a message hygiene solution in front of your on-premises Exchange environment. The process will be similar if you are using a different mail solution but want to implement EOP before your solution.
In part II I will explain the steps when you want to implement EOP for outbound messaging.