Tag Archives: Edge Transport Server

Exchange 2019 on Windows Server Core disk management

When installing an Exchange 2019 Edge Transport server on Windows 2019 Server core I realized there’s no disk management MMC snap-in, so all disk configuration needs to be done using PowerShell.

For this blogpost I added a 20GB disk to my Windows 2019 Server Core server which I want to use as a D:\ drive for my SMTP queue.

You can use the Get-Disk command to retrieve the server’s disk configuration, and you can pipe this disk object into the Initialize-Disk command to bring it online and assign a new partition:

Get-Disk –Number 1 | Initialize-Disk –PartitionStyle GPT New-Partition –DiskNumber 1 –UseMaximumSize

Initialize-Disk

By default, Windows installs on drive C:\ and the DVD is mounted as drive D:\. You can use the Get-WmiObject and the Set-WmiInstance commands to assign it a different drive letter, for example drive Z:\

Get-WmiObject -Class Win32_volume -Filter ‘DriveType=5′ | Select -First 1 | Set-WmiInstance -Arguments @{DriveLetter=’Z:’}

The next step is to assign drive letter D:\ to the newly added disk:

Add-PartitionAccessPath -DiskNumber 1 -PartitionNumber 2 –AccessPath “D:\”

And finally format it using NTFS file system and a block size of 64KB:

Get-Partition –Disknumber 1 –PartitionNumber 2 | Format-Volume –FileSystem NTFS –NewFileSystemLabel “Queue” -AllocationUnitSize 65536 –Confirm:$false

format-disk

Now you can continue with the standard installation procedure for an Exchange 2019 Edge Transport server (which does not differ from an Exchange 2013 or Exchange 2016 Edge Transport server)

Moving from Exchange 2010 to Office 365 Part III

Exchange 2010 hybrid and Edge Transport Server

In two previous blog posts I explained how to setup an Exchange 2010 hybrid environment. In these blog posts I used the Exchange 2010 (multi-role) server for the hybrid configuration, so both the Exchange Web Services (used for free/busy, Mailbox Replication Service, OOF, mail tips) and the SMTP connection between Exchange Online and Exchange 2010.

Now that Exchange 2010 end of support is getting closer (less than a year!) I get more questions regarding the move from Exchange 2010 to Exchange Online. And several questions include the use of an Exchange 2010 Edge Transport server in front of the Exchange 2010 multi-role server.

This configuration will look something like this:

exchange 2010 hybrid edge transport

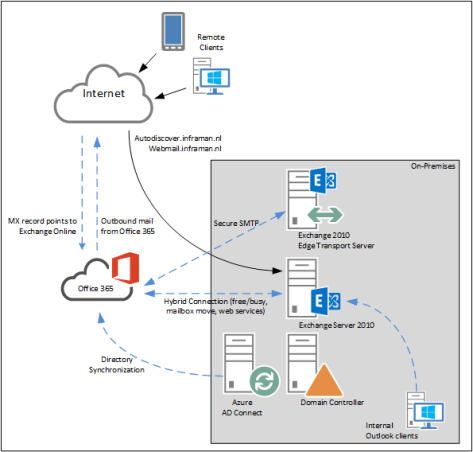
Inbound mail from Internet is getting through Exchange Online Protection and when the mailbox is still on Exchange 2010 it is routed via the Edge Transport Server to the internal Exchange organization. Outbound mail is leaving the organization via the Edge Transport server or via Exchange Online Protection, depending of the location of the mailbox.

The challenge when configuring this in Exchange 2010 is shown in the following screenshot:

missing edge transport server

Compared to running the HCW on Exchange 2013 or Exchange 2016 there’s no option to configure the Edge Transport server for secure mail transport in Exchange 2010!!
The only option right now is to run the Hybrid Configuration Wizard, configure it using the Client Access and Mailbox servers option, but use the data for the Edge Transport where needed.

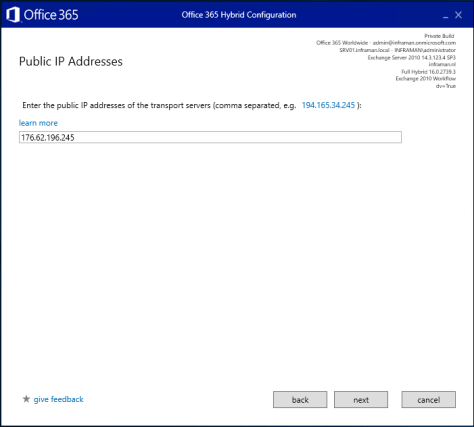
So, run the Hybrid Configuration Wizard, and when you need to enter the public IP address of the transport servers, enter the Public IP address of the Edge Transport server and not the public IP address of the load balancer VIP pointing to the Exchange 2010 internal servers). In my environment, the webmail.inframan.nl points to 176.62.196.253 and the Edge Transport Server smtphost.inframan.nl points to 176.62.196.245. This is the IP address I am going to use as shown in the following screenshot:

hcw public ip address

The next step is to select the certificate that’s used on the Edge Transport Server. By default, the HCW will only look at the internal Exchange 2010 server, so it won’t find any certificate installed on the Edge Transport server. To overcome this, I have imported the certificate of the Edge Transport Server in the certificate store of the internal Exchange 2010 server used by the HCW. In the HWC, click on the drop down box and select the certificate of the Edge Transport server, in my environment the smtphost.inframan.nl certificate:

hcw loading certificates

The last step is where the FQDN of the organization needs to be entered. I have a lot of discussion here because most admins want to enter something like ‘hybrid.domain.com’, but the FQDN of the transport server needs to be entered here, so in my environment this is the FQDN of the Edge Transport Server, i.e. smtphost.inframan.nl. This FQDN is used (together with the certificate information) to create a Send Connector from Exchange Online to the Edge Transport server.

hcw organization fqdn

Finish the Hybrid Configuration Wizard. It will be configured in Exchange 2010 and in Exchange Online and after a short time you can close the HCW:

hcw configure organization relationship

Now, when looking at the Exchange Management Console you can see the Send Connector from Exchange 2010 to Exchange Online. It is configured with the FQDN smtphost.inframan.nl as expected, but the source server of the Send Connector is still the internal Hub Transport server as shown in the following screen shot:

outbound to office 365 connector

Remove the Hub Transport server entry and add the Edge Transport server instead. If you have an Edge Synchronization in place you will see it immediately when you click the Add button.

In Exchange Online, the Receive Connector that’s created will check for any certificate with a wildcard like name, so the smtphost.inframan.nl certificate will automatically be accepted. The Send Connector is also created correctly. The FQDN of the Edge Transport server is used as the server to route message to, and the CN of the certificate that was selected in the HCW is also configured as shown in the following screenshot:

office 365 send connector certificate

We’re almost there. The only thing that needs to be done is to configure the Receive Connector on the Edge Transport Server for TLS from Exchange Online. You should have already configured the Edge Transport Server with the correct 3rd party certificate and when setting up an inbound connection it should use the 3rd party certificate. You can test this using the https://checktls.com tool online.

On the Edge Transport server, execute the following command in the Exchange Management Shell:

Get-ReceiveConnector "smtphost\Default internal receive connector SMTPHOST" | Set-ReceiveConnector -Fqdn smtphost.inframan.nl -TlsDomainCapabilities mail.protection.outlook.com:AcceptOorgProtocol

This will make sure the cross-premises email will be treated as internal email (SCL=-1). If you omit this step, there’s always the risk the email will be treated as external (I’ve seen SCL=5 in my environment) and will end up in the user’s Junk Email Folder.

Summary

When configuring an Exchange 2010 hybrid configuration it is not possible to configure an Edge Transport Server in the Hybrid Configuration Wizard. It is possible to configure this in the HCW for Exchange 2013 and Exchange 2016, but for Exchange 2010 this needs some manual changes.

In this blogpost I showed you the steps needed to configure an Edge Transport Server for secure messaging between Exchange Online and Exchange 2010. When configured this way cross-premises email will be seen as internal email and thus treated accordingly.


Implementing Exchange Online Protection for on-premises Exchange Part II

In my previous blogpost I’ve explained how to implement Exchange Online Protection (EOP) for inbound messaging. In this blogpost I’ll explain what it takes to use EOP for outbound messaging.

As explained, the desired configuration should like this this:

Exchange 2019 EOP

Directory synchronization is in place (not explained in previous blog post), Send Connector from EOP to Exchange on-premises is created, MX record has changed to EOP and messages are delivered through EOP to the mailboxes on-premises.

Outbound mail flow

For outbound mail flow, two connectors need to be created:

  • One Send Connector on the on-premises Exchange server that will send all outbound messages to EOP. This send connector will most likely replace the existing Internet Send Connector that typically uses DNS to send external email to recipients.
  • One Receive Connector on EOP that accepts messages only from the Send Connector that was created on-premises.

For security purposes, TLS is enforced by default so a valid 3rd party certificate is required.

To create the Receive Connector in EOP, open the Exchange (Online Protection) Admin Center, select mail flow and click Connectors. Click the + icon just like when creating the connector in the previous blog post, but right now select Your organization’s email server in the From: dropdown box and Office 365 in the To: dropdown box as shown in the following screenshot (click to enlarge):

EOP-Route2

Click Next and follow the wizard. There are two ways for Exchange Online Protection to identify your outbound on-premises Exchange server. This can be either by its certificate or by its IP address. In the example below, I’ve selected the certificate and its FQDN for identification, but you can also enter and IP address (click to enlarge):

Receive-Connector-EOP

Click Next to continue and follow the wizard. Check the configuration and click Save to have the Receive Connector created in Exchange Online Protection.

The on-premises outbound connector was already in place (through the Edge subscription) and this connector need to be changed from DNS delivery to smarthost delivery. Logon to the on-premises Exchange Admin Center, select mail flow and click connectors. Open the outbound connector, click delivery and select the route mail through smart host radio button. In the smart hosts box, use the + icon to add your domain specific EOP FQDN, which is something like yourdomain-com.mail.protection.outlook.com as shown in the following screenshot (click to enlarge):

EdgeSync-SendConnector

When Edge synchronization has synchronized all information to the Edge Transport server it is possible to test the new configuration. When sending an email from Exchange on-premises to my Gmail account and check the header information after receiving, it is clearly visible that mail flows via the Edge Transport server through Exchange Online Protection to Gmail (click to enlarge):

EOP-headers-2

Note. Do not forget to update your SPF record! If your SPF record is not updated, organizations that do check for SPF (like Gmail) will detect an incorrect IP address or FQDN and possibly reject the message. You can find the correct SPF record in your Office 365 Admin Center (under Setup | Domains) and will look like “v=spf1 include:spf.protection.outlook.com -all

Summary

In the previous two blogposts I showed you how to implement Exchange Online Protection as a message hygiene solution in front of your on-premises Exchange solution. It can be configured for use with an Edge Transport server, but it can also be configured directly from the Mailbox server, or when using a 3rd party SMTP solution in your organization’s perimeter network.

In the next blog I’ll explain more about configuring and customizing Exchange Online Protection.


Exchange 2016 Edge Transport Server and IPv6

I’ve never paid too much attention to IPv6, except for turning it off completely in case of strange issues. And admit it, most of you do the same.

Security is getting more and more important, and as a messaging consultant you want your Exchange environment top notch. In the Dutch community NGN I was pointed to internet.nl where you can check your presence on the Internet. Lots of red crosses when it comes to messaging and IPv6, reason for me to start looking into that.

In this blogpost I will focus on the Exchange 2016 Edge Transport server (I have two for inbound and outbound email) and the Exchange 2016 Mailbox server, which is load balanced behind a Kemp LoadMaster LM3600.

Exchange 2016 Edge Transport server

Although a lot of Exchange admins disable IPv6 on their Exchange servers (through a registry key) in case of strange issues, it is not a recommended solution.

I have two Exchange 2016 Mailbox servers, one Exchange 2013 multi-role server and two Edge Transport servers (one Exchange 2013 and the other Exchange 2016) for inbound and outbound SMTP traffic. There are two MX records which point to these Edge Transport servers. Both have an external IPv4 address.

The first step of course is to add an IPv6 address to the network adapter of the Edge Transport servers, your provider should be able to supply you with a sufficient IP range.

image

This should not result in too much issues. If you want to ping your server on IPv6 make sure that the File and Printer Sharing (Echo request – ICMPv6-In) inbound rule is enabled in Windows Firewall.

The next step is to enable the Edge Transport server for IPv6 usage. The Mailbox server has everything setup by default, but the Edge Transport server is only configured for IPv4.

Continue reading Exchange 2016 Edge Transport Server and IPv6

Cisco IronPort and Exchange 2016

If you have been following my blogs over the years you should be aware that I’ve always been using Exchange Edge Transport servers in front of my Mailbox servers for message hygiene purposes. My last (well known) environment looked like this:

image

There are two Mailbox servers (Exchange 2013 and Exchange 2016) and two Edge Transport servers (also Exchange 2013 and Exchange 2016). MX records point to both Edge Transport servers and there are two Edge Synchronizations. And the Edge Transport servers were capable for DKIM signing (as posted in a previous blogpost), but lacked DKIM verification and DMARC validation.

The most important part in the Edge Transport server is the Real Time Blocklist, configured to use Spamhaus for connection filtering. While this works pretty well (there still is quite some spam that gets delivered into mailboxes) there is always room for improvement. I have been looking at cloud solution, but they didn’t always deliver what was expected.

A couple of my customers are using Cisco Email Security Appliance (previously known as IronPort) solutions on-premises and are happy with it, so time to start testing a Cisco Email Security Appliance (ESA) in my own environment. Continue reading Cisco IronPort and Exchange 2016