Tag Archives: Hybrid Configuration Wizard

Remove Exchange Hybrid Configuration

After decommissioning the Resource Forest I still have an Exchange 2016 environment on-premises, but all my mailboxes are in Office 365. Users are provisioned in Active Directory, Remote Mailboxes are provisioned in Exchange 2016 and everything is synchronized to Office 365 using Azure AD Connect.

Do I still need an Exchange Hybrid Configuration? Unless there are plans to move resources back to Exchange on-premises there’s no need for a Hybrid Configuration. To stay in a supported configuration, an Exchange server on-premises is still needed for management purposes, but only Azure AD Connect is needed and not a full hybrid configuration.

Note. If you want to use the on-premises Exchange server for SMTP relay purposes you don’t need the Hybrid configuration either. Just make sure you have a SMTP Send Connector that points to Exchange Online Protection and you’re good.

Removing the Hybrid configuration consists of the following steps:

  • Disable Autodiscover SCP in Exchange
  • Remove the Hybrid Configuration from Active Directory
  • Remove Connectors in Exchange Online
  • Remove the Organization Sharing from Exchange Online
  • Disable OAuth

Disable Autodiscover SCP in Exchange

When all Exchange resources are in Exchange Online you no longer need the on-premises Service Connection Points (SCP) for Autodiscover. But make sure you have the correct CNAME records for Autodiscover that point to Autodiscover.outlook.com.

To disable the SCP records in Active Directory, execute the following command in Exchange Management Shell:

Get-ClientAccessServer | Set-ClientAccessServer -AutoDiscoverServiceInternalUri $Null

Remove the Hybrid Configuration from Active Directory

Removing the Hybrid Configuration from Active Directory is just one PowerShell command in Exchange Management Shell:

Remove-HybridConfiguration -Confirm:$false

There’s one pitfall here, this will also remove the outbound to Office 365 Send Connector from Exchange. If you want to keep SMTP relay from on-premises to your mailboxes in Exchange Online you have to manually recreate this connector (use yourdomain-com.mail.protection.outlook.com as a smarthost for this)

Remove Connectors in Exchange Online

In the Exchange Online Admin Center, remove the outbound SMTP connectors that point from Exchange Online to your on-premises Exchange organization. If you want to keep SMTP routing, keep the inbound SMTP connector, otherwise you can remove this as well.

Remove the Organization Sharing from Exchange Online
To remove the Hybrid Organization Sharing from Exchange Online navigate to Organization | Sharing in the Exchange Admin Center and remove the organization sharing.

Disable OAuth on-premises

When used before you can disable the OAuth configuration as well from Exchange on-premises and Exchange Online.

In Exchange on-premises Management Shell, execute the following command:

Get-intraOrganizationConnector | Set-IntraOrganizationConnector -Enabled $False

And to do this in Exchange Online Management Shell, execute the following (same) command:

Get-IntraorganizationConnector | Set-IntraOrganizationConnector -Enabled $False

These are the steps needed to remove the Hybrid Configuration from your Exchange environment.

Note. Microsoft recommends to leave the Exchange Hybrid option in Azure AD Connect.

Summary

In this blogpost I explained how to remove the Hybrid Configuration from your Exchange environment after you have moved all resources to Exchange Online.

The on-premises Exchange server is still needed for management purposes. After removing the Hybrid Configuration you can still manage your recipient Exchange Online using the on-premises Exchange server, all changes are replicated through Azure Active Directory.

Is that last Exchange server on-premises still needed? Yes, you need it for managing your recipients in Exchange Online. When you have Azure AD Connect running in your environment, the objects are managed in on-premises Active Directory. The source of authority is Active Directory. As long as Microsoft hasn’t fixed the source of authority problem, an Exchange server on-premises is still needed.

Exchange Resource Forest and Office 365 Part V

Upgrade to Exchange 2016

Two years ago I wrote a number of blogpost regarding an Exchange Resource Forest model and Office 365 starting at Exchange Resource Forest and Office 365 part I. There are four articles, all based on Exchange 2010 and at the end of each article you’ll find a link to the next article. In the more information section at the end of this blogpost you’ll find all links.

Over the years I have received numerous requests on how to continue; moving to Exchange 2016 in a Resource Forest or when all mailboxes are in Exchange Online, decommission the Resource Forest. This is not a problem, but brings a new challenge when it comes to the last Exchange server for management purposes that need to be kept. And yes, this blogpost is the preparation for the ‘decommision the resource forest’ blogpost 😉

I have a few customers running a resource forest environment, and all have this same problem. They must move away from Exchange 2010, either to Exchange 2016 or to Exchange Online (or both). In this blogpost I’ll discuss the upgrade from Exchange 2010 in a Resource Forest to Exchange 2016 (in the same Resource Forest of course) in a hybrid scenario. In one of the next blogs I’ll discuss the way to decommission the Resource Forest in a hybrid scenario.

Note. I did a webinar recently for Kemp on the Upgrading Exchange 2010 topic. It’s a Brighttalk hosted webinar that you can find here The Best Known Methods on Upgrading Microsoft Exchange.

Upgrading Exchange 2010 to Exchange 2016

Upgrading Exchange 2010 in a resource forest is not different then upgrading any other Exchange environment, not even when running this in a hybrid environment. These are the steps that need to be taken:

Design your Exchange 2016 environment (won’t cover that in this blogpost).

  1. Prepare Active Directory for Exchange 2016.
  2. Build your Exchange environment.
  3. Change client access to Exchange 2016.
  4. Run Hybrid Configuration Wizard.
  5. Move Resources to Exchange 2016.
  6. Decommission Exchange 2010.

Prepare Active Directory for Exchange 2016

Before you can install the first Exchange 2016 server, Active Directory needs to be prepared. This is only true for the resource forest, there’s no need to do this at the account forest.

You can prepare the Active Directory schema using the following command:

C:\> Setup.exe /PrepareSchema /IAcceptExchangeServerLicenseTerms

It is possible that the following error message is shown:

A hybrid deployment with Office 365 has been detected. Please ensure that you are running setup with the /TenantOrganizationConfig switch. To use the TenantOrganizationConfig switch you must first connect to your Exchange Online tenant via PowerShell and execute the following command: “Get-OrganizationConfig | Export-Clixml -Path MyTenantOrganizationConfig.XML”. Once the XML file has been generated, run setup with the TenantOrganizationConfig switch as follows “/TenantOrganizationConfig MyTenantOrganizationConfig.XML”.

This issue is covered in a previous blogpost: A hybrid deployment with Office 365 has been detected.

Build your Exchange environment

Exchange 2016 can be installed on Windows Server 2012 R2 and Windows Server 2016, I always recommend the latter because of support lifecycle. Windows Server 2019 and Windows Server Core are not supported for running Exchange 2016.

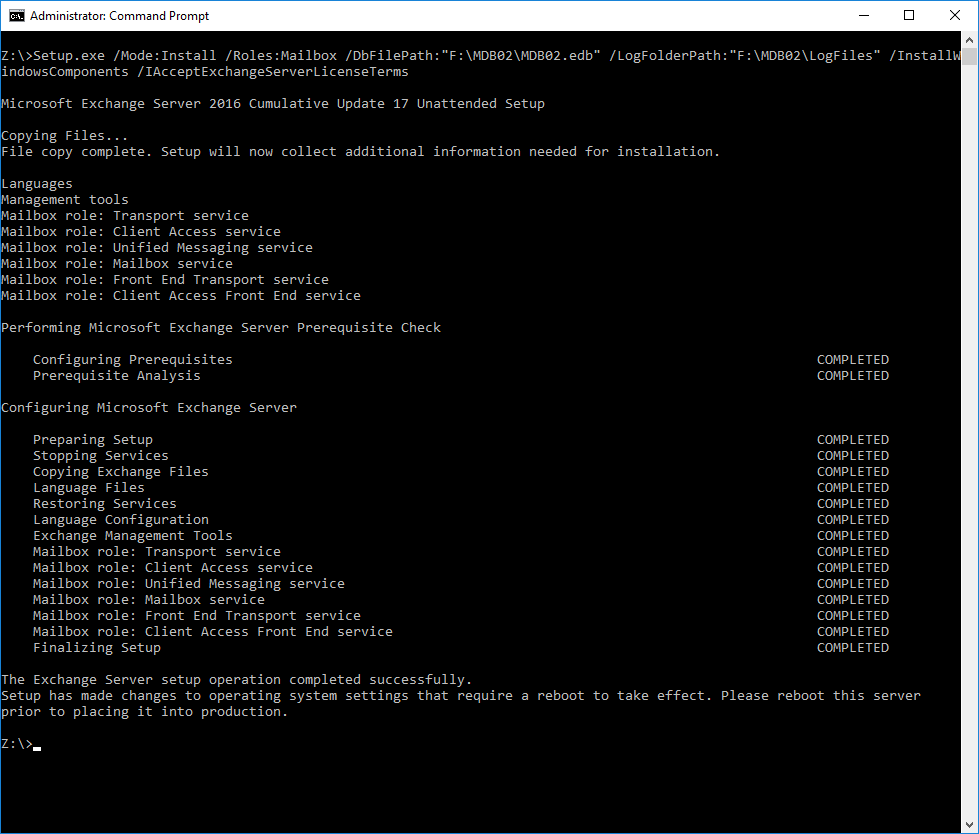
I prefer to install the Exchange 2016 server unattended, especially if you must install multiple servers. You can use a command similar to this:

C:\> Setup.exe /Mode:Install /Roles:Mailbox /DbFilePath:”F:\MDB02\MDB02.edb” /LogFolderPath:”F:\MDB02\LogFiles” /InstallWindowsComponents /IAcceptExchangeServerLicenseTerms

Unattended Setup

After installing the Exchange server, the server should be configured:

  • Virtual Directories; make sure you use the same internalURL and externalURL as the Exchange 2010 servers.
  • SSL Certificates.
  • Storage, Databases and Database Availability Group (when needed of course).
  • Relocate (IIS) logfiles.
  • Send and Receive Connectors (SMTP Relay).

Change client access to Exchange 2016.

When you have configured the Exchange 2016 it is time to test the proxy functionality from Exchange 2016 to Exchange 2010. The easiest way to test this is to edit the HOSTS file for the webmail.contoso.com and Autodiscover.contoso.com entries on a client and point it to the Exchange 2016 server.

hosts file

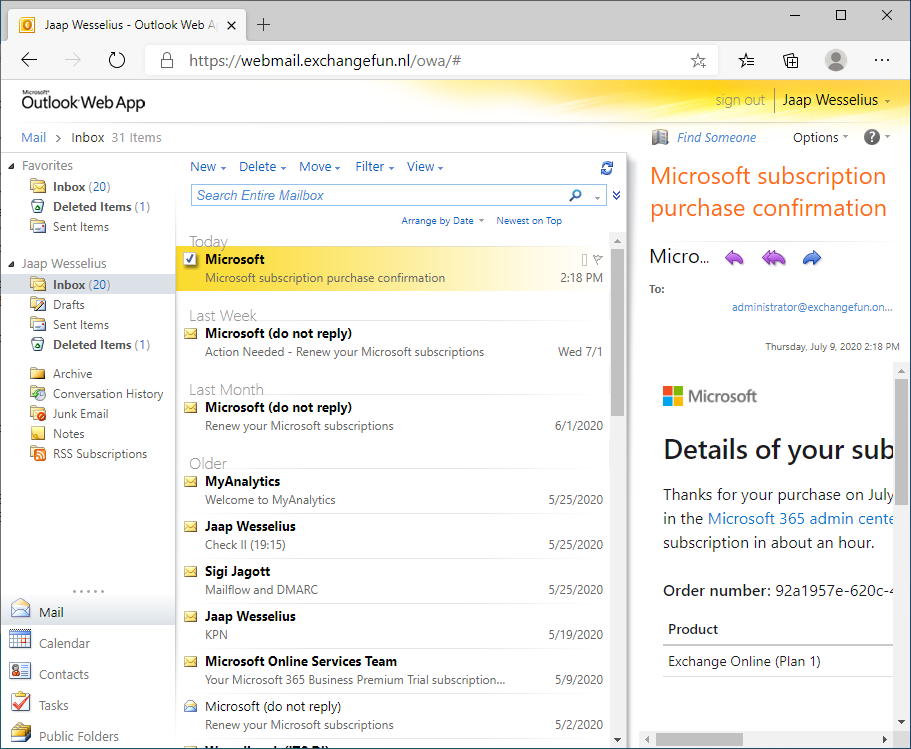
From the client, connect to the new Exchange 2016 server and start OWA with an Exchange 2010 mailbox. You should see the initial blue OWA screen:

Exchange 2016 OWA Login

And after logging on the yellowish Exchange 2010 OWA user interface. It will automatically proxy to the correct Exchange 2010 mailbox server:

Exchange 2010 OWA Login

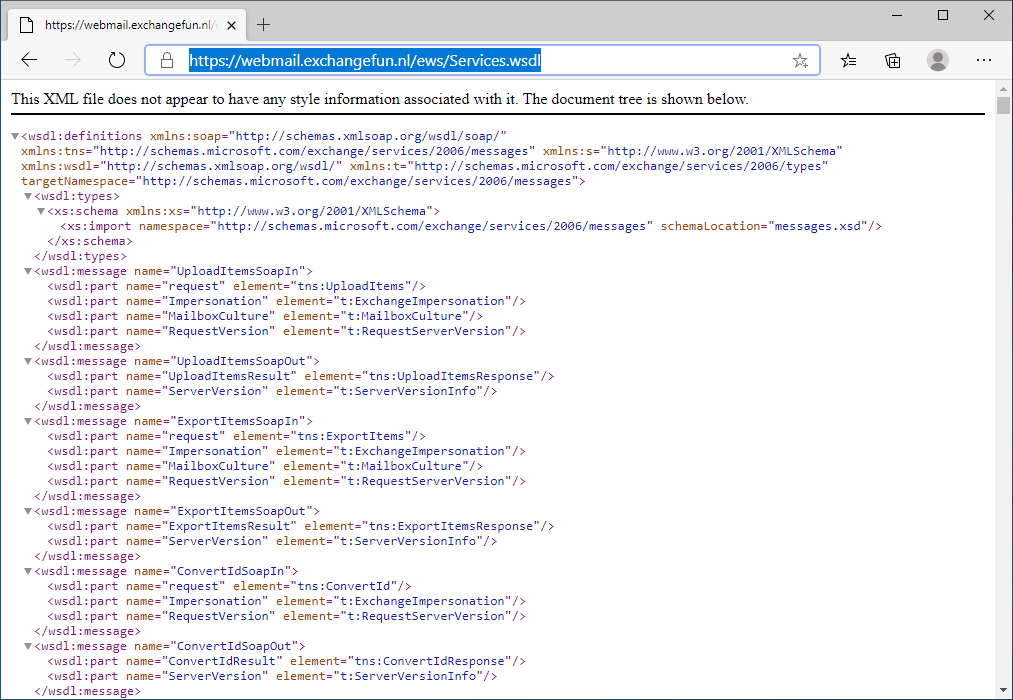
The same should happen when you request the Exchange Web Services page on https://webmail.contoso.com/ews/exchange.asmx, this should also successfully proxy to Exchange 2010:

EWS proxy

One important thing here is that this is a down-level proxy only. This means that when a client does a request to Exchange 2016 for a resource on Exchange 2010 (down-level proxy, like in the previous example) it should work. If a client does a request to Exchange 2010 for a request on Exchange 2016 (i.e. up-level proxy) it fails. This is shown in the following figure, and it does not work.

downlevel uplevel

When all is configured and tested, DNS (internal and external) can be changed so that webmail.contoso.com and Autodiscover.contoso.com point to the new Exchange 2016 server. All clients will now connect to the new Exchange 2016 server and connect to their mailbox on Exchange 2010 without a problem.

One thing you must be aware of is RPC/TCP traffic (the original MAPI connection) between Outlook and Exchange 2010 if you are not running Outlook Anywhere. Outlook will still use RPC/TCP to connect to the CAS Array (this is the RPC Endpoint for Outlook) which is running on the Exchange 2010 servers. You can see that when checking the connection status in Outlook. In the following screenshot, outlook.exchangefun.nl is the CAS Array.

Outlook 2010 Connection Status

There are two entries shown, one is for the regular mailbox, the second is for accessing a shared mailbox on Exchange 2010.

When performing the Test E-mail AutoConfiguration check on Outlook 2010, you can see that RPC Connects to outlook.exchangefun.nl, but that OWA, EWS and OAB want to connect to webmail.exchangefun.nl, which is the Exchange 2016 server now.

Outlook 2010 Test Email AutoConfiguration

So, Outlook connects using RPC to the Exchange 2010 server and using HTTPS to connect to the Exchange 2016 server. From Exchange 2016 the connection is proxied to the correct Exchange 2010 server.

Note. Be aware that if you have configured Kerberos authentication in your Exchange 2010 environment you have to upgrade this to Exchange 2016 as well. This is documented in the Microsoft articles Recommendation: Enabling Kerberos Authentication for MAPI Clients, How to Enable Kerberos Authentication for Accessing Exchange in a Resource Forest andExchange 2013 and Exchange 2010 Coexistence with Kerberos Authentication. For Exchange 2010/2016 coexistence you can follow that last link.

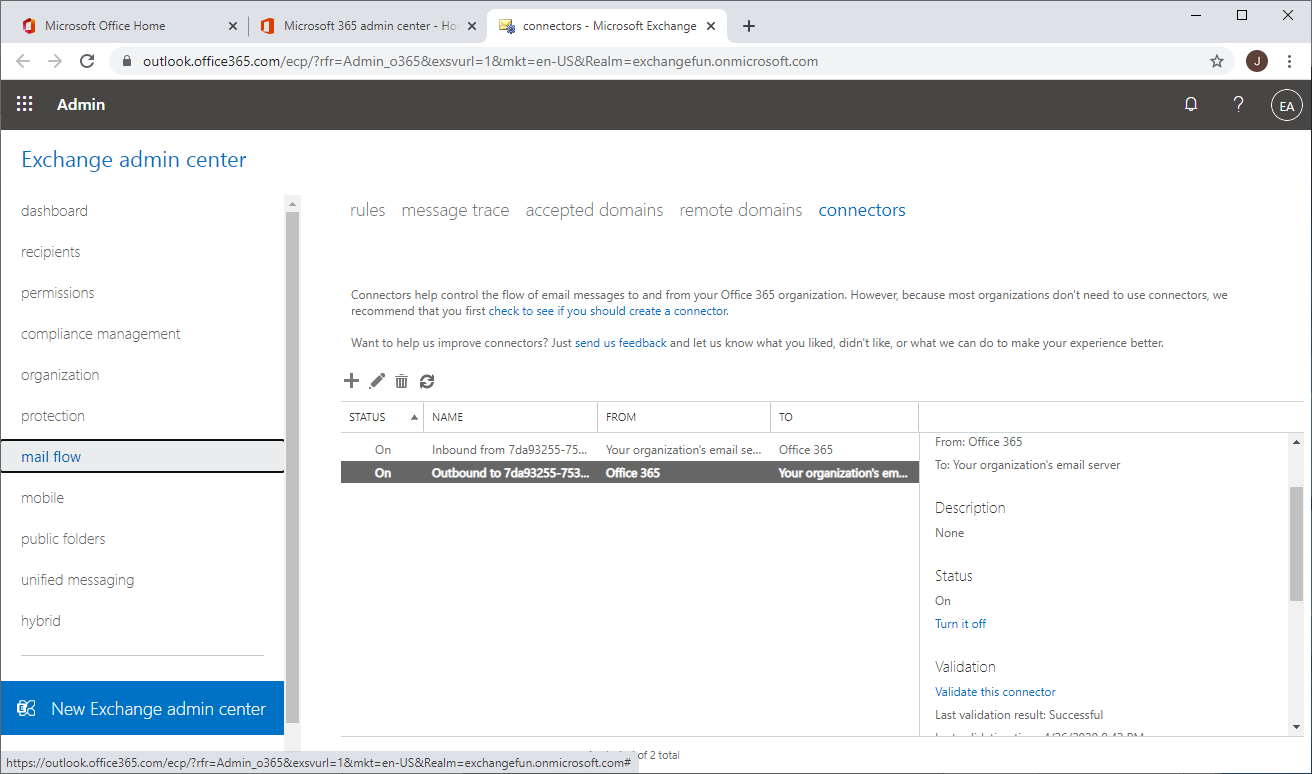
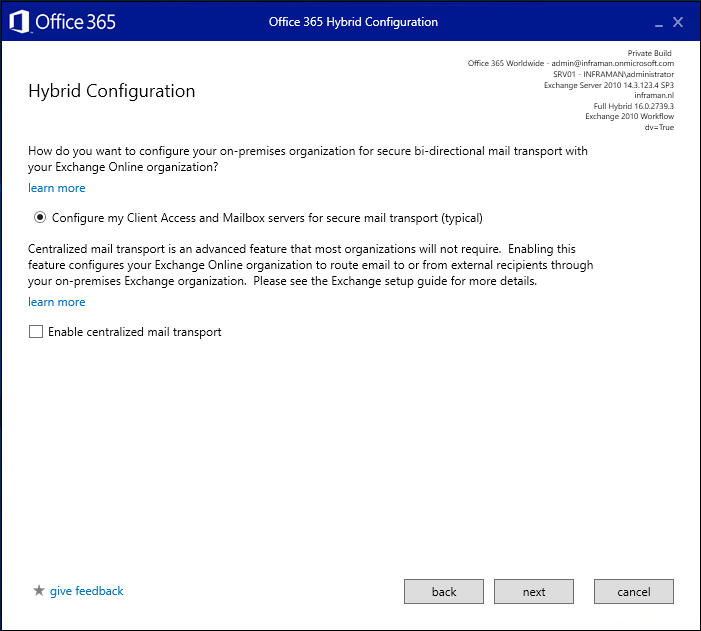
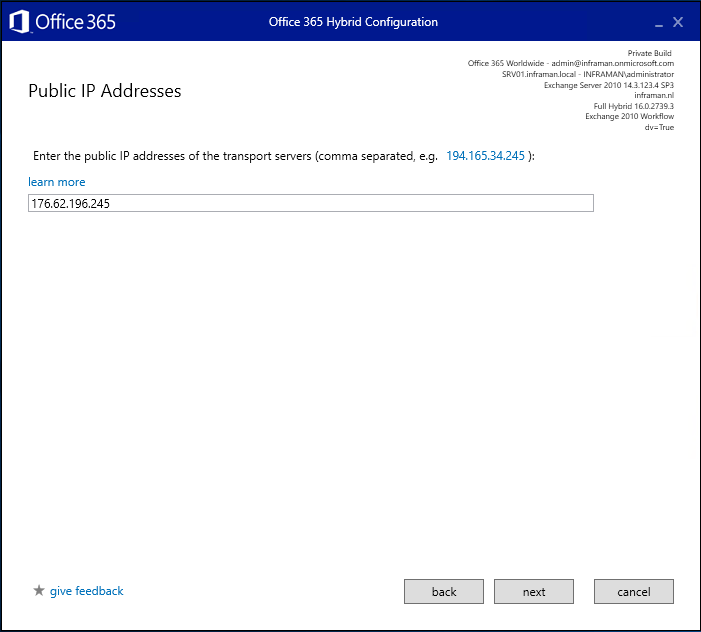
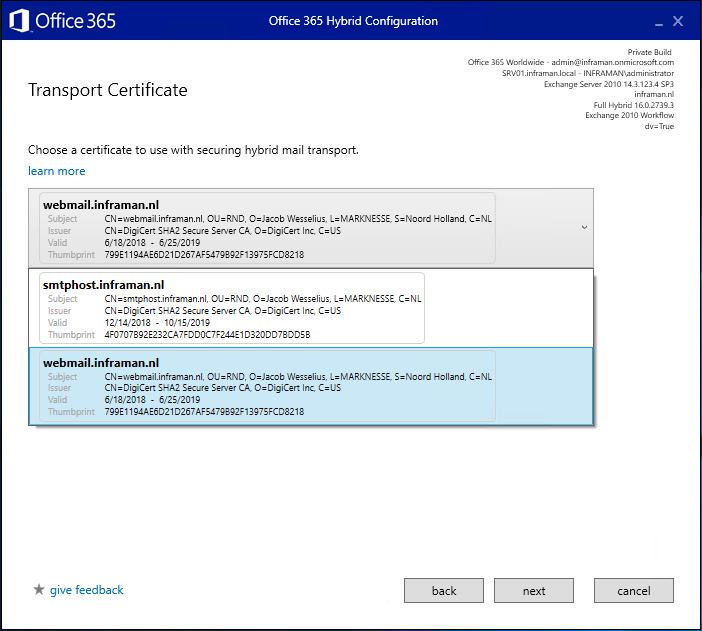
Run the Hybrid Configuration Wizard

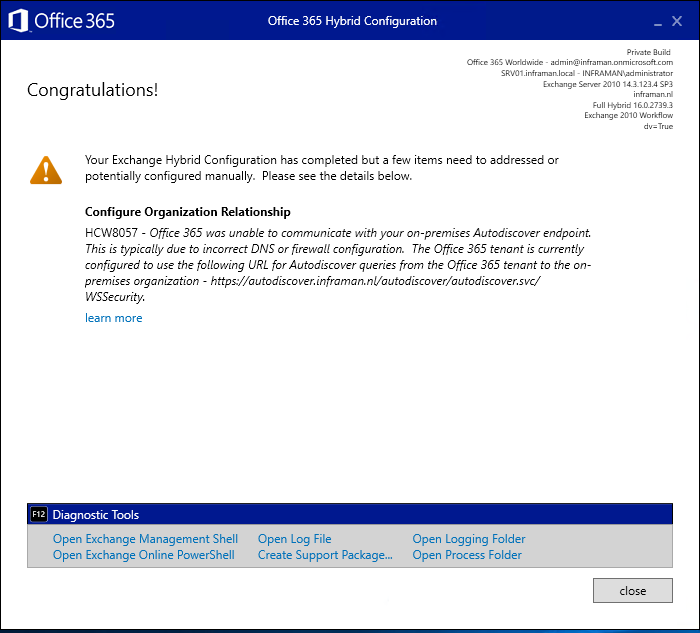
When all is running well it is time to upgrade the Hybrid Configuration by running the HCW on the Exchange 2016 server. You can find the latest version of the HCW on http://aka.ms/hybridwizard.

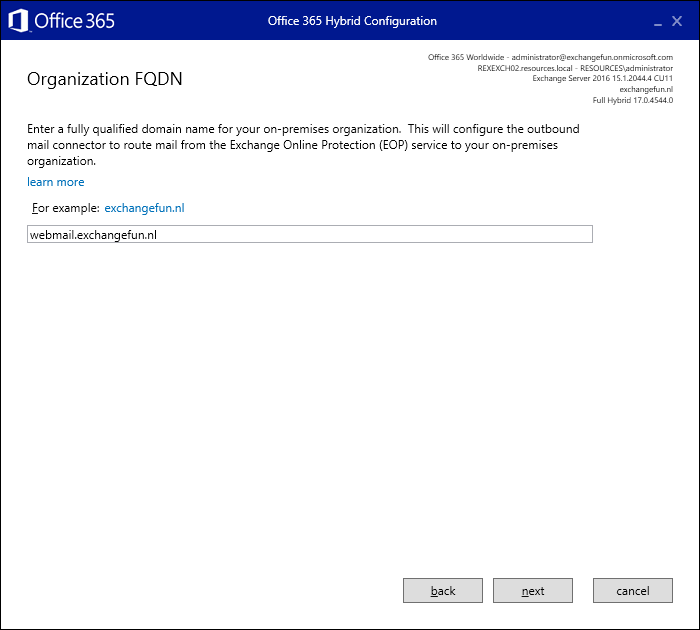
The HCW will detect the optimal Exchange server to configure (which should be automatically the Exchange 2016 server). You should select the Exchange 2016 server for the Receive Connector Configuration and the Send Connector Configuration. For the Organization FQDN I typically use the default FQDN (like webmail.contoso.com) to keep everything consistent. Sometimes I see admins use something like hybrid.contoso.com but that doesn’t bring much, except for more complexity.

HCW Organization FQDN

When reaching the end of the HCW you can select to upgrade the Hybrid Configuration. The original Hybrid Configuration was created on Exchange 2010, but now it is upgrade to Exchange 2016 so I don’t see any reason to not check the checkbox.

HCW Upgrade current configuration

The easiest way to check the new Hybrid Configuration is to see if free/busy works cross-premises. Open a mailbox in Exchange Online and check if you can plan a meeting with a mailbox in Exchange 2010 and check the availability of this mailbox. Baron’s mailbox is in Exchange Online, my mailbox is in Exchange 2010 (still). The free/busy request is sent to webmail.exchangefun.nl which is now the Exchange 2016 server. From there it is proxied to the Exchange 2010, and it works like a charm:

Cross-premises freebusy

To check if cross-premises mail security you can send an email from an online mailbox to an on-premises mailbox. If you check the headers, the SCL should have a value of -1 (which means it is treated as an internal message) and the X-MS-Exchange-CrossTenant-AuthAs should have a value ‘Internal’.

At this moment there is an Account and Resource Forest environment, where the Resource Forest contains an Exchange 2010/2016 coexistence environment. All clients, including Exchange Online connect to Exchange 2016 while recipients are still on Exchange 2010.

Exchange 2010 2016 Coexistence

Move Resources to Exchange 2016

At this moment, mailboxes can be migrated from Exchange 2010 to Exchange 2016. And to be honest, this is not that exciting. It is fully transparent for users. It is an online process, so the mailbox content is copied from Exchange 2010 to Exchange 2016 while the user continues to work. Only when the move is finalized, the user is presented the following message box and needs to restart Outlook.

The Microsoft Exchange Administrator has made a change

Now back to the RPC/TCP (MAPI) part earlier in this post. Exchange 2016 does not support RPC/TCP anymore, so when a mailbox is moved from Exchange 2010 to Exchange 2016, the protocol changes as well. In this case, it changes from RPC/TCP to Mapi/Http for Mailboxes, and to Outlook Anywhere for Public Folders (still on Exchange 2010, but Exchange 2010 does not support Mapi/Http).

Outlook 2010 Connection Status Exchange 2016

Public Folders (if any) must also be moved to Exchange 2016. This can only be done when all mailboxes are moved to Exchange 2016. A mailbox on Exchange 2016 can access Public Folders on Exchange 2010, but a mailbox on Exchange 2010 cannot access Public Folders on Exchange 2016. The Public Folder migration is covered in my previous blogpost Exchange 2010 Public Folder migration, which was also performed on my Exchange resource forest environment.

In an Exchange 2010/2016 coexistence environment there are two Offline Address Books:

  • Default Offline Address Book – used in Exchange 2010
  • Default Offline Address Book (Ex2013) – used in Exchange 2016 (the name was not changed when Exchange 2016 was introduced, not sure if this is a cosmetic bug but it does work correctly).

When configuring the Mailbox databases makes sure the \Default Offline Address Book (Ex2013) is set on the OfflineAddressBook property of the Mailbox database.

One pitfall that always takes more time than expected is the Receive Connector configuration, especially for SMTP relay purposes. Multiple devices (scanners, faxes), printers, applications, access on IP level, lack of documentation etc. Use the Protocol logging features on the various Receive Connectors to figure out what devices or applications are using these Connectors and configure them to use the Exchange 2016 server. But beware, this can take a lot of time ☹

Edge Transport Server

You might have noticed I have an Exchange 2010 Edge Transport server running. This is used for SMTP traffic to and from the Internet. My MX record is pointing to the Edge Transport server, but cross-premises SMTP is delivered directly on the Mailbox server.
When is the best time to upgrade the Edge Transport server to Exchange 2016? There’s no real rule of thumb for this. The Exchange 2010 Edge Transport server works fine with an Exchange 2016 Mailbox server, but the other way around also works fine. I typically upgrade the Edge Transport servers to Exchange 2016 after installing the Mailbox servers, but before moving Mailboxes. But there are much more options when doing this.

Decommissioning Exchange 2010

When all resources have been moved to Exchange 2016 you can decommission the Exchange 2010 environment. This is just a matter of:

  • Decommissioning Mailbox database copies.
  • Decommission the Database Availability Group.
  • Remove Mailbox databases.
  • Remove the Public Folder databases (if not removed earlier).
  • Change/Remove Send and Receive Connectors (also see previous section).

When all prerequisites for the decommissioning process have been met, the actual Exchange 2010 servers can be uninstalled. I still see admins just removing the Exchange VM’s but this is not a good idea since the Exchange configuration continue to exist in Active Directory.

Properly remove the Exchange 2010 server using Control Panel and Uninstall or change a program by deselecting all options as shown in the following screenshot.

Uninstall Exchange 2010

After a few minutes the Exchange 2010 server will be fully installed (the official way).

Summary

In this blogpost I explained how to upgrade Exchange 2010 to Exchange 2016 when running in a resource forest configuration, and in a hybrid configuration. The process is not very different from an upgrade in a ‘normal’ single forest, single domain environment, not even from a hybrid perspective.

The process is simple, upgrade Active Directory, install and configure the servers, change client access to Exchange 2016 and run the Hybrid Configuration Wizard. When done you can move resources to Exchange 2016 and when finished decommission the Exchange 2010 environment.

In part VI of this series I’ll discuss how to decommission a resource forest in a hybrid configuration.

More information

Moving from Exchange 2010 to Office 365 Part III

Exchange 2010 hybrid and Edge Transport Server

In two previous blog posts I explained how to setup an Exchange 2010 hybrid environment. In these blog posts I used the Exchange 2010 (multi-role) server for the hybrid configuration, so both the Exchange Web Services (used for free/busy, Mailbox Replication Service, OOF, mail tips) and the SMTP connection between Exchange Online and Exchange 2010.

Now that Exchange 2010 end of support is getting closer (less than a year!) I get more questions regarding the move from Exchange 2010 to Exchange Online. And several questions include the use of an Exchange 2010 Edge Transport server in front of the Exchange 2010 multi-role server.

This configuration will look something like this:

exchange 2010 hybrid edge transport

Inbound mail from Internet is getting through Exchange Online Protection and when the mailbox is still on Exchange 2010 it is routed via the Edge Transport Server to the internal Exchange organization. Outbound mail is leaving the organization via the Edge Transport server or via Exchange Online Protection, depending of the location of the mailbox.

The challenge when configuring this in Exchange 2010 is shown in the following screenshot:

missing edge transport server

Compared to running the HCW on Exchange 2013 or Exchange 2016 there’s no option to configure the Edge Transport server for secure mail transport in Exchange 2010!!
The only option right now is to run the Hybrid Configuration Wizard, configure it using the Client Access and Mailbox servers option, but use the data for the Edge Transport where needed.

So, run the Hybrid Configuration Wizard, and when you need to enter the public IP address of the transport servers, enter the Public IP address of the Edge Transport server and not the public IP address of the load balancer VIP pointing to the Exchange 2010 internal servers). In my environment, the webmail.inframan.nl points to 176.62.196.253 and the Edge Transport Server smtphost.inframan.nl points to 176.62.196.245. This is the IP address I am going to use as shown in the following screenshot:

hcw public ip address

The next step is to select the certificate that’s used on the Edge Transport Server. By default, the HCW will only look at the internal Exchange 2010 server, so it won’t find any certificate installed on the Edge Transport server. To overcome this, I have imported the certificate of the Edge Transport Server in the certificate store of the internal Exchange 2010 server used by the HCW. In the HWC, click on the drop down box and select the certificate of the Edge Transport server, in my environment the smtphost.inframan.nl certificate:

hcw loading certificates

The last step is where the FQDN of the organization needs to be entered. I have a lot of discussion here because most admins want to enter something like ‘hybrid.domain.com’, but the FQDN of the transport server needs to be entered here, so in my environment this is the FQDN of the Edge Transport Server, i.e. smtphost.inframan.nl. This FQDN is used (together with the certificate information) to create a Send Connector from Exchange Online to the Edge Transport server.

hcw organization fqdn

Finish the Hybrid Configuration Wizard. It will be configured in Exchange 2010 and in Exchange Online and after a short time you can close the HCW:

hcw configure organization relationship

Now, when looking at the Exchange Management Console you can see the Send Connector from Exchange 2010 to Exchange Online. It is configured with the FQDN smtphost.inframan.nl as expected, but the source server of the Send Connector is still the internal Hub Transport server as shown in the following screen shot:

outbound to office 365 connector

Remove the Hub Transport server entry and add the Edge Transport server instead. If you have an Edge Synchronization in place you will see it immediately when you click the Add button.

In Exchange Online, the Receive Connector that’s created will check for any certificate with a wildcard like name, so the smtphost.inframan.nl certificate will automatically be accepted. The Send Connector is also created correctly. The FQDN of the Edge Transport server is used as the server to route message to, and the CN of the certificate that was selected in the HCW is also configured as shown in the following screenshot:

office 365 send connector certificate

We’re almost there. The only thing that needs to be done is to configure the Receive Connector on the Edge Transport Server for TLS from Exchange Online. You should have already configured the Edge Transport Server with the correct 3rd party certificate and when setting up an inbound connection it should use the 3rd party certificate. You can test this using the https://checktls.com tool online.

On the Edge Transport server, execute the following command in the Exchange Management Shell:

Get-ReceiveConnector "smtphost\Default internal receive connector SMTPHOST" | Set-ReceiveConnector -Fqdn smtphost.inframan.nl -TlsDomainCapabilities mail.protection.outlook.com:AcceptOorgProtocol

This will make sure the cross-premises email will be treated as internal email (SCL=-1). If you omit this step, there’s always the risk the email will be treated as external (I’ve seen SCL=5 in my environment) and will end up in the user’s Junk Email Folder.

Summary

When configuring an Exchange 2010 hybrid configuration it is not possible to configure an Edge Transport Server in the Hybrid Configuration Wizard. It is possible to configure this in the HCW for Exchange 2013 and Exchange 2016, but for Exchange 2010 this needs some manual changes.

In this blogpost I showed you the steps needed to configure an Edge Transport Server for secure messaging between Exchange Online and Exchange 2010. When configured this way cross-premises email will be seen as internal email and thus treated accordingly.


The version of the Client Access server selected is not supported

When running the Hybrid Configuration Wizard in an Exchange 2010 environment (I reproduced this with Exchange 2010, but didn’t try this with Exchange 2013 or Exchange 2016) the following error message is generated:

unsupported version

The version of the Client Access server selected, <ServerName>, is not supported. Please go back and select a server that is supported or upgrade the server to a supported version. If Exchange Server 2010, please install the wizard on the same machine.

Note. The HCW is not run on the Exchange 2010 since it requires .NET Framework 4.6.2 and this version of .NET Framework is not supported on Exchange 2010. Even worse, I’ve seen issues with Exchange 2010 after installing .NET Framework 4.6.2 so it’s a bad idea after all.

Running Exchange 2010 on a server with .NET Framework 4.5.x installed is fully supported, but the HCW won’t install on such an Exchange 2010 server since HCW depends on .NET Framework 4.6.2 and the following error message is generated:

unable to install or run this application

So, we are in a deadlock situation. HCW requires .NET Framework 4.6.2 which is not supported on the Exchange server, and when running the HCW on a non-Exchange 2010 server with the correct version of .NET Framework it fails with an error message.

We have been working with Microsoft CSS (product support) on this case. While it should be fixed in the HCW in the first place, under supervision of CSS the following workaround is available.

If you have HCW open and face this error, press F12 and a few other options appear as can be seen in the following screenshot:

HCW Error

If you click Open Logging Folder you get to the folder where the HCW Logs are stored. If you open the correct logfile and search for *ERROR* you can find something similar to:

server error

Obviously the HCW does an incorrect version check (at least when not running on the Exchange 2010 server itself) so it stops. Version checking is something that was built recently into the HCW so Microsoft can check for N-2 version of the implemented Exchange version.

Back to the error message, if you click Open Process Folder a new HCW command prompt is opened on the correct location:

HCW Prompt

Now when you start the Hybrid Configuration Wizard from the Command Prompt you can use the /dv switch (Microsoft.Online.CSE.Hybrid.App.exe /dv) and now the HCW will not do a version check and continue running and finish successfully.

Important note. This was done under the supervision of Microsoft CSS and should not be done by customers directly. If you are running into this issue, please contact Microsoft support to get the right support. Before you know things break beyond repair (and beyond support).

More information

Updated: December 6, 2018


Hybrid Configuration Wizard diagnostics

Life can be so simple sometimes… learned this nice feature at Microsoft Ignite last week… when running the Hybrid Configuration Wizard (HCW) and you press F12, the diagnostics tools becomes available:

hybrid-diagnostics

You can open the individual directories, open the log file itself or create a support package when you have to contact Microsoft support in case of issues. Very nice and useful!

support-package