So far, all my customers had decommissioned Public Folders in the Exchange 2010 timeframe, all migration I did have never included Public Folders, until now. The Exchange 2010 (hybrid) to Exchange 2016 (hybrid) migration included approx. 1000 mailboxes and maybe 100 Public Folders (in only one Public Folder database) but they were real Public Folders with real users using them 😊
Migrating Public Folders looks easy, it’s a matter of gathering information regarding the Public Folders and its permissions, copying that over to a Public Folder database and keeping the contents in sync and when you’re ready finalize the migration. Or in steps:
- Downloading scripts from Microsoft from https://www.microsoft.com/en-us/download/details.aspx?id=38407.
- Preparing the organization for public folder migration.
- Generating CSV files using the Microsoft scripts.
- Creating public folder mailboxes in Exchange 2016 databases.
- Starting the migration, and waiting for initial synchronization to complete.
- Locking the public folders for final migration (this requires an outage, usually of at least an hour, but longer for very large environments).
- Finalize the public folder migration.
- Testing modern public folders, and then unlocking them for access by users (the outage is now over).
I know there are several other blogs available on this topic, but this way I also have my own reference available.
Note. Migrating Public Folders can only be done when all mailboxes are migrated to Exchange 2016. Mailboxes still on Exchange 2010 cannot access Public Folders on Exchange 2016!
Take snapshot of existing Public Folders on Exchange 2010
The first step is to take a snapshot of the existing environment, both the Public Folders, their statistics and permissions. Basic PowerShell and the output is exported to an XML file:
[PS] C:\> Get-PublicFolder -Recurse | Export-CliXML C:\PFMigration\Legacy_PFStructure.xml
[PS] C:\> Get-PublicFolderStatistics | Export-CliXML C:\PFMigration\Legacy_PFStatistics.xml
[PS] C:\> Get-PublicFolder -Recurse | Get-PublicFolderClientPermission | Select-Object Identity,User -ExpandProperty AccessRights | Export-CliXML C:\PFMigration\Legacy_PFPerms.xml
Most customers will run into issues with naming of their Public Folders. Customers tend to use strange characters in the Public Folders names (back slash, forward slash) and these are not supported. Hence, they should be replaced. To retrieve a list of all Public Folders with a back slash or forward slash in their name, you can use the following command:
[PS] C:\> Get-PublicFolderStatistics -ResultSize Unlimited | Where {($_.Name -like “*\*”) -or ($_.Name -like “*/*”) } | Format-List Name, Identity
You can use any tool you like to change the name, depending of the number of Public Folders of course. If you have 300,000 Public Folders you won’t use the Exchange Management Console to changes names of Public Folders (well, I cannot imagine you would).
Check for any previous migration attempts in your Exchange environment:
[PS] C:\> Get-OrganizationConfig | Format-List PublicFoldersLockedforMigration, PublicFolderMigrationComplete
Both values should have a value of False:

You can (should) use the Get-MigrationBatch cmdlet on Exchange 2016 (!) to see if there are any previous migration batches for Public Folders. If there are, delete them using the Remove-MigrationBatch cmdlet before continuing.
Generate the CSV files
The next step is to export the Public Folder statistics using the scripts downloaded from the Microsoft site. This will create a CSV file which is later used to map it to one or more Public Folders mailboxes. Run the following command on the Exchange 2010 server:
[PS] C:\PFScripts> .\Export-PublicFolderStatistics.ps1 C:\PFMigration\PFStatistics.csv

The PublicFolderToMailboxMapGenerator scripts is used to create a mapping file. This maps the output of the previous command to one or more Public Folder mailboxes.
For this, you need to set the maximum size of a Public Folder mailbox. For example, to use a maximum size of 30GB, the value (in bytes) would be 32212254720. So, for a 30GB Public Folder mailbox you can use the following command:
[PS] C:\PFScripts > .\PublicFolderToMailboxMapGenerator.ps1 32212254720 C:\PFMigration\PFStatistics.csv C:\PFMigration\folder-to-mailbox.csv

Create the Public Folder mailboxes in Exchange 2016
The Public Folder database(s) in Exchange 2016 are created using the Create-PublicFolderMailboxesForMigration.ps1 script. This script takes the mapping file that was created in the previous step, and it takes the estimated number of concurrent users. In my environment the number of concurrent users is approx. 900, so the command will be:
[PS] C:\PFScripts> .\Create-PublicFolderMailboxesForMigration.ps1 -FolderMappingCsv C:\PFMigration\folder-to-mailbox.csv -EstimatedNumberOfConcurrentUsers:900
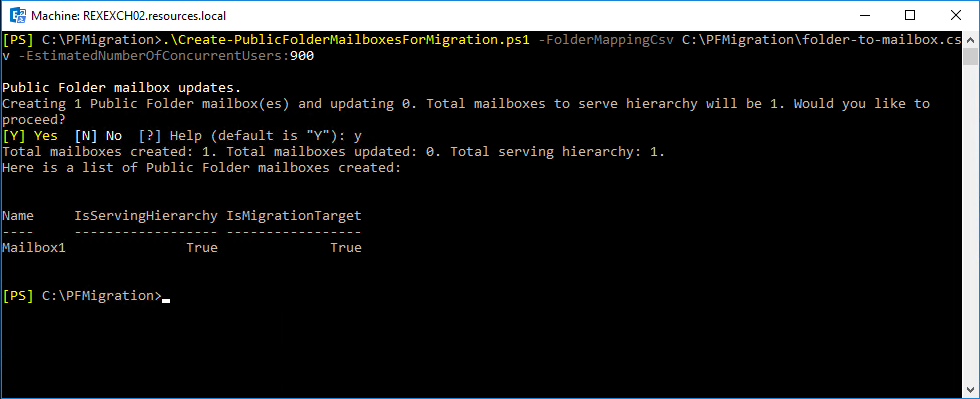
This will create a mailbox called Mailbox1 in a random Exchange 2016 database. If you want to use a specific database, you can edit the Create-PublicFolderMailboxesForMigration.ps1 script and add the -Database parameter to the New-Mailbox command.

Public Folder Migration Batch
At this point everything is in place for the Public Folder migration. The Public Folder database has been created, the Public Folders are created in this Mailbox and the permissions are set. A migration batch can be created using the following command on the Exchange 2016 server:
[PS] C:\PFScripts> New-MigrationBatch -Name PFMigration -SourcePublicFolderDatabase (Get-PublicFolderDatabase -Server ) -CSVData (Get-Content -Encoding Byte) -NotificationEmails
This would translate to something like:
[PS] C:\PFScripts> New-MigrationBatch -Name PFMigration -SourcePublicFolderDatabase PF01 -CSVData (Get-Content “C:\PFMigration\folder-to-mailbox.csv” -Encoding Byte) -NotificationEmails j.wesselius@exchangelabs.nl
Start the migration batch using the Start-MigrationBatch cmdlet:

It is possible to use the Get-PublicFolderMailboxMigrationRequest to get more information regarding the migration from Exchange 2010 to Exchange 2016:

You can see this migration batch in the Exchange Admin Center as well (under Recipients | Migration).

When you click the View Details option, all details regarding the migration, including the number of Public Folders, sizes, performance etc. will be downloaded as a text file.

To get more information regarding the batch you can also use the Get-PublicFolderMailboxMigrationRequest in combination with the Get-PublicFolderMailboxMigrationRequest Statistics command. This also gives a lot of information, and using the Select parameter you can only show the information you’re interested in. For example:
[PS] C:\>PFScripts> Get-PublicFolderMailboxMigrationRequest | Get-PublicFolderMailboxMigrationRequestStatistics | Select StartTimeStamp, CompleteAfter,BytesTransferred, ItemsTransferred, PercentComplete,Message
The ItemsTransferred value can be compared against the ItemsCount value when running Get-PublicFolder -Recurse | Get-PublicFolderStatistics command on the old Exchange 2010 server. This should closely match.
Finalize the Public Folder migration
All users still connect to the old Public Folders in Exchange 2010 and all changes are replicated to the Public Folders in Exchange 2016. The last stop in the migration is finalizing. In this step the Public Folders in Exchange 2010 are closed (users are disconnected) and the remaining contents are synchronized with Exchange 2016.
Be aware that this automatically means downtime for users. I typically recommend finalizing migrations off business hours. Since finalizing Public Folder migration can take quite some time (and this is unpredictable) I recommend starting this on Friday night.
The migration batch is now completed, and the new Public Folders in Exchange 2016 can be tested. Once ok the migration is finalized, and all users can connect to Public Folders in Exchange 2016. This is fully transparent for users, so no need to do anything on the client side.
To lock the Public Folders for migration, change the organization configuration and complete the migration batch, use the following commands:
[PS] C:\PFScripts> Set-OrganizationConfig -PublicFoldersLockedForMigration:$true Set-OrganizationConfig -PublicFoldersEnabled Remote
It can take some time before the previous commands are activated. When not fully active and continue with the Complete-MigrationBatch cmdlet, you will receive an error message stating:
Before finalizing the migration, it is necessary to lock down public folders on the legacy Exchange server (downtime required). Make sure public folder access is locked on the legacy Exchange server and then try to complete the batch again.

You can speed up this process by restarting the Information Store on the Exchange 2010 server (although difficult when running multiple Exchange 2010 servers).
Continue with the following cmdlet to complete the migration batch:
[PS] C:\>PFScripts> Complete-MigrationBatch PFMigration
To test the new Public Folders, you can enable it for a test mailbox using the following command:
[PS] C:\PFScripts> Set-Mailbox -Identity <testuser> -DefaultPublicFolderMailbox <PF Mailbox Identity>
In our environment, the mailbox identity is Mailbox1. You should check for the following:
- View hierarchy
- Check permissions.
- Access content
- Create and delete public folders.
- Post content to and delete content from a public folder.
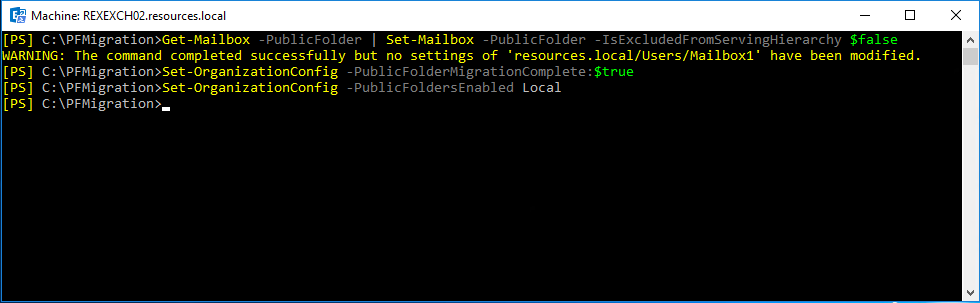
If all is well, you can finalize the migration using the following commands:
[PS] C:\> Get-Mailbox -PublicFolder | Set-Mailbox -PublicFolder -IsExcludedFromServingHierarchy $false
[PS] C:\> Set-OrganizationConfig -PublicFolderMigrationComplete:$true
[PS] C:\> Set-OrganizationConfig -PublicFoldersEnabled Local
Outlook clients will now (seamlessly) connect to the new Public Folder infrastructure on Exchange 2016. Outlook will use Autodiscover to retrieve Public Folder mailbox information, so it can take some time (again) before this is picked up correctly. You can see this when running the Test E-mail Autoconfiguration option in Outlook (2010 in this example):

Summary
When moving from Exchange 2010 to Exchange 2016 you have to move Public Folders too. Starting in Exchange 2013, Microsoft introduced the concept of Modern Public Folders. Migrating to Modern Public Folders is not that difficult, but it needs proper preparation.
In our scenario we had issues with Public Folder names (strange unsupported characters) and Public Folders that were no longer in use. These can be fixed or removed before the actual migration takes place.
Another issue we ran into was that it took a long time before all clients discovered that Public Folders had moved to a new environment. Sometimes up to 48 hours (don’t know why and how). When this happens users cannot open Public Folders and start logging tickets at the Servicedesk. The only thing I could say at that point is “be patient”.
Other than that the migration went smooth, all clients (Outlook 2010 and 2016, mailboxes in Exchange 2016 and Exchange Online) were able to access the Public Folders after the migration.
More information
Last updated: October 22, 2020


You must be logged in to post a comment.