Many customers are running in an Exchange hybrid environment where they have mailboxes in Exchange Online and in Exchange on-premises and a lot of my customers have Exchange 2016 running on-premises. Not a lot of customers still have Public Folders in Exchange on-premises, but they are still there. This blog explains steps to migrate Modern Public Folders from Exchange 2016 to Exchange Online, but this blog is also valid for modern Public Folders in Exchange 2013 and Exchange 2019. If you are still running Exchange 2010 and you want to move your (legacy) Public Folders to Exchange Online, follow the steps in this Microsoft article: Use batch migration to migrate legacy public folders to Microsoft 365 or Office 365.
Note. This is a long read. It has also been a long project, preparations took a couple of weeks, the synchronization a couple of days, roll-back after the first attempt to finalize the migration and start over again with fixing the unexpected issues. When migration Public Folder from Exchange 2016 to Exchange Online, take your time and do it right!
When to migrate your Public Folders to Exchange Online
Public Folder access cross-premises is one-way only. Mailboxes in Exchange Online can access Public Folders in Exchange on-premises, but not the other way around. So, mailboxes in Exchange on-premises cannot access Public Folders in Exchange Online. You should only migrate Public Folder to Exchange Online, after you have migrated all user mailboxes to Exchange Online.
Note. I deliberately say “user mailboxes” in this context, you can still have mailboxes in Exchange on-premises for applications, service accounts, devices etc. that do not need to access Public Folders.
Requirements
The following requirements on-premises need to be met before the migration of Public Folders to Exchange Online can be started:
- Exchange 2016 CU4 or higher (which is a no brainer in my opinion)
- The Exchange administrator needs to be a member of the Organization Management role group (in Exchange Online and in Exchange 2016)
- Public Folders need to be less than 25GB in size
- User mailbox migration need to be finished before Public Folder migration starts
- Migration needs to be executed using Exchange PowerShell. The Public Folder Migration option is not available in the Exchange Admin Center
- All Public Folder data must be migrated in one single migration batch
- Verify if the DefaultPublicFolderAgeLimit is configured on the organization level or if you have any AgeLimit configured for the individual Public Folders, so that automatic deletions of the content is prevented
e domains, the Exchange system objects (like mail-enabled Public Folder objects) can reside in multiple locations since these locations have changed over the years (with different versions of Exchange). Sometimes these object can be found in the root domain, but also in a child domain. If you are using an Active Directory environment with multiple domains, make sure you extend the scope of Powershell using the following command:
[PS] C:\> Set-ADServerSetting -ViewEntireForest $TrueMigration Steps
Migration of Public Folders from Exchange 2016 to Exchange Online consists of the following steps:
- Download the migration scripts
- Prepare for the migration
- Generate the CSV files
- Create Public Folder mailboxes in Exchange Online
- Start Migration Request
- Lockdown Public Folders in Exchange 2016
- Finalize Public Folder migration
- Test and unlock Public Folders in Exchange Online
- Finalize the migration in Exchange 2016
These steps will be discussed in the following sections.
1. Download the migration scripts
Download the premigration or source side validation script from the Microsoft website https://aka.ms/ssv2 (SourceSideValidations.ps1) and the Public Folder migration scripts (https://www.microsoft.com/en-us/download/details.aspx?id=54855). Store the scripts on the Exchange server in the C:\PFScripts directory.
The SourceSideValidations.ps1 script does an inventory of all Public Folders in the Exchange organization and reports any issues that are found and can cause problems during the Public Folders migration.
The results of this script are written in the SourceSideValidations.csv in the PFScripts directory and contains something like this:
| ResultType | Severity | Count | Action |
| TotalItemSize | Error | 2 | Items should be deleted from these folders until the folder size is less than 25 GB. |
| EmptyFolder | Information | 138 | Folders contain no items and have only empty subfolders. These will not cause a migration issue, but they may be pruned if desired. |
| SpecialCharacters | Error | 12 | Folders have characters @, /, or \ in the folder name. These folders should be renamed prior to migrating. The following command can be used: Import-Csv .\ValidationResults.csv | ? ResultType -eq SpecialCharacters | % { $newName = ($_.ResultData -replace “@|/|\”, ” “).Trim() Set-PublicFolder $_.FolderEntryId -Name $newName } |
| OrphanedMPF | Error | 37 | Mail public folders are orphaned. They exist in Active Directory but are not linked to any public folder. Therefore, they should be deleted. After confirming the accuracy of the results, you can delete them manually, or use a command like this to delete them all: Import-Csv .\ValidationResults.csv | ? ResultType -eq OrphanedMPF | % { $folder = <see below> $parent = ([ADSI]”$($folder.Parent)”) $parent.Children.Remove($folder) } |
| OrphanedMPFDuplicate | Error | 3 | Mail public folders point to public folders that point to a different directory object. These should be deleted. Their email addresses may be merged onto the linked object. After confirming the accuracy of the results, you can delete them manually, or use a command like this: Import-Csv .\ValidationResults.csv | ? ResultType -eq OrphanedMPFDuplicate | % { $folder = <see below> $parent = ([ADSI]”$($folder.Parent)”) $parent.Children.Remove($folder) } |
| OrphanedMPFDisconnected | Error | 1 | Mail public folders point to public folders that are mail-disabled. These require manual intervention. Either the directory object should be deleted, or the folder should be mail-enabled, or both. Open the ValidationResults.csv and filter for ResultType of OrphanedMPFDisconnected to identify these folders. The FolderIdentity provides the DN of the mail object. The FolderEntryId provides the EntryId of the folder. |
| Badpermission | Error | 89 | Invalid permissions were found. These can be removed using the RemoveInvalidPermissions switch as follows: .\SourceSideValidations.ps1 -RemoveInvalidPermissions |
Note. In this table in row 4 and row 5 there’s the $folder variable. I was able to add the PowerShell command in there, so here’s the command. Please substitute as needed:
$Folder = ([ADSI]("LDAP://$($_.FolderIdentity)"))Besides reporting the issues, the last column also reports the solutions about how to solve the issues. These are (also) discussed in the next section.
2. Prepare for the migration
The SourceSideValidations.ps1 script is a good starting point as it returns a number of potential issues for the migration and these need to be fixed before you can start the migration:
- The TotalItemSize is easy to fix. Remember that the size is per folder, so if you have a large folder containing for example 40GB of data, you can create 3 subfolders and move 10GB of data in each subfolder. Problem solved 🙂
- The EmptyFolder is informational. You can migrate these to Exchange Online, or decide to remove them before the migration.
- Public Folder names that contain a backslash or a forward slash are not supported in Exchange Online. These are also reported by the SourceSideValidations.ps1 script. To check for Public Folders containing these characters, you can use the following commands in Exchange PowerShell on-premises:
[PS] C:\> Get-PublicFolder -Recurse -ResultSize Unlimited | Where {$_.Name -like "*\*" -or $_.Name -like "*/*"} | Format-List Name, Identity, EntryIdTo remove these illegal characters, you can use the following commands in Exchange PowerShell on-premises:
Import-Csv .\ValidationResults.csv | ? ResultType -eq SpecialCharacters |
% {
  $newName = ($_.ResultData -replace "@|/|\\", " ").Trim()
  Set-PublicFolder $_.FolderEntryId -Name $newName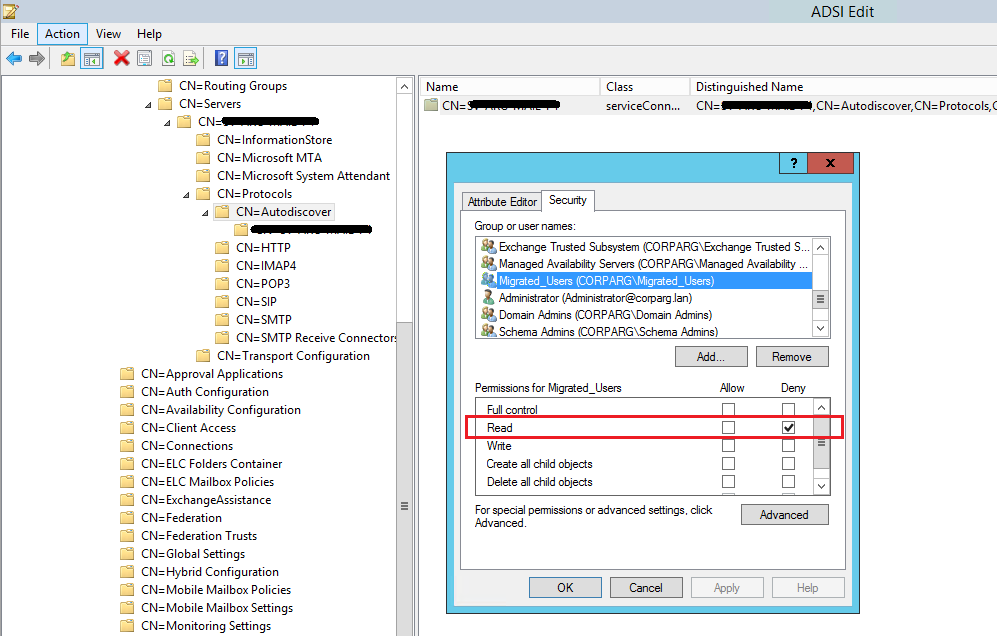
}- Check for orphaned folders, duplicate orphaned folders and disconnected orphaned folders. You can try to mail-disabled the corresponding Public Folder and re-enable the Public Folder again. I have also seen situations where the Exchange object in Active Directory (in the Microsoft Exchange System Objects container) was deleted using ADSI Edit.
- Confirm SMTP Email addresses and Accepted Domains in Exchange on-premises and Exchange Online match. Most likely this is the case since all (user) mailboxes are already migrated, but it can happen that an email address is set on a Public Folder in Exchange 2016 with a domain that’s unknown in Exchange Online (contoso.local for example).
- Also, make sure your public folders are stamped with a Microsoft online email address, like folder@contoso.mail.onmicrosoft.com. This makes life much easier after the migration, when you still have local application trying to send email to public folders.
- Create an Accepted Domain with a well-known name to prevent messages getting lost in the DNS transition period. To do this, execute the following command in Exchange PowerShell on-premises:
[PS] C:\> New-AcceptedDomain -Name PublicFolderDestination_78c0b207_5ad2_4fee_8cb9_f373175b3f99 -DomainName "contoso.mail.onmicrosoft.com" -DomainType InternalRelay- Create a snapshot of the existing Public Folder environment in Exchange 2016. This can be useful when checking if the Public Folder migration was successful. The following four commands will export the Public Folders, the Public Folder Statistics, the Public Folder permissions and the mail-enabled Public Folders. Be aware that this can take a considerable amount of time, depending of the number of Public Folders in your organization.
[PS] C:\> Get-PublicFolder -Recurse -ResultSize Unlimited | Export-CliXML OnPrem_PFStructure.xml
[PS] C:\> Get-PublicFolderStatistics -ResultSize Unlimited | Export-CliXML OnPrem_PFStatistics.xml
[PS] C:\> Get-PublicFolder -Recurse -ResultSize Unlimited | Get-PublicFolderClientPermission | Select-Object Identity,User,AccessRights -ExpandProperty AccessRights | Export-CliXML OnPrem_PFPerms.xml
[PS] C:\> Set-ADServerSettings -ViewEntireForest $True
[PS] C:\> Get-MailPublicFolder -ResultSize Unlimited | Export-CliXML OnPrem_MEPF.xml- In Azure AD Connect there’s the option to synchronize Exchange Mail Public Folders to Azure AD, as shown in the following screenshot:
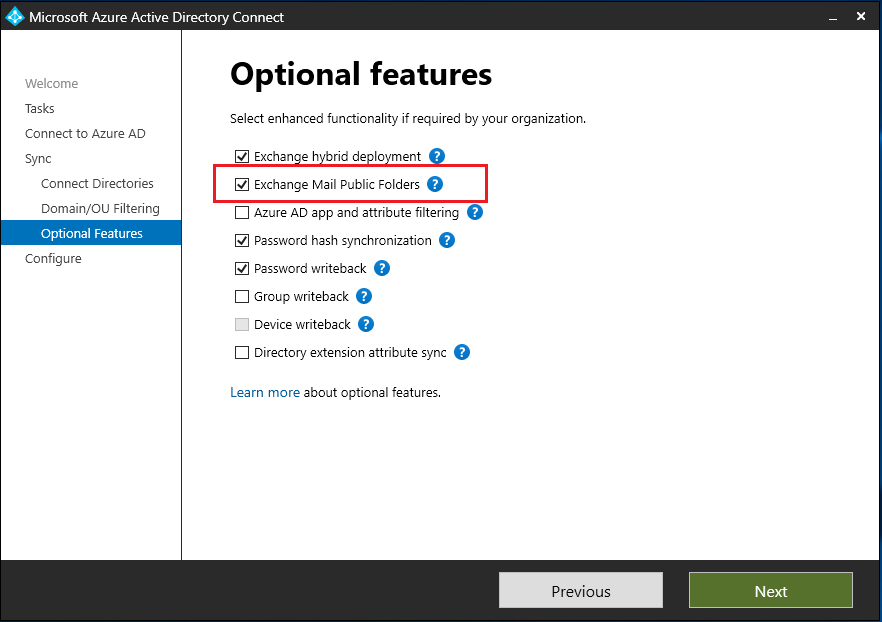
This is used for Directory Based Edge Blocking (DBEB) only so that external mail for Public Folders is not blocked by DBEB. DBEB is automatically available when recipients are in Exchange Online, so there’s no need to synchronize this using Azure AD Connect. Uncheck the Exchange Mail Public Folders in the Optional Features in Azure AD Connect.
Note. When the issues are solved and all prerequisites are met, run the SourceSideValidations.ps1 script again to see if no more issues are returned.
3. Generate .CSV Files
If you have done all the prerequisite step, it’s time to generate the CSV files in preparation of the actual Public Folder migration to Exchange Online.
The first CSV file is the Name-to-Folder size mapping file. This file contains three columns: FolderSize, DeletedItemSize and Foldername. To create this file, execute the Export-ModernPublicFolderStatistics.ps1 script with a filename option, like this:
[PS] C:\PFScripts\> .\Export-ModernPublicFolderStatistics.ps1 On_Prem_Stats.csvThe second CSV is created using the ModernPublicFolderToMailboxMapGenerator.ps1 script. This script creates a mapping between the Public Folders from the previous step to mailboxes in Exchange Online. For input, this script takes the CSV file from the previous step, together with the maximum Public Folder mailbox size and the maximum mailbox recoverable items quota.
The maximum mailbox size by default is 100GB, but it recommended to use 50GB here to anticipate for future growth of the Public Folders in this mailbox. The recommended size for recoverable items quota is 15GB.
The command to execute this script is something like this:
[PS] C:\> PFScripts\ .\ModernPublicFolderToMailboxMapGenerator.ps1 -MailboxSize 50GB -MailboxRecoverableItemSize 15GB -ImportFile On_Prem_Stats.csv -ExportFile PFMapping.csvWhen you look at the output file you will see only two columns: TargetMailbox and FolderPath. The TargetMailbox shows the Public Folder mailboxes that will be created. These Public Folder mailboxes have generic names, like Mailbox1, Mailbox2, Mailbox3 etc. You can change the Public Folder mailbox names in the CSV file into something that’s more suitable for your environment, for example PFMailbox1, PFMailbox2, PFmailbox3 etc.
4. Create Public Folder mailboxes in Exchange Online
When all information has been gathered the Public Folder mailboxes can be created. One Public Folder mailbox will be used for the Public Folder hierarchy (this will be primary mailbox, and the first mailbox in the CSV file that was created earlier) and the others are used for storing the Public Folders contents.
To create the Public Folder mailboxes, use the following commands in Exchange Online (!) PowerShell:
$PFMappings = Import-Csv C:\PFScripts\PFMapping.csv
$PrimaryMailboxName = ($PFMappings | Where-Object FolderPath -eq "\").TargetMailbox
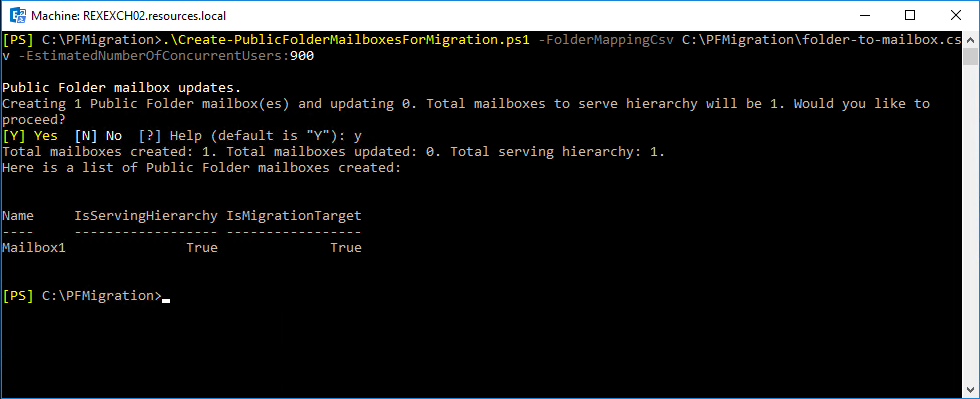
New-Mailbox -HoldForMigration:$True -PublicFolder -IsExcludedFromServingHierarchy:$False $PrimaryMailboxName
($PFMappings | Where-Object TargetMailbox -ne $PrimaryMailboxName).TargetMailbox | Sort-Object -Unique | ForEach-Object { New-Mailbox -PublicFolder -IsExcludedFromServingHierarchy:$False $_}It is possible that some warning messages appear because of AD replication within Exchange Online as can be seen in the following screenshot. Just wait some time and these Public Folder mailboxes will become automatically.

5. Start Migration Request
Before starting the migration request, start the synchronization of mail-enabled public folders to Exchange Online. In my current project I don’t have to do this since this script was already running as part of the hybrid configuration (mailboxes in Exchange Online, Public Folders in Exchange 2016).
But to start this, run the following command:
[PS] C:\PFScripts> .\Sync-ModernMailPublicFolders.ps1 -CsvSummaryFile:sync_summary.csvNote. Be aware that you use the latest version of this script. Older version (prior to June 2022) do not support Modern Authentication and will fail with an Access Denied error. I have blogged about this a couple of months ago: Sync-ModernMailPublicFOlders.ps1 fails with access denied.
It is possible that error messages are shown on the console, and if you have a lot of Public Folders these can also be quite a lot (been there, done that unfortunately), but you can import the sync_summary.csv file into Microsoft Excel for detailed analysis.
To create the migration request, we need the source credential of the PF Administrator, the endpoint where the MRS is running, the GUID of the hierarchy mailbox in Exchange 2016 and the Public Folder mapping file (PFMapping.csv) that was created in the previous step.
Execute the following command in Exchange 2016 PowerShell. Copy the value of $HierarchyGUID to (for example) Notepad since it will be used in the last command where the actual migration batch is created.
[PS] C:\PFScripts> $HierarchyGUID = (Get-OrganizationConfig).RootPublicFolderMailbox.HierarchyMailboxGuid.GUIDExecute the following command in Exchange Online PowerShell:
[PS] C:\PFScripts> $Source_Credential = Get-Credential Contoso\Administrator
[PS] C:\PFScripts> $Source_RemoteServer = "webmail.contoso.com"
[PS] C:\PFScripts> $Mapping = [System.IO.File]::ReadAllBytes('C:\PFScripts\PFMapping.csv')
[PS] C:\PFScripts> $PfEndpoint = New-MigrationEndpoint -PublicFolder -Name PublicFolderEndpoint -RemoteServer $Source_RemoteServer -Credentials $Source_Credential
[PS] C:\PFScripts> New-MigrationBatch -Name PublicFolderMigration -CSVData $Mapping -SourceEndpoint $PfEndpoint.Identity -SourcePfPrimaryMailboxGuid <HierarchyGUID> -NotificationEmails Administrator@contoso.com
As shown in the following screenshot:

Note. Please take some time between creating the Public Folder mailboxes (especially the primary hierarchy mailbox), the New-MigrationEndpoint command will fail if there’s not enough time for internal Exchange Online replication, causing error messages like “mailbox <GUID> cannot be found”.
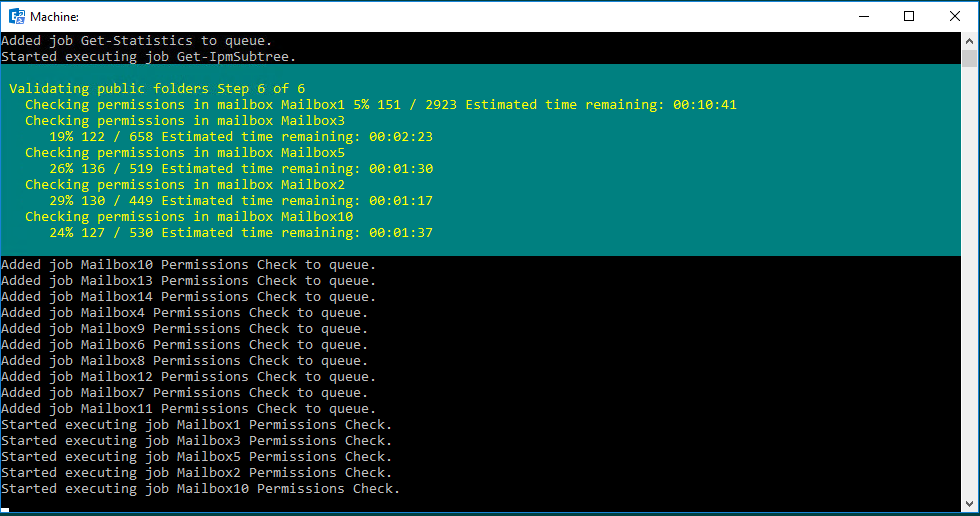
When created you can start the migration request using the following command in Exchange Online Powershell:
[PS] C:\PFScripts> Start-MigrationBatch PublicFolderMigrationWhen the migration batch is started, it will create a number of Public Folder Mailbox Migration Requests, depending on the number of Public Folder Mailboxes. In this example, there are 18 Public Folder mailboxes and 18 individual migration requests will be created as part of the migration batch. It took up to 4 hours before all migration requests were created. Be aware of this because at first you will be thinking that something is wrong 🙂
Use the following commands in Exchange Online PowerShell to monitor the migration batch and the individual migration requests:
[PS] C:\PFScripts> Get-PublicFolderMailboxMigrationRequest
[PS] C:\PFScripts> Get-PublicFolderMailboxMigrationRequestStatistics
[PS] C:\PFScripts> Get-MigrationBatch -Identity PublicFolderMigration
What I personally do for some more details is adding some more options and using the format-table feature, like this:
[PS] C:\PFScripts\> Get-PublicFolderMailboxMigrationRequest | Get-PublicFolderMailboxMigrationRequestStatistics | Select TargetMailbox,Status,StatusDetail,ItemsTransferred,BytesTransferred,BytesTransferredPerMinute,PercentComplete | ft -aIf for some reason you have failed migration requests in your migration batch, you can always run the Start-MigrationBatch -Identity PublicFolderMigration command to resume the batch.
Another interesting issue I had was that the PFMailbox1 that holds the hierarchy, failed synchronization with StatusDetail ‘FailedOther’. When requesting the PublicFolderMailboxMigrationStatistics for this PFMailbox, the following error is returned:
olderMappingFlags: InheritedInclude" could not be mail-enabled. The error is as follows: "No mail public folder was found in Active Directory with OnPremisesObjectId='dd887445-0b0a-447f-a6fc-889cc49ab16c' or LegacyExchangeDN='/CN=Mail Public Folder/CN=Version_1_0/CN=e71f13d1-0178-42a7-8c47-24206de84a77/CN=000000006F0ABC0AC0DF544387022DEA38DAE5840100F33760E70CFA4C489E930054C1EC880900038611485B0000'". This may indicate that mail public folderobjects in Exchange Online are out of sync with your Exchange deployment. You may need to rerun the script Sync-MailPublicFolders.ps1 on your source Exchange server to update mail-enabled public folder objects in Exchange Online Active Directory.Synchronization takes a couple of days (I started on Tuesday and plan to finalize the next weekend) and during that time new mail-enabled Public Folders are created and synchronized.
To bring this back in sync, run the Sync-ModernMailPublicFolders.ps1 script again, wait some time (for replication in Exchange Online) and start the migration batch again.
Remember that up to this point, users can continue to work just like they can when their mailbox is migrated to Exchange Online. Only when the migration request is finalized the Public Folders are not available.
6. Lockdown Public Folders in Exchange 2016
Finalizing the Public Folder migration is not different than when migrating Mailboxes from Exchange 2016 to Exchange Online. When the finalization takes places, users are logged off of the Public Folders, the last content is migrated to Exchange Online and the Public Folder mailboxes in Exchange Online become active. However, they are not automatically available to users, some additional steps (including testing) are needed.
Important to note is that a Public Folder migration finalization can take a lot of time, depending on the number of folders, the number of items (equals data) and if there are corrupt ACLs in the source Public Folders. Microsoft recommends to plan at least 48 hours of downtime during the Public Folder migration finalization.
To check if the Public Folder migration batch is successfully synced (and thus ready to finalize) use the following commands in Exchange Online PowerShell:
[PS] C:\PFScripts> Get-MigrationBatch -Identity PublicFolderMigration | ft *last*sync*
[PS] C:\PFScripts> Get-PublicFolderMailboxMigrationRequest | Get-PublicFolderMailboxMigrationRequestStatistics |ft targetmailbox,*last*sync*
Preferably, the LastSyncedDate on the migration batch and the LastSuccessfulSyncTimestamp on the individual jobs) should be within the last 7 days as can be seen in the following screenshot. If it’s not, check the Public Folder migration requests to see why it is not in sync.

If all is ok, you can lock down the Public Folders in Exchange 2016 by executing the following command in Exchange PowerShell:
[PS] C:\PFScripts> Set-OrganizationConfig -PublicFolderMailboxesLockedForNewConnections $trueAfter (Active Directory) replication you can check if Public Folders do not accept new connections anymore by typing the following command in Exchange PowerShell:
[PS] C:\PFScripts> Get-PublicFolder \It should generate an error message saying “Could not find the public folder mailbox” as shown in the following screenshot:

7. Finalize Public Folder migration
Before finalizing the Public Folder migration you should run the SyncModernPublicFolders.sp1 script again to make sure that newly created Mail-Enabled Public Folder (or better, their email addresses) are synchronized with Exchange Online.
[PS] C:\PFScripts> .\Sync-ModernPublicFolders.ps1 -CsvSummaryFile:Sync_Summary.csvAnd to complete the migration batch:
[PS] C:\PFScripts> Complete-MigrationBatch PublicFolderMigrationMigrationbatch status will change from Synced to Completing. This can take a tremendous amount of time; Microsoft recommendation is to take 48 hours into account for this. In my scenario, there are 18 Public Folder mailboxes that are sync. The on-premises Public Folders were closed around 10PM on Friday night, but after twelve hours all Public Folder Mailbox Requests still had a status of ‘synced’. But when requesting the details of the migration batch (Get-MigrationBatch | fl) the TriggeredAction property of the migration batch was set to SyncAndComplete. Microsoft also says that it can take up to 24 hours before the status of the migration batch and the corresponding migration requests change from ‘synced’ to ‘Completing’. In the meantime, you can only wait, and check back every few hours. Eventually the migrationbatch status will change to Completed.
When the migration batch is completed you can test the Public Folders in Exchange. To do this, configure a user account with the default Public Folder mailbox in Exchange Online, using the following command in Exchange Online PowerShell:
[PS] C:\PFScripts> Set-Mailbox -Identity <user> -DefaultPublicFolderMailbox PFMailbox1The default Public Folder mailbox is the first PF mailbox (holding the hierarchy) that was created in a previous step using the ModernPublicFolderToMailboxMapGenerator.ps1 script.
Make sure you can see the PF hierarchy, check the permissions, create some Public Folders (and delete them) and post some content into Public Folders (both direct as via email). In our first attempt, permissions failed and we had to roll-back the migration. It took over 6 weeks before we could do a second attempt (ok, I have to admit, it was holiday time, but still….).
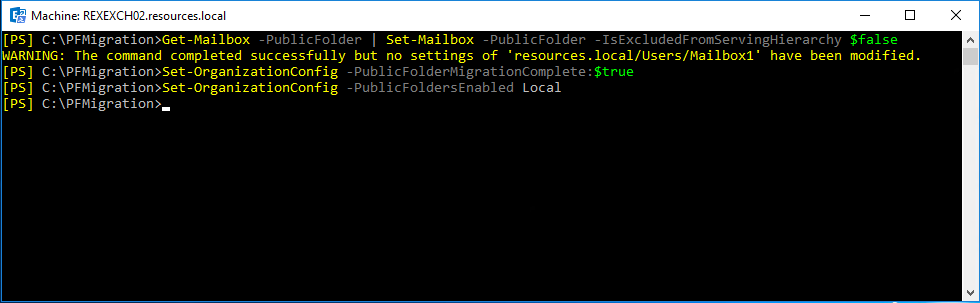
When tested successfully, change the Public Folders for all users. This is an organizational setting and can be changed using the following command in Exchange Online PowerShell:
[PS] C:\PFScripts> Set-OrganizationConfig -RemotePublicFolderMailboxes $Null -PublicFoldersEnabled LocalIt is possible that SMTP message are stuck in SMTP Queues on the Exchange 2016 servers during the migration. To redirect these stuck messages run the following command on your Exchange 2016 server:
[PS] C:\PFScripts> $Server=Get-TransportService;ForEach ($t in $server) {Get-Message -Server $t -ResultSize Unlimited| ?{$_.Recipients -like "*PF.InTransit*"} | ForEach-Object {Suspend-Message $_.Identity -Confirm:$False; $Temp="C:\ExportFolder\"+$_.InternetMessageID+".eml"; $Temp=$Temp.Replace("<","_"); $Temp=$Temp.Replace(">","_"); Export-Message $_.Identity | AssembleMessage -Path $Temp;Resume-message $_.Identity -Confirm:$false}}To stamp Mail-Enabled Public Folder objects in Active Directory with an external email address in Exchange Online (i.e. @contoso.mail.onmicrosoft.com) execute the following PowerShell script in Exchange 2016:
[PS] C:\PFScripts> .\SetMailPublicFolderExternalAddress.ps1 -ExecutionSummaryFile:mepf_summary.csvAnd the ultimate last step, set the Public Folders in Exchange 2016 to ‘remote’. This is an organizational settings and can be configured by executing the following command in Exchange 2016:
[PS] C:\PFScripts> Set-OrganizationConfig -PublicFolderMailboxesMigrationComplete:$true -PublicFoldersEnabled Remote8. Remove Public Folder Mailboxes
After some time, if you are 100% sure you are not going to roll-back your Public Folder migration, the Public Folder Mailboxes in Exchange 2016 can be removed. Remember, this step is irreversible!
Roll-back Public Folder migration
If for some reason you must roll-back the migration you must execute the PowerShell commands in a reverse order. Be aware that if you roll back the migration after you finalized the migration, you will lose all mail delivered to the Public Folders in Exchange Online (unless you manually copy all new items to a location in a mailbox, which is practically impossible of course).
The first step is to unlock the Public Folder migration in Exchange 2016 by using the following command:
[PS] C:\> Set-OrganizationConfig -PublicFoldersLockedForMigration:$FalseDelete all Public Folder mailboxes in Exchange Online using the following Powershell commands:
PS] C:\> $hierarchyMailboxGuid = $(Get-OrganizationConfig).RootPublicFolderMailbox.HierarchyMailboxGuid
[PS] C:\> Get-Mailbox -PublicFolder:$true | Where-Object {$_.ExchangeGuid -ne $hierarchyMailboxGuid} | Remove-Mailbox -PublicFolder -Confirm:$false -Force
[PS] C:\> Get-Mailbox -PublicFolder:$true | Where-Object {$_.ExchangeGuid -eq $hierarchyMailboxGuid} | Remove-Mailbox -PublicFolder -Confirm:$false -Force
If you run into issues with this, check one of my previous blogs Multiple Mailbox users match identity “Mailbox1” (which I ran into after a roll-back and a 2nd migration attempt).
The last step is to undo the migration completion in the organization config of Exchange 2016 using the following command:
[PS] C:\> Set-OrganizationConfig -PublicFolderMigrationComplete:$FalseYou should now be able to continue to work with the Public Folders in Exchange 2016.
Send-As and Send-on-Behalf permissions
A common pitfall is that Send-As and Send-on-Behalf permissions are not migrated to Exchange Online. If you are using these permissions you have to identify the Public Folders that have these permissions applied using the following commands:
[PS] C:\> Get-MailPublicFolder | Get-ADPermission | ?{$_.ExtendedRights -like "*Send-As*"}
[PS] C:\> Get-MailPublicFolder | ?{$_.GrantSendOnBehalfTo -ne "$null"} | Format-Table name,GrantSendOnBehalfTo
To grant these permissions in Exchange Online, use the following example commands in Exchange Online PowerShell:
[PS] C:\> Add-RecipientPermission -Identity <Public Folder> -Trustee <User> -AccessRights SendAs
[PS] C:\> Set-MailPublicFolder -Identity <Public Folder> -GrantSendOnBehalfTo <User>
Most likely you will have tons of Public Folders with these permissions, to you must first export to a CSV file, following with an import of the CSV file and assigning permissions in Exchange Online.
Allow anonymous users to send email to a mail-enabled Public Folder
I did not run into this after the migration to Exchange Online, but it might be possible that you lose the anonymous user permissions to send mail to a public folder after the migration. To make sure anonymous users can send email to a Public Folder, use the following command in Exchange Online PowerShell:
[PS] C:\> Add-PublicFolderClientPermission -Identity "\publicfoldername" -User "Anonymous" -AccessRights CreateItemsSummary
In this blog I tried to write down my experiences with a recent Public Folder migration from Exchange 2016 to Exchange Online. Depending on your Public Folder infrastructure this can take a considerable amount of time. And even if you have everything right, there still is the possibility that something goes wrong and you have to start all over again.
Although after the migration the Public Folder infrastructure is Microsoft’s problem and you only have the service available, I still recommend not migrate your Public Folders to Exchange Online and look for a different solution like Microsoft 365 Groups, Shared Mailboxes or Microsoft Teams. That’s the better solution, and at least it’s more future proof than Public Folders.


You must be logged in to post a comment.