When installing an Exchange 2019 Edge Transport server on Windows 2019 Server core I realized there’s no disk management MMC snap-in, so all disk configuration needs to be done using PowerShell.
For this blogpost I added a 20GB disk to my Windows 2019 Server Core server which I want to use as a D:\ drive for my SMTP queue.
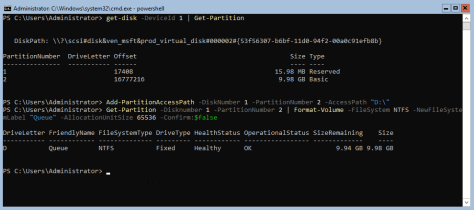
You can use the Get-Disk command to retrieve the server’s disk configuration, and you can pipe this disk object into the Initialize-Disk command to bring it online and assign a new partition:
Get-Disk –Number 1 | Initialize-Disk –PartitionStyle GPT New-Partition –DiskNumber 1 –UseMaximumSize

By default, Windows installs on drive C:\ and the DVD is mounted as drive D:\. You can use the Get-WmiObject and the Set-WmiInstance commands to assign it a different drive letter, for example drive Z:\
Get-WmiObject -Class Win32_volume -Filter ‘DriveType=5′ | Select -First 1 | Set-WmiInstance -Arguments @{DriveLetter=’Z:’}
The next step is to assign drive letter D:\ to the newly added disk:
Add-PartitionAccessPath -DiskNumber 1 -PartitionNumber 2 –AccessPath “D:\”
And finally format it using NTFS file system and a block size of 64KB:
Get-Partition –Disknumber 1 –PartitionNumber 2 | Format-Volume –FileSystem NTFS –NewFileSystemLabel “Queue” -AllocationUnitSize 65536 –Confirm:$false
Now you can continue with the standard installation procedure for an Exchange 2019 Edge Transport server (which does not differ from an Exchange 2013 or Exchange 2016 Edge Transport server)
