As long as I can remember the Hybrid Configuration Wizard finishes successfully, and itgenerates the error about the OAuth portion of the hybrid configuration.
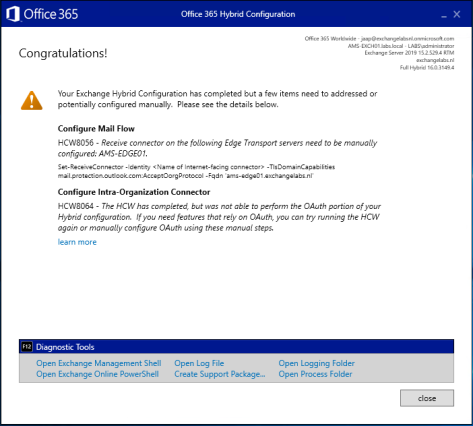
HCW8064 – The HCW has completed, but was not able to perform the OAuth portion of your Hybrid configuration. If you need features that rely on OAuth, you can try running the HCW again or manually configure OAuth using these manual steps.
The Learn more option redirects to the Microsoft page Configure OAuth authentication between Exchange and Exchange Online organizations. I used that article for the PowerShell commands in this blogpost.
OAuth is used cross-premises to logon to other services, on behalf of the user. So, if you are logged on to some Microsoft service, this service can use OAuth to access services in Exchange on-premises and vice versa.
Example of these cross-premises services are:
- Message Records Management (MRM).
- Exchange in-place eDiscovery.
- Exchange in-place Archiving.
- Teams calendaring.
The HCW can configure Azure Active Directory for OAuth authentication, it can create the IntraOrganizationConnectors, but it cannot export and import the (self-signed) certificate on the Exchange server, nor can it (or does it) create the authorization server objects in Active Directory. So, time to test, guided by the Microsoft article and write down my experiences.
Note. This only works for Exchange 2013 and higher, I have been working on this in a mixed Exchange 2016 and Exchange 2019 environment.
Configuring OAuth between Office 365 and Exchange Online involve a number of steps.
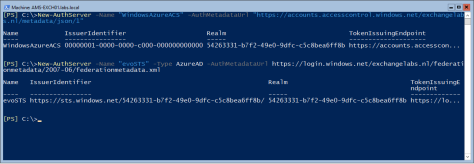
Create Authorization server objects in Exchange on-premises
To create the authorization server objects in your on-premises environment enter the following commands in the Exchange Management Shell.
New-AuthServer -Name "WindowsAzureACS" -AuthMetadataUrl "https://accounts.accesscontrol.windows.net/contoso.com/metadata/json/1"
New-AuthServer -Name "evoSTS" -Type AzureAD -AuthMetadataUrl https://login.windows.net/contoso.com/federationmetadata/2007-06/federationmetadata.xml
Your verified domain contoso.com (in the command) should be something like exchangelabs.nl, and not <your tenant name> as outlined in the Microsoft article.
Enable the partner application for use with Exchange Online
The partner application was created in the previous step (the first command) and this should be enabled. Do this using the following command in Exchange Management Shell (on-premises):
Get-PartnerApplication | ?{$_.ApplicationIdentifier -eq "00000002-0000-0ff1-ce00-000000000000" -and $_.Realm -eq ""} | Set-PartnerApplication -Enabled $true
Export the Exchange authorization certificate
Authentication cross-premises is using certificates, so the on-premises certificate needs to be exported to Azure Active Directory. In case you were wondering where the CN=Microsoft Exchange Server Auth Certificate certificate was coming from when running the Get-ExchangeCertificate command in Exchange Management Shell, here you go.
Use the following PowerShell commands and store them in a PowerShell script called ExportAuthCert.ps1 or something and run it. This should export the OAuth certificate to a file called OAuthCert.cer.
$ThumbPrint = (Get-AuthConfig).CurrentCertificateThumbprint
If((Test-Path $ENV:SYSTEMDRIVE\OAuthConfig) -eq $false)
{
md $ENV:SYSTEMDRIVE\OAuthConfig
}
CD $ENV:SYSTEMDRIVE\OAuthConfig
$oAuthCert = (dir Cert:\LocalMachine\My) | ?{$_.ThumbPrint -Match $ThumbPrint}
$CertType = [System.Security.Cryptography.X509Certificates.X509ContentType]::Cert
$CertBytes = $oAuthCert.Export($CertType)
$CertFile = "$env:SYSTEMDRIVE\OAuthConfig\OAuthCert.cer"
[System.IO.File]::WriteAllBytes($CertFile, $CertBytes)

Note. The Export-ExchangeCertificate command doesn’t work in this scenario since the self-signed certificate isn’t exportable.
Import the Exchange authorization certificate into Azure AD
The next step is to import the OAuthCert.cer certificate into Azure AD. Connect to the Microsoft Online service (Connect-MSOLService, if you don’t have this installed you can use the Install-Module MSOnline command) and run the following commands when connected:
$Cred = Get-Credential
Connect-MSOLService -Credential $Cred
$CertFile = "$ENV:SYSTEMDRIVE\OAuthConfig\OAuthCert.cer"
$objFSO = New-Object -ComObject Scripting.FileSystemObject
$CertFile = $objFSO.GetAbsolutePathName($CertFile)
$CER = New-Object System.Security.Cryptography.X509Certificates.X509Certificate
$CER.Import($CertFile)
$binCert = $cer.GetRawCertData()
$CredValue = [System.Convert]::ToBase64String($binCert)
$ServiceName = "00000002-0000-0ff1-ce00-000000000000"
$P = Get-MsolServicePrincipal -ServicePrincipalName $ServiceName
New-MsolServicePrincipalCredential -AppPrincipalId $P.AppPrincipalId -Type asymmetric -Usage Verify -Value $credValue
This will import the self-signed certificate from the Exchange server into Azure AD so it can be used for mutual authentication.
I did not run the commands mentioned above on my Exchange server but on my Azure AD Connect server since the MSOL module was loaded on that server. For importing the certificate file I had to use the following command accessing the certificate file (instead of the $ENV:System variable):
$CertFile = "\\AMS-EXCH01\C$\OAuthConfig\OAuthCert.cer"
Register endpoints in Azure Active Directory
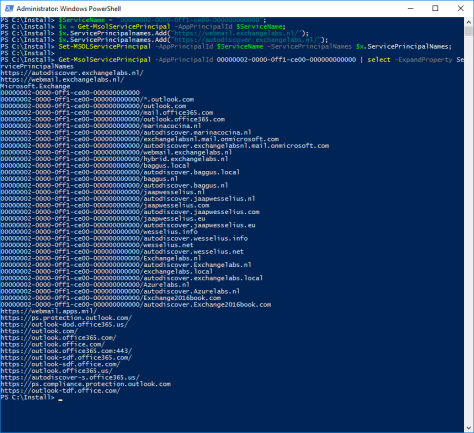
The last step is to register the endpoints of your on-premises Exchange environment into Azure Active Directory. You can use the following commands to register the endpoints:
$ServiceName = "00000002-0000-0ff1-ce00-000000000000";
$x = Get-MsolServicePrincipal -AppPrincipalId $ServiceName;
$x.ServicePrincipalnames.Add("https://webmail.exchangeserver.com/");
$x.ServicePrincipalnames.Add("https://autodiscover.exchangeserver.com/");
Set-MSOLServicePrincipal -AppPrincipalId $ServiceName -ServicePrincipalNames $x.ServicePrincipalNames;
Instead of webmail.exchangeserver.com and Autodiscover.exchangeserver.com you must use your own local FQDNs of the Exchange server (shown below in the verification screenshot).
You can use the the following command to check if this was configured correctly.
Get-MsolServicePrincipal -AppPrincipalId 00000002-0000-0ff1-ce00-000000000000 | select -ExpandProperty ServicePrincipalNames
As shown in the following screenshot:
Note. Over the years I have run the HCW several times. Domains have been added, but not (automatically) deleted in Azure Active Directory.
IntraOrganizationConnectors and AvailabilityAddressSpace
The Hybrid Configuration Wizard created the IntraOrganizationConnectors (both in Exchange 2016 as well as Exchange Online) and configured the AvailabilityAddressSpace. There’s no need to create these, but you have to check them using the Get-IntraOrganizationConnector and the Get-AvailabilityAddressSpace commands)
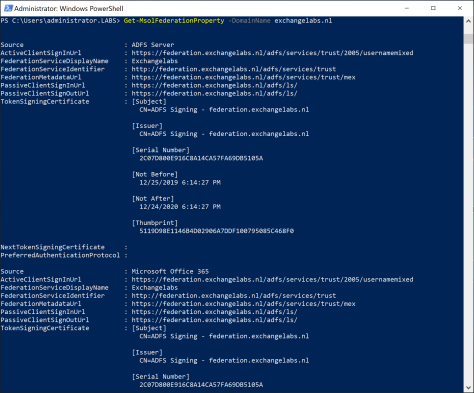
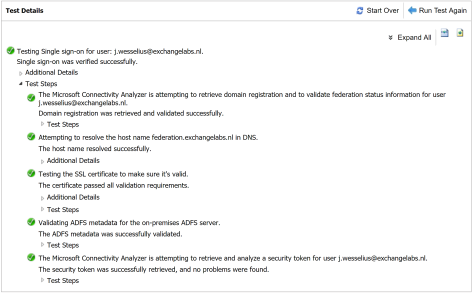
Verify the OAuth configuration
To verify the OAuth configuration you can use the Test-OAuthConnectivity command. You must do this on the on-premises Exchange server and in Exchange Online.
On the on-premises Exchange server use the Exchange Online Uri and a mailbox on-premises:
Test-OAuthConnectivity -Service EWS -TargetUri https://outlook.office365.com/ews/exchange.asmx -Mailbox onprem-user@exchangeserver.com -Verbose | Format-List
In Exchange Online, use the Exchange on-premises Uri with a mailbox in Exchange Online:
Test-OAuthConnectivity -Service EWS -TargetUri https://webmail.exchangeserver.com/metadata/json/1 -Mailbox Online-User@exchangeserver.com -Verbose | Format-List
The output is an extended list, but in the end you should see ResultType: Success and IsValid:True on your console:
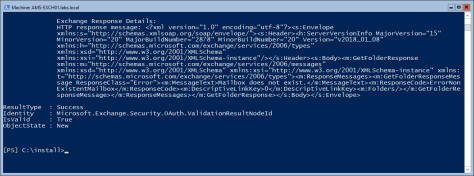
You have now configured the OAuth between Exchange Online and Exchange On-Premises.


You must be logged in to post a comment.