Tag Archives: MFA

How to change MFA method for your Office 365 account

This might look like an easy blogpost (actually, it is) but every time I’m struggling with this, so I decided to write it down.

My default MFA authentication method was a text message (SMS) on my phone. This works fine, but it is not always easy to work with, especially not when using the native mail app on a mobile device. So, to change it, logon to OWA or the Microsoft Portal, click the initials in the upper right corner and click View account:

You can also navigate to https://myaccount.microsoft.com to get here directly. In the overview page click on Security Info to see the MFA methods available. To add a new method, click +Add Method.

In the pop-up window, select another method, for example the authenticator app and click Add. The first step is of course to download the authenticator app on your device, if it’s already installed click Next.

In the Setup your account pop-up box click next and a QR code will appear on your screen:

In the authenticatorapp, click the + icon in the upper right corner, select your account type and select Scan QR code. Approve the sign-in on your device, the security info will show Notification approved and you’re good to go.

The last step you have to do is to change the default sign-in method on the security info page by clicking Change next to Default sign-in method.

New Exchange Online PowerShell v2

When using PowerShell with Exchange Online you can use the ‘good old traditional’ way to connect to Exchange Online:

$ExCred = Get-Credential 
$Session = New-PSSession -ConfigurationName Microsoft.Exchange -ConnectionUri https://ps.outlook.com/powershell/ -Credential $ExCred -Authentication Basic -AllowRedirection
Import-PSSession $Session

This is not a recommended way to connect to Exchange Online using your tenant admin account, it uses basic authentication (will be decommissioned in 2021) and MFA (number one prerequisite for tenant admin security!) is not possible.

The second option is the Exchange Online Remote PowerShell Module which you can download from the Exchange Online Admin Center (use Internet Explorer for this download!) as shown in the following screenshot:

Exchange Online PowerShell Module

This is a separate PowerShell module you can start and use the Connect-EXOPSSession command to connect to Exchange Online. This PowerShell module users Modern Authentication and supports Multi-Factor Authentication.

The latest (and newest) option is the Exchange Online PowerShell V2 module. This module works far more efficient with large datasets than the previous PowerShell modules for Exchange Online. It also supports Modern Authentication and Multi-Factor Authentication.

To install the Exchange Online PowerShell V2 module you first have to install the PowerShellGet module using the Install-Module PowershellGet command:

Install-Module PowershellGet

Followed by the Install-Module -Name ExchangeOnlineManagement command:

Install-Module ExchangeOnlineManagement

When installed you can use the Connect-ExchangeOnline command to connect to Exchange Online. When MFA for your admin account is configured it will automatically use it:

Connect-ExchangeOnline

The differences between V1 and V2 are clearly visible in the commands. All V2 commands contain EXO, like:

  • Get-Mailbox vs Get-EXOMailbox
  • Get-Recipient vs Get-EXORecipient
  • Get-MailboxStatistics vs Get-EXOMailboxStatistics
  • Get-CASMailbox vs Get-EXOCASMailbox

This means that all scripts you have written for use with Exchange Online need to be changed to reflect the V2 commands.

For a complete overview you can use the Get-Command *EXO* to retrieve all PowerShell commands that contain EXO (still very limited 🙂 ):

Get-Command EXO

The Exchange Online PowerShell V2 module is still in preview, the current version is 0.3582.0 which you can check using the Get-Module ExchangeOnlineManagement command:

Get-Module ExchangeOnlineManagement

The Exchange Online PowerShell v2 module is a work in progress, but it the future of PowerShell in Exchange Online, so you should keep an eye on this development.

More Information

Use the Exchange Online PowerShell V2 module – https://docs.microsoft.com/en-us/powershell/exchange/exchange-online/exchange-online-powershell-v2/exchange-online-powershell-v2?view=exchange-ps

Implementing Active Directory Federation Services step-by-step part II

In the previous blog (Implementing Active Directory Federation Services step-by-Step) I have showed you how to install and configure Active Directory Federation Services (ADFS) in your internal network and DMZ, capable of handling Office 365 authentication request. In this blog I’ll show you how to configure Office 365 and how to test it.

Federated Domains

In a typical managed domain, the user accounts and password hashes are synchronized to Azure Active Directory. Office 365 uses Domain Controllers in Azure AD to authenticate the users and grant them access to the resources in the cloud.

In a federated domain, the user accesses the Office 365, but access is denied, and the request is redirected to Azure Active Directory. There, the home realm (the user’s domain) is discovered and the request is redirected to the ADFS server based on the home realm. If my user account is j.wesselius@exchangelabs.nl, my home realm is exchangelabs.nl and the request is redirected to the federation server that was created earlier, and that was used to configure the domain in Azure Active Directory.

I did a session on this at IT Dev Connections in 2017 (in San Francisco), the following is one animated slide that can be downloaded which shows the flow between a client, Office 365, Azure AD and the on-premises ADFS and Domain Controller:

ADFS Federation Flow

To get this working, the domain in Azure Active Directory needs to be converted to a federated domain so that Azure AD knows any authentication request needs to be redirected to the on-premises ADFS environment.

When adding a domain to Azure Active Directory it is automatically created as a managed domain. As said before, authentication takes places against Domain Controllers in Azure AD. You can check a domain using the Get-MsolDomain -DomainName exchangelabs.nl PowerShell command as shown in the following screenshot:

Get-MsolDomain

To convert this to a federated domain, start a PowerShell command (with elevated privileges) and enter the following commands:

[PS] C:\> Connect-MsolService

[PS] C:\> Set-MsolADFSContext -Computer ams-adfs01.labs.local

[PS] C:\> Convert-MsolDomainToFederated -DomainName Exchangelabs.nl

Note. Use the FQDN of the local first ADFS server with the Set-MsolADFSContext command, not the federation URL

This will connect the existing on-premises infrastructure to Azure AD, and convert the domain to a federated domain. Now, when checking the domain in Azure AD using the same command as before you’ll see it now is a federated domain:

Set-MsolAdfsContext Exchangelabs

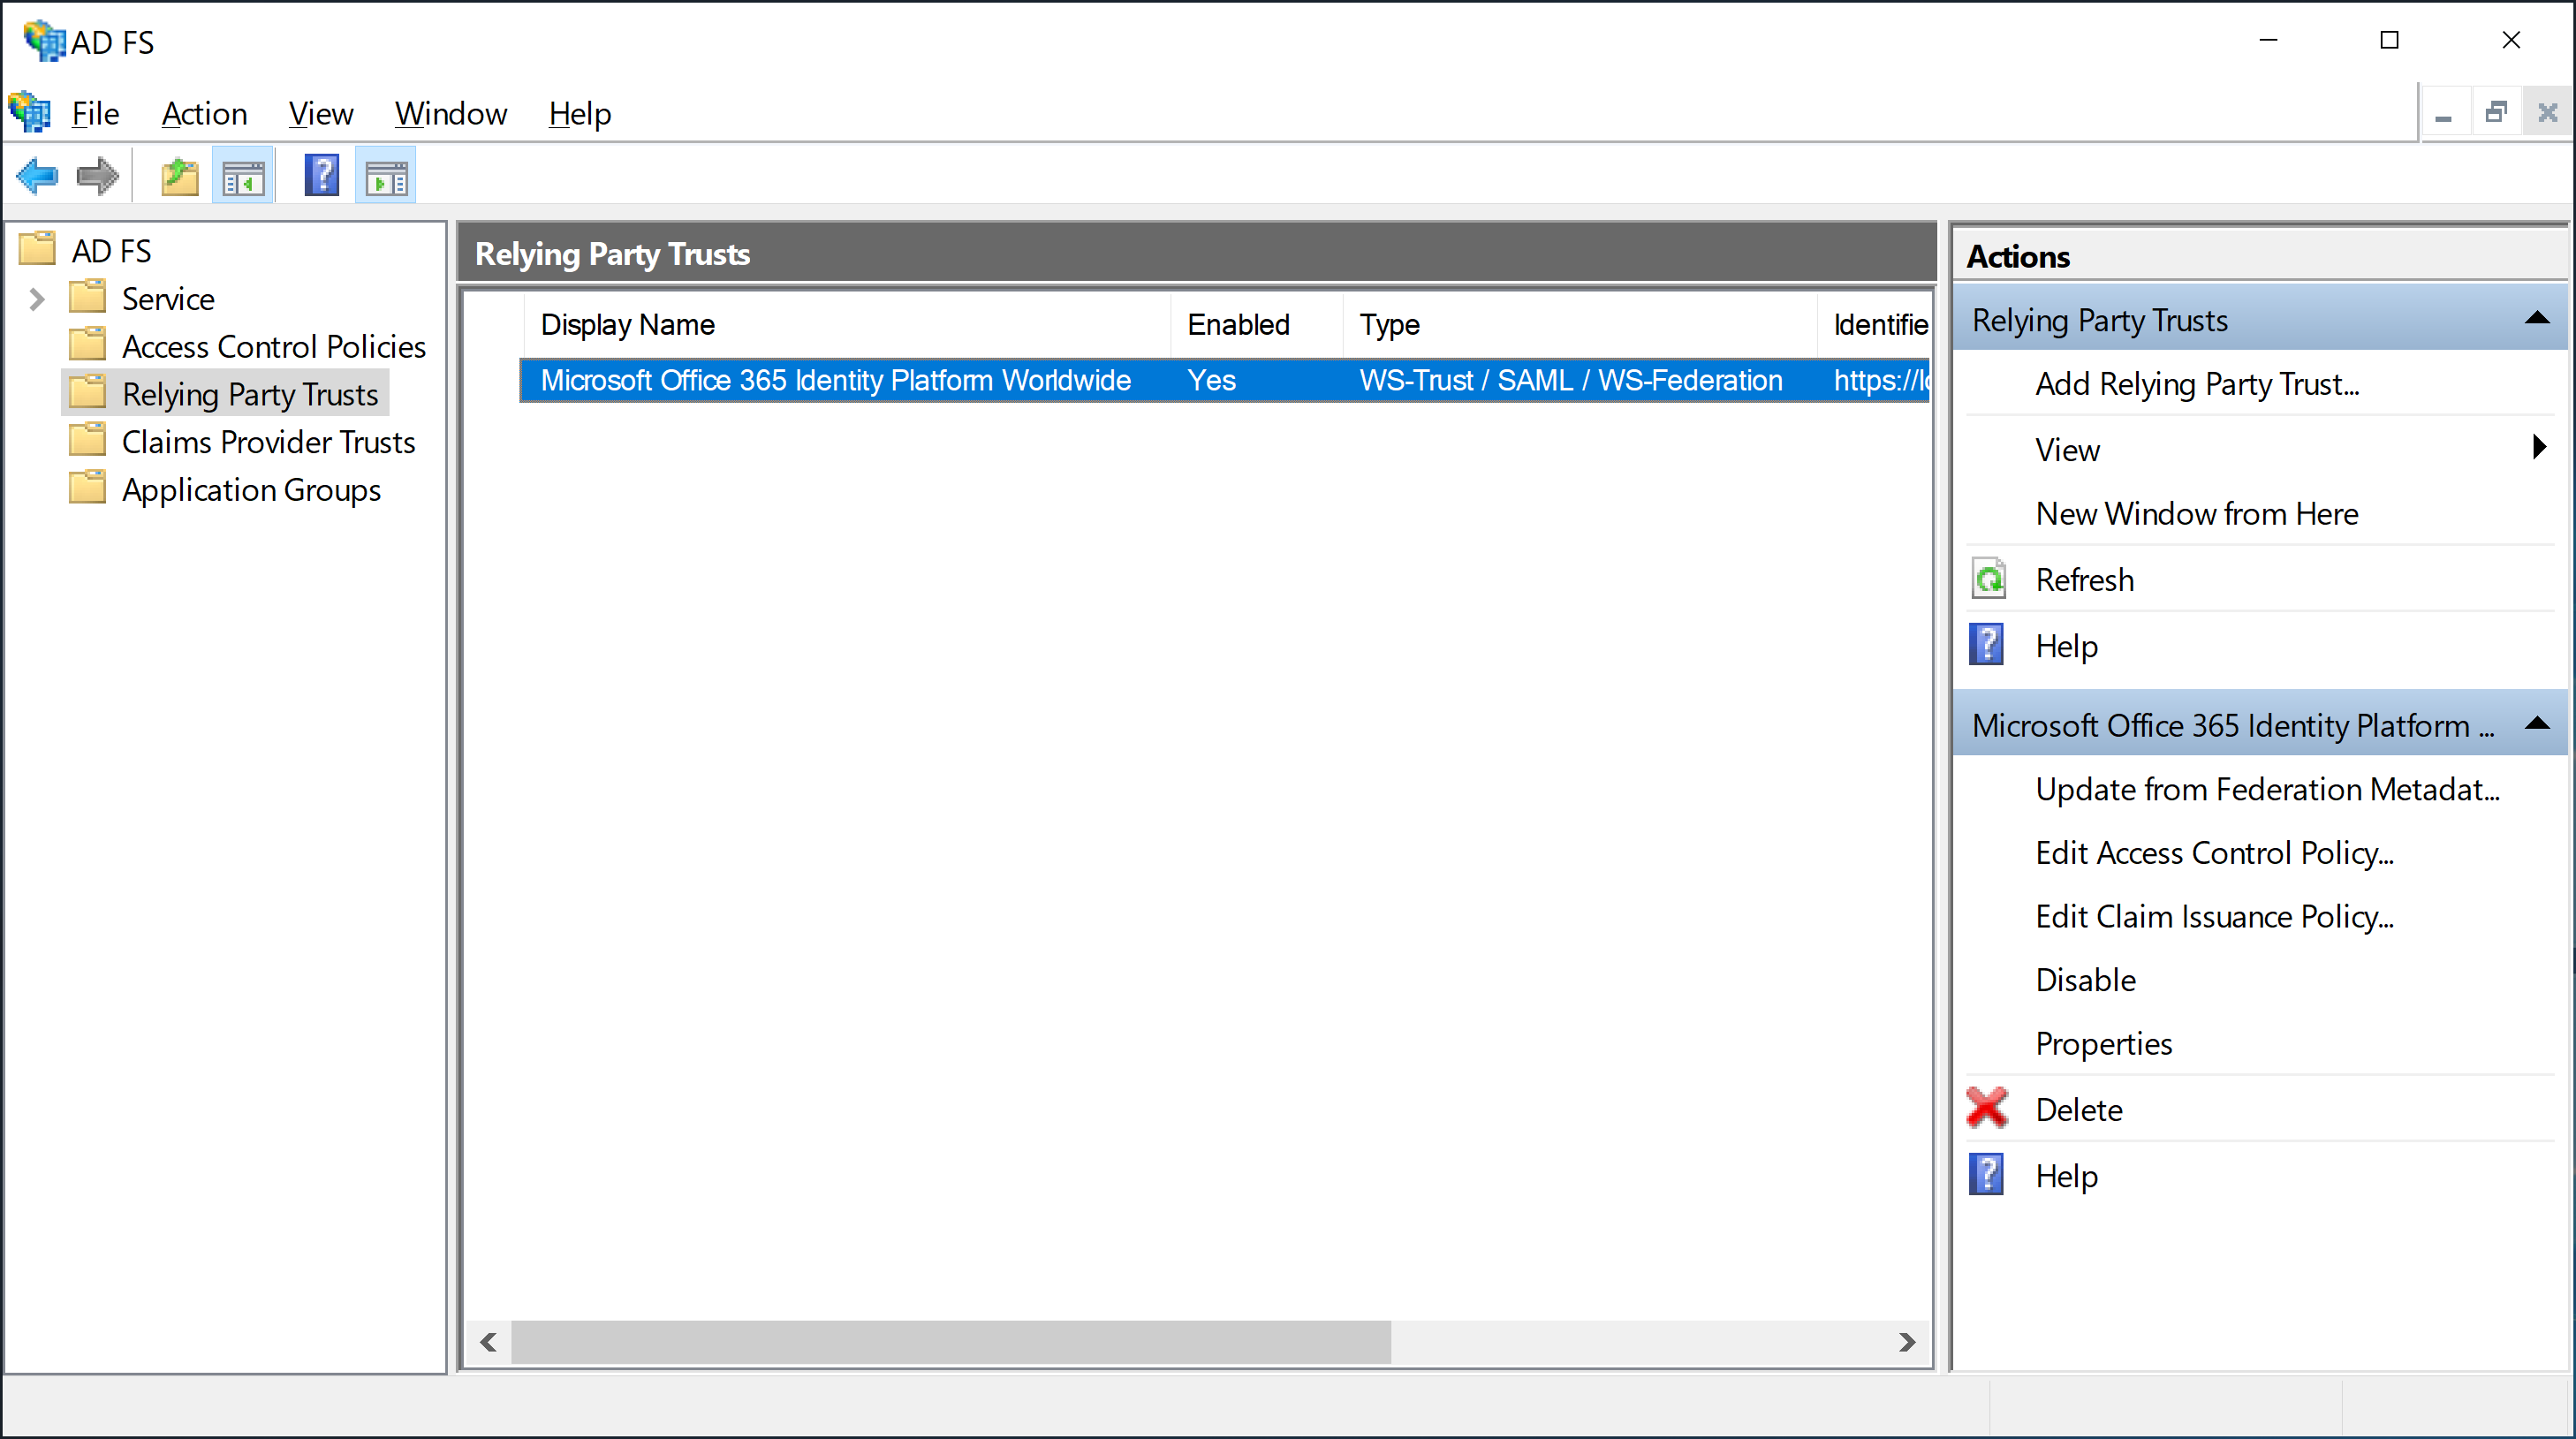
In in the ADFS Management Console you’ll a new Relying Party Trust (RPT) for use with Office 365:

ADFS Relying Party Trust

To get more into detail in Azure AD about the federation settings, you can use the Get-MsolDomainFederationSettings command which shows more information:

Get-MsolDomainFederationSettings

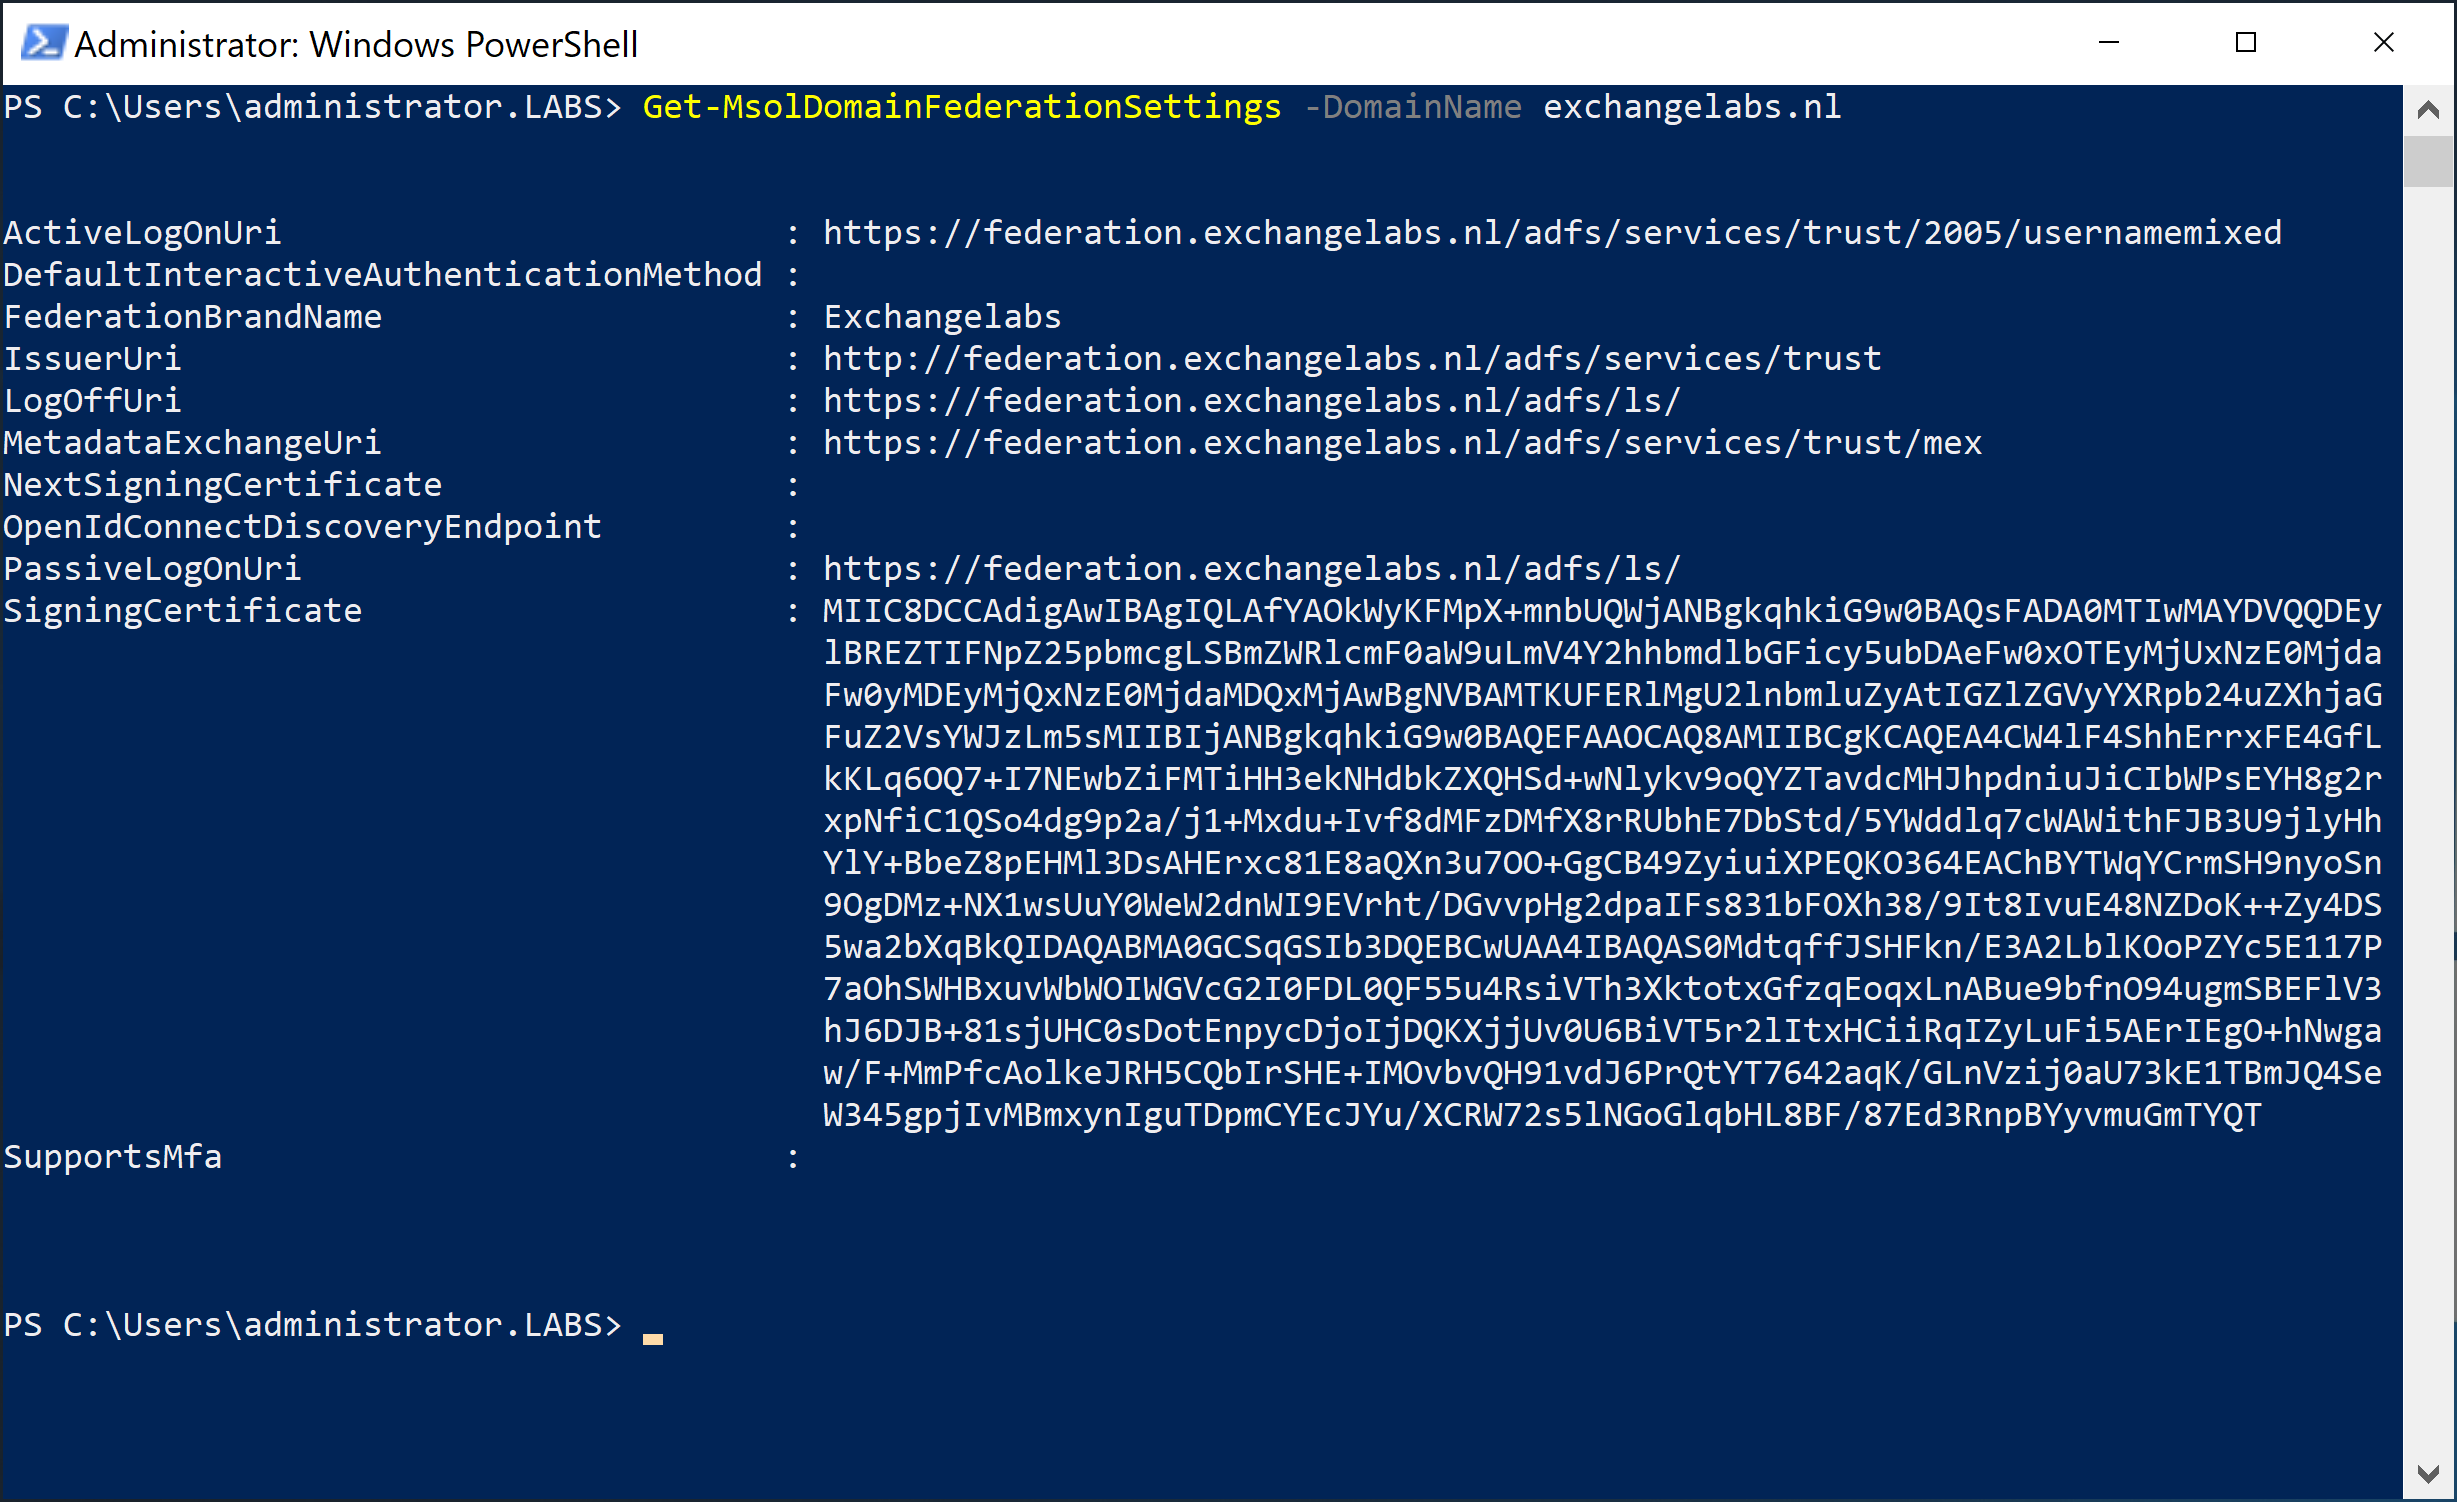
Clearly visible are the Logon, Issuer and LogOffUri, which point to our on-premises ADFS implementation. Even more information can be retrieved using the Get-MsolFederationProperty command as shown in the following screenshot:

Get-MsolFederationProperty

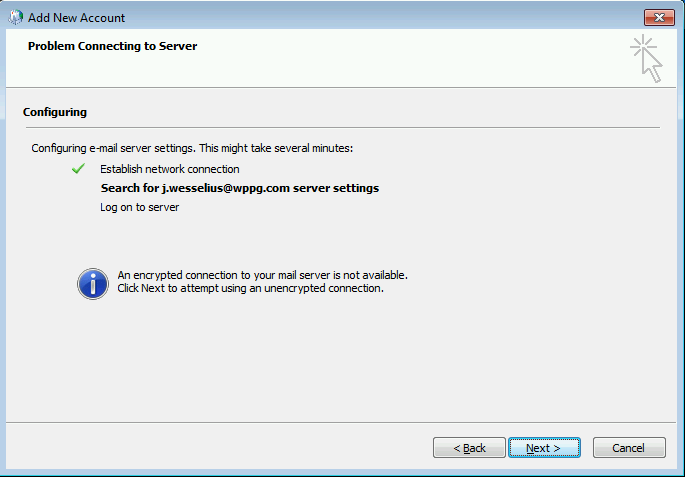
To test the new configuration, navigate to the Microsoft Online Portal and login using an account with the domain we just configured, i.e. j.wesselius@exchangelabs.nl:

Microsoft Online Portal

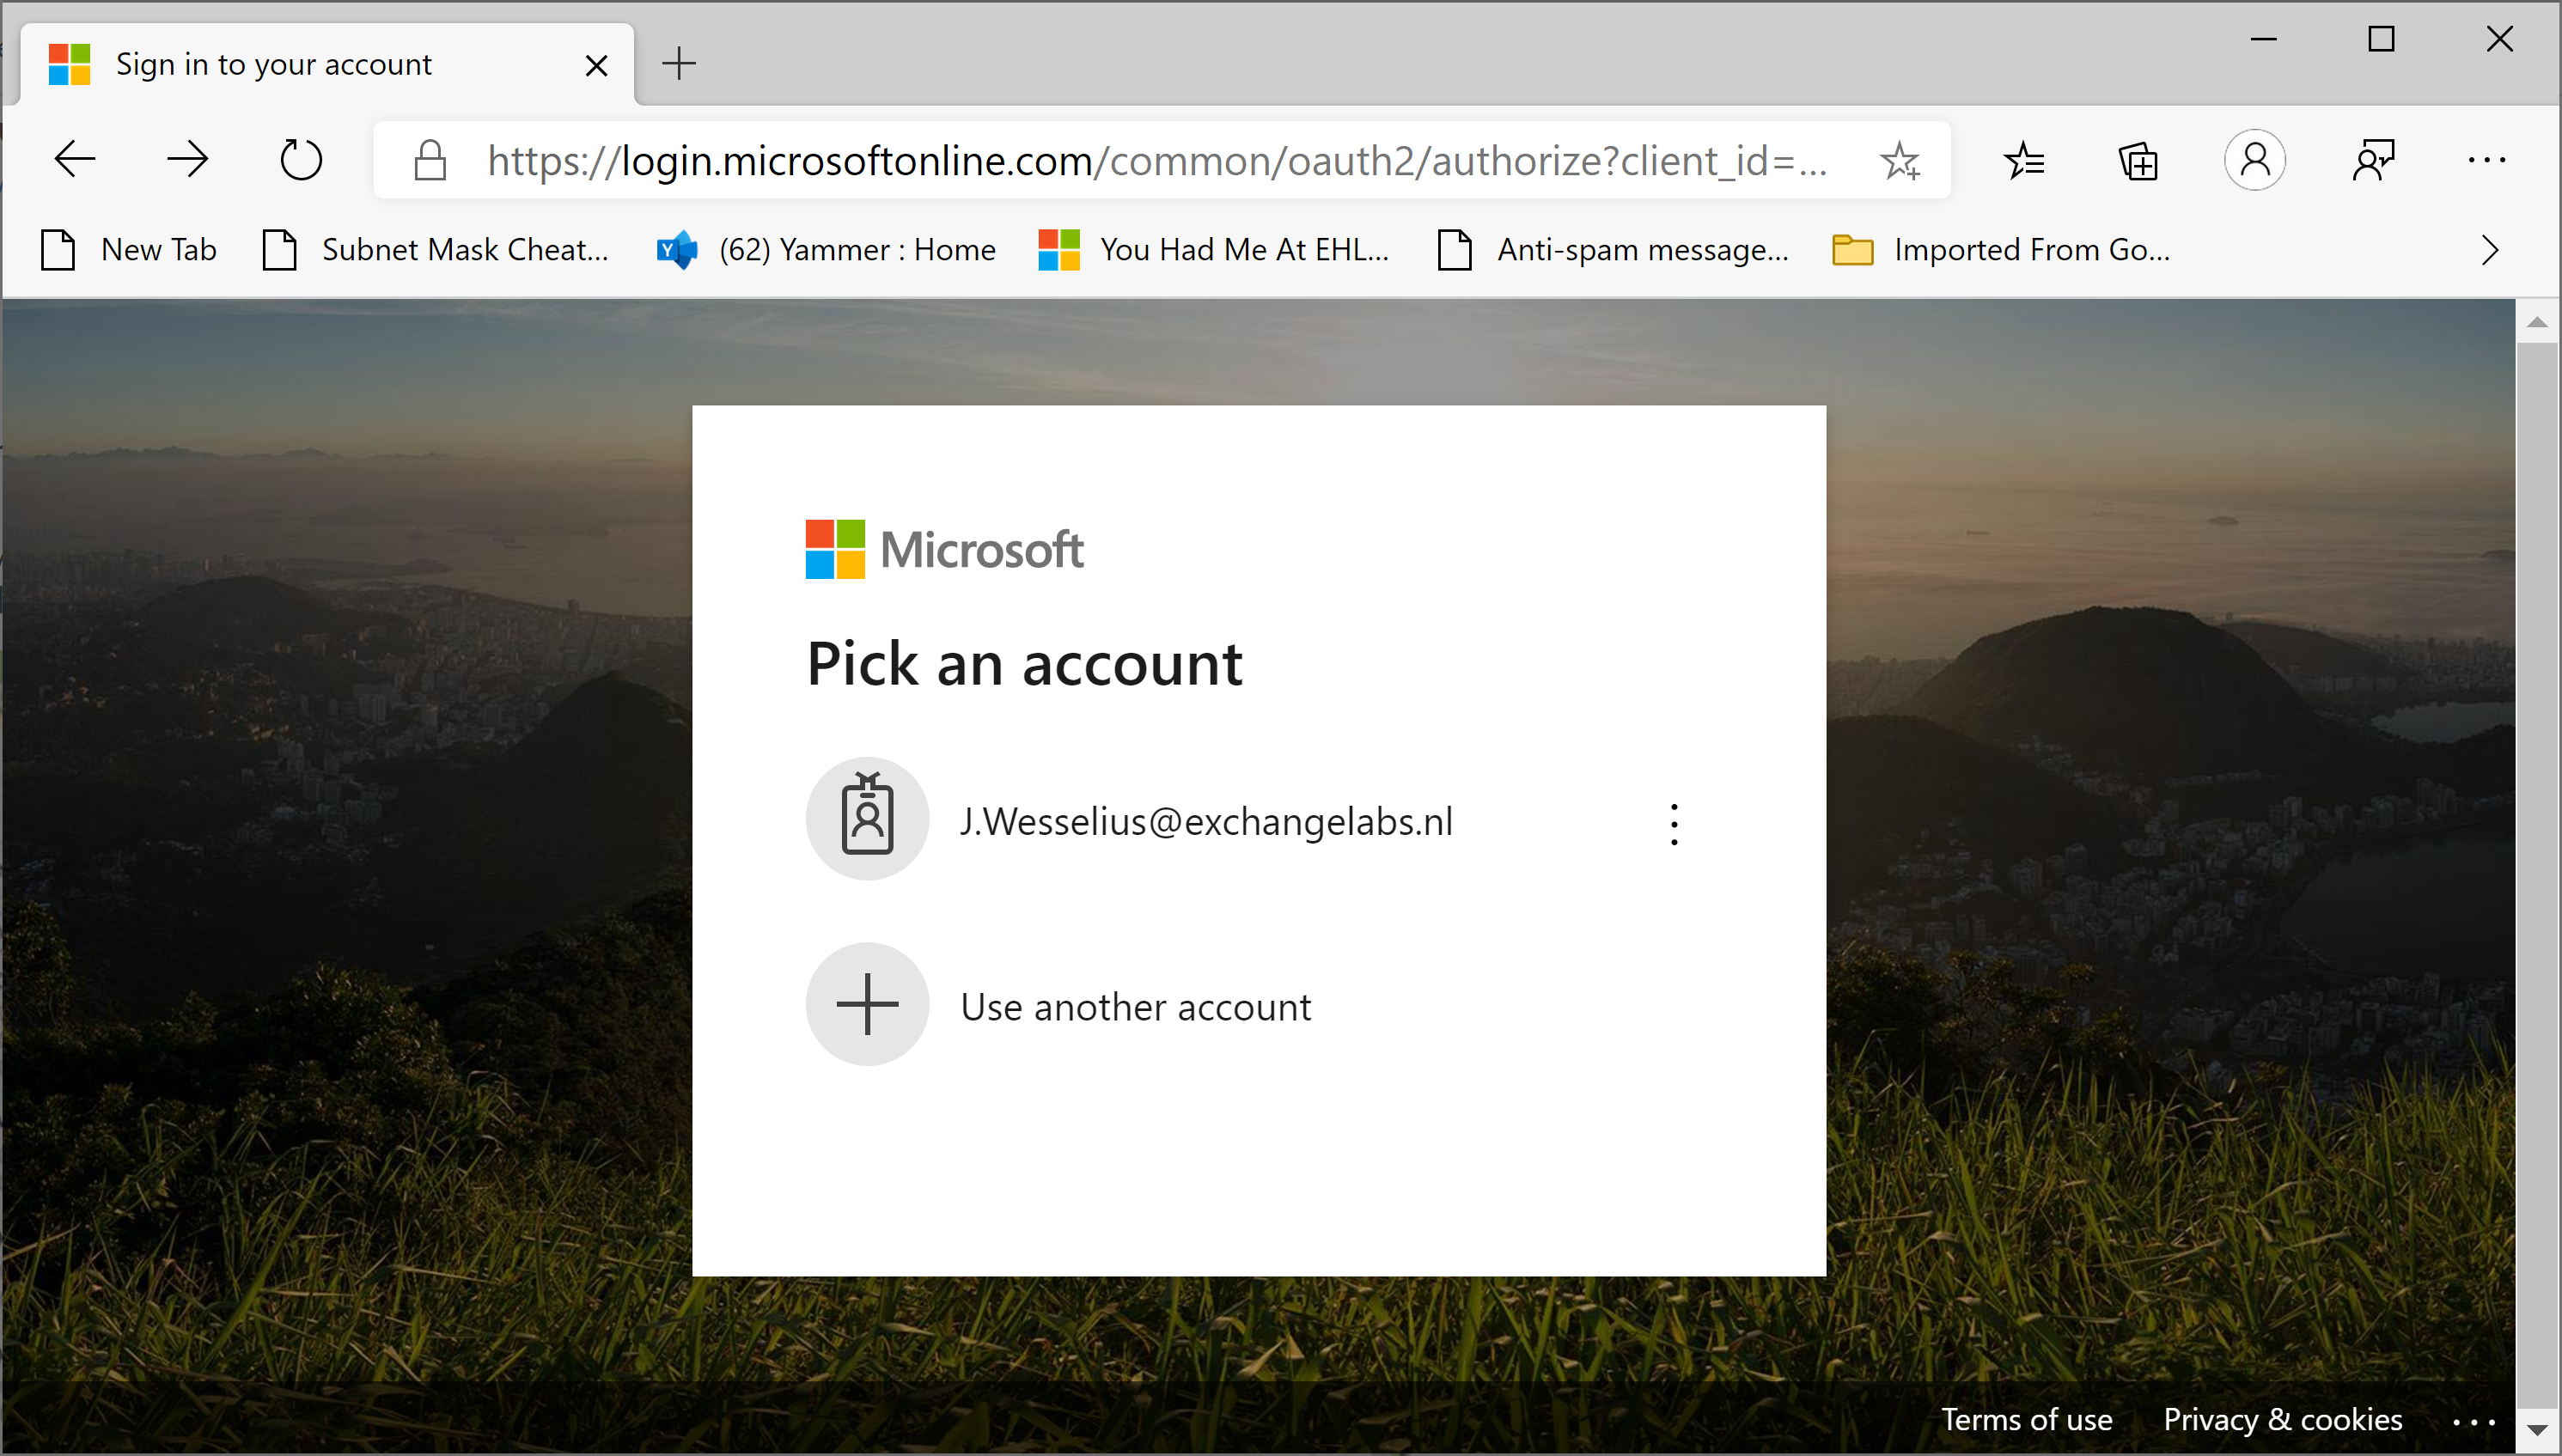
When selecting this account, Azure AD determines the home realm (exchangelabs.nl) and redirect to the on-premises URL as found in the federation settings in Azure AD. You’ll see this happen on the fly in your browser:

Taking you to your organizations sign-in page

And a few seconds later we are redirected to our on-premises ADFS environment:

ADFS Federation Sign-in page

Clearly visible is the Federation Service display Name which was configured with the first ADFS server in the previous blogpost.

Enter your password, and how wonder, MFA is still working as well (which was a pleasant surprise for me 😊):

ADFS Exchangelabs MFA

Another interesting test is using the Remote Connectivity Analzyer ( (https://aka.ms/exrca) which has a Single Sign-On test. Navigate to the Remote Connectivity Analyzer, click the Office 365 tab and select the Office 365 Single Sign-On test radio button.

Enter username and password, do the verification code test and await the results. You’ll see something similar as the following screenshot:

Remote Connectivity Analyzer Single Sign-On Test

The logon attempt was successful, but more interesting is that you can expand all test steps to see what’s going on under the hood and try to understand how ADFS works.

Summary

In the previous two blogposts I demonstrated how to install and configure ADFS in your on-premises infrastructure. I installed only one ADFS server and one WAP proxy, which is far from a high available environment. Why high available? Without the ADFS server it is no longer possible to logon to any Office 365 service, so a high available infrastructure is a requirement for any ADFS implementation.

But customers are moving to the cloud to decommission their on-premises solutions, and with ADFS we’re building an on-premises solution for authenticating cloud solutions. But for compliancy reasons it might be needed to authenticate against local domain controllers (no passwords in the cloud for example). On the other hand, you can use Pass Through Authentication (PTA, see my blogpost Azure AD Connect Pass-through authentication) for this as well. PTA doesn’t offer as much possibilities as ADFS yet, but it is improving.

Is ADFS future proof? Some people say it isn’t, but as long as I find articles like What’s new in Active Directory Federation Services for Windows Server 2019 on the Microsoft website I don’t see too many issues with that.

More information

Outlook 2010 stays offline with Exchange Online

One of my clients is running Exchange 2010 in hybrid mode, and they have Outlook 2010 and Outlook 365 ProPlus client. For testing purposes, I have two VMs, one with Windows 7 and Office 2010 and one with Windows 10 and Office 365 ProPlus. And every Monday morning I run the Windows 7 VM for an hour or so to see if everything is working fine 😊

This morning my Outlook 2010 was working offline, and it didn’t want to go online (OWA and Outlook 365 ProPlus were working fine). Remove the Outlook profile but creating a new Outlook profile didn’t work. After a minute the dreaded an encrypted connection to your mail server is not available error message appeared:

An encrypted connection to your mail server is not available

Mostly this is caused by Autodiscover that goes wrong somewhere, the Remote Connectivity Analyzer shows that Autodiscover to the on-premises Exchange 2010 goes well, but that the redirect to Exchange Online goes wrong and it generates the following error message:

An HTTP 456 Unauthorized response was received from the remote Unknown server. This indicates that the user may not have logged on for the first time, or the account may be locked. To logon, go to http://portal.microsoftonline.com.

And further down more details are revealed:

X-AutoDiscovery-Error: LiveIdBasicAuth:AppPasswordRequired:<RequestId=8a51c25b-9213-4873-aff8-ebc1da40544f>;

An HTTP 456 Unauthorized response was received from the remote Unknown server

The AppPasswordRequired explains more. Last week I changed the MFA settings (see previous authenticator app for Office 365 blogpost). This works fine for OWA and Office 365 ProPlus, but not for Outlook 2010. Since Outlook 2010 does not work with Office 365 MFA, especially not in a hybrid environment (not even with an App Password).

The only workaround here was to temporarily disable MFA for my user account, create a new Outlook profile (which worked fine without MFA) and re-enable MFA. Again, Outlook 2010 does not recognize the MFA and still works with Exchange Online using basic authentication, but all other Office 365 services work fine with Office 365 MFA (both SMS and Authenticator authentication).

Authenticator app for Office 365

I have been running MFA for Office 365 user accounts up-and-running for quite some time now and very satisfied with it. But as you may have seen in the blogpost, I have been running SMS only, and with a 30 days renewal that works fine. But I was also interested in the Authenticator app, especially when running multiple clients on mobile devices.

Changing the authentication can be done on a per-user basis. Logon to the Microsoft portal (portal.office.com) using your regular work account. Select My Account (under your thumbnail profile picture) and select Security and Privacy and click Additional security verification as shown in the following screenshot:

Select Update your phone numbers used for account security, check the Authenticator app or token checkbox and click Setup authenticator app button.

Scan the QR code on your mobile device in the authenticator app, confirm the registration, click Save and you’re all set. The next time you logon to Office 365 you’ll see the following Approve Sign in Request window:

But instead of entering a verification code received via SMS you must approve the sign in on the Authenticator app.