Tag Archives: Azure Active Directory

Claims X-Ray ADFS Online Troubleshooting Tool

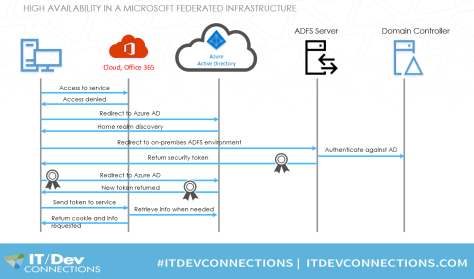
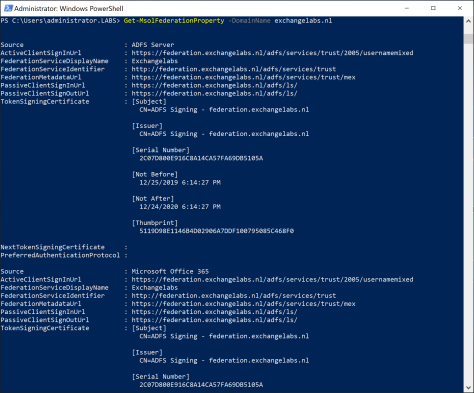
When you are troubleshooting an ADFS deployment, or you’re working with a 3rd party vendor on authentication issues, or maybe when you’re just interested in a deep dive in your ADFS environment, then there are multiple tools available from Microsoft for testing purposes.
To learn more about ADFS in general the Active Directory Federation Services Wiki Portal is a good starting point, for online tools the ADFS Help from Microsoft (https://adfshelp.microsoft.com) is a good starting point.

One of the interesting online tools for troubleshooting ADFS is called Claims X-Ray. Claims X-Ray consists of a dedicated Relying Party Trust (RPT) in your ADFS environment. You can logon to the RPT automatically using the online tool, or manually via the ADFS IdpInitiatedSignon page (as discussed in my previous blogpost Implementing Active Directory Federation Services step-by-step)
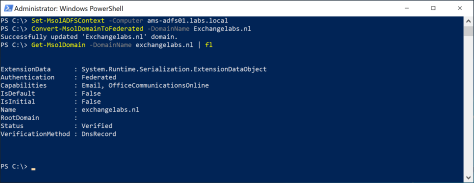
The X-Ray Relying Party Trust can be created using the following PowerShell commands on your (primary) ADFS server:

[PS] C:\> {$authzRules = "=>issue(Type = `"http://schemas.microsoft.com/authorization/claims/permit`", Value = `"true`"); "
[PS] C:\> $issuanceRules = "@RuleName = `"Issue all claims`"`nx:[]=>issue(claim = x); "
[PS] C:\> $redirectUrl = "https://adfshelp.microsoft.com/ClaimsXray/TokenResponse"
[PS] C:\> $samlEndpoint = New-AdfsSamlEndpoint -Binding POST -Protocol SAMLAssertionConsumer -Uri $redirectUrl

[PS] C:\> Add-ADFSRelyingPartyTrust -Name "Claims X-ray" -Identifier "urn:microsoft:adfs:claimsxray" -IssuanceAuthorizationRules $authzRules -IssuanceTransformRules $issuanceRules -WSFedEndpoint $redirectUrl -SamlEndpoint $samlEndpoint

As shown in the following screenshot:

ADFS RPT X-Ray

If you want to test the Claims X-Ray using oAuth you need to create the oAuth client using the following PowerShell commands, again on your (primary) ADFS server:

[PS] C:\> Add-AdfsClient -Name "Claims X-ray Client" -ClientId "claimsxrayclient" -RedirectUri https://adfshelp.microsoft.com/ClaimsXray/TokenResponse
[PS] C:\> if ([System.Environment]::OSVersion.Version.major -gt 6) { Grant-AdfsApplicationPermission -ServerRoleIdentifier urn:microsoft:adfs:claimsxray -AllowAllRegisteredClients -ScopeNames "openid","profile" }

X-Ray oAuth client

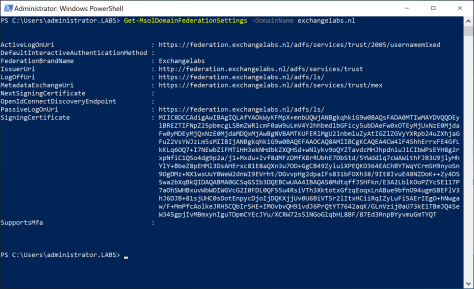
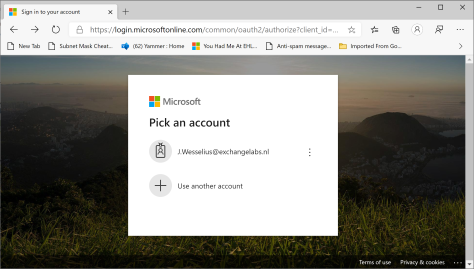
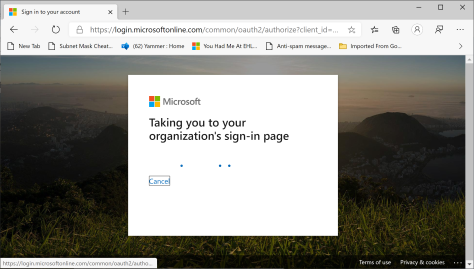
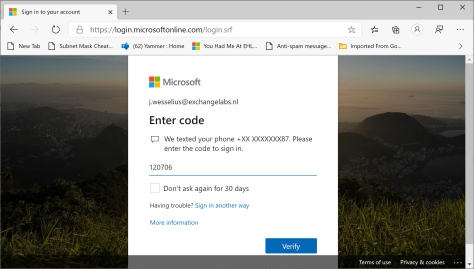
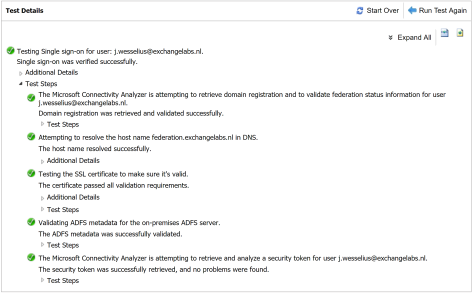
When the Relying Party Trust is created you can continue with the online tool to test it, and thus have a closer look at your environment. In the Claims X-Ray tool enter the federation instance (i.e. federation.exchangelabs.nl) and click Test Authentication as shown in the following screenshot:

Claims X-Ray

It will redirect to your WAP server (default ADFS behavior), enter valid user credentials and it will show the returned SAML token, including the claims it contains.

If I do this for my own environment, it will return a token with 21 claims which contain interesting information like the IP address of the originating client (userip or x-ms-forwarded-client-ip, where I ran the web browser), the IP address of the ADFS WAP server (x-ms-clientip), the type of browser I am using, whether I’m on the corporate network or not, the UPN, implicit UPN and Windows accountname to name a few. A couple of these claims are shown in the following screenshot:

ADFS Token Claims

It is also possible to use the IdpInitiatedSignon page, the Claims X-Ray RPT option is added to this page by the PowerShell commands:

Claims X-Ray initiated signon

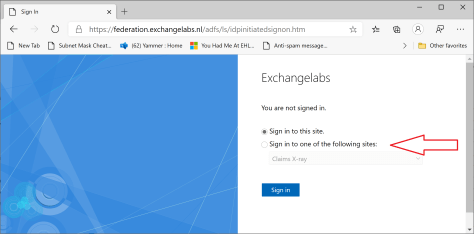
When you logon you’ll see a new token with different claims, depending on the location where you are logged on at that moment. While commuting in the train for example I can figure out the way I’m authenticated by ADFS and which claims are issued for this particular scenario:

Claims X-Ray initiated signon authentication

Using the Claims X-Ray online tool you can test the behavior of your ADFS environment from different clients, networks etc. when you have to troubleshoot your environment, or if you are just interested.

For example, at the moment I’m working on an issue where we are difficulties with a MobileIron deployment that needs to authenticate against an ADFS deployment. The rules and policies from the regular RPT can be copied to the Claims X-Ray RPT, after which you can determine the behavior of the RPT, and hopefully figure out why it won’t work in the first place.

More information

Claims X-Ray – https://adfshelp.microsoft.com/ClaimsXray/TokenRequest


Implementing Active Directory Federation Services step-by-step part II

In the previous blog (Implementing Active Directory Federation Services step-by-Step) I have showed you how to install and configure Active Directory Federation Services (ADFS) in your internal network and DMZ, capable of handling Office 365 authentication request. In this blog I’ll show you how to configure Office 365 and how to test it.

Federated Domains

In a typical managed domain, the user accounts and password hashes are synchronized to Azure Active Directory. Office 365 uses Domain Controllers in Azure AD to authenticate the users and grant them access to the resources in the cloud.

In a federated domain, the user accesses the Office 365, but access is denied, and the request is redirected to Azure Active Directory. There, the home realm (the user’s domain) is discovered and the request is redirected to the ADFS server based on the home realm. If my user account is j.wesselius@exchangelabs.nl, my home realm is exchangelabs.nl and the request is redirected to the federation server that was created earlier, and that was used to configure the domain in Azure Active Directory.

I did a session on this at IT Dev Connections in 2017 (in San Francisco), the following is one animated slide that can be downloaded which shows the flow between a client, Office 365, Azure AD and the on-premises ADFS and Domain Controller:

ADFS Federation Flow

To get this working, the domain in Azure Active Directory needs to be converted to a federated domain so that Azure AD knows any authentication request needs to be redirected to the on-premises ADFS environment.

When adding a domain to Azure Active Directory it is automatically created as a managed domain. As said before, authentication takes places against Domain Controllers in Azure AD. You can check a domain using the Get-MsolDomain -DomainName exchangelabs.nl PowerShell command as shown in the following screenshot:

Get-MsolDomain

To convert this to a federated domain, start a PowerShell command (with elevated privileges) and enter the following commands:

[PS] C:\> Connect-MsolService

[PS] C:\> Set-MsolADFSContext -Computer ams-adfs01.labs.local

[PS] C:\> Convert-MsolDomainToFederated -DomainName Exchangelabs.nl

Note. Use the FQDN of the local first ADFS server with the Set-MsolADFSContext command, not the federation URL

This will connect the existing on-premises infrastructure to Azure AD, and convert the domain to a federated domain. Now, when checking the domain in Azure AD using the same command as before you’ll see it now is a federated domain:

Set-MsolAdfsContext Exchangelabs

In in the ADFS Management Console you’ll a new Relying Party Trust (RPT) for use with Office 365:

ADFS Relying Party Trust

To get more into detail in Azure AD about the federation settings, you can use the Get-MsolDomainFederationSettings command which shows more information:

Get-MsolDomainFederationSettings

Clearly visible are the Logon, Issuer and LogOffUri, which point to our on-premises ADFS implementation. Even more information can be retrieved using the Get-MsolFederationProperty command as shown in the following screenshot:

Get-MsolFederationProperty

To test the new configuration, navigate to the Microsoft Online Portal and login using an account with the domain we just configured, i.e. j.wesselius@exchangelabs.nl:

Microsoft Online Portal

When selecting this account, Azure AD determines the home realm (exchangelabs.nl) and redirect to the on-premises URL as found in the federation settings in Azure AD. You’ll see this happen on the fly in your browser:

Taking you to your organizations sign-in page

And a few seconds later we are redirected to our on-premises ADFS environment:

ADFS Federation Sign-in page

Clearly visible is the Federation Service display Name which was configured with the first ADFS server in the previous blogpost.

Enter your password, and how wonder, MFA is still working as well (which was a pleasant surprise for me 😊):

ADFS Exchangelabs MFA

Another interesting test is using the Remote Connectivity Analzyer ( (https://aka.ms/exrca) which has a Single Sign-On test. Navigate to the Remote Connectivity Analyzer, click the Office 365 tab and select the Office 365 Single Sign-On test radio button.

Enter username and password, do the verification code test and await the results. You’ll see something similar as the following screenshot:

Remote Connectivity Analyzer Single Sign-On Test

The logon attempt was successful, but more interesting is that you can expand all test steps to see what’s going on under the hood and try to understand how ADFS works.

Summary

In the previous two blogposts I demonstrated how to install and configure ADFS in your on-premises infrastructure. I installed only one ADFS server and one WAP proxy, which is far from a high available environment. Why high available? Without the ADFS server it is no longer possible to logon to any Office 365 service, so a high available infrastructure is a requirement for any ADFS implementation.

But customers are moving to the cloud to decommission their on-premises solutions, and with ADFS we’re building an on-premises solution for authenticating cloud solutions. But for compliancy reasons it might be needed to authenticate against local domain controllers (no passwords in the cloud for example). On the other hand, you can use Pass Through Authentication (PTA, see my blogpost Azure AD Connect Pass-through authentication) for this as well. PTA doesn’t offer as much possibilities as ADFS yet, but it is improving.

Is ADFS future proof? Some people say it isn’t, but as long as I find articles like What’s new in Active Directory Federation Services for Windows Server 2019 on the Microsoft website I don’t see too many issues with that.

More information

on-Premises Azure Active Directory Password Protection

Last year I wrote a blogpost on password in Azure Active Directory (Choose a password that’s harder for people to guess – https://jaapwesselius.com/2018/10/15/choose-a-password-thats-harder-for-people-to-guess/) in which I mentioned the banned password lists and the Azure AD Password Protect feature. Back then this was only for Azure AD, but right now it is also available for on-premises Domain Controller as well (for some time already). It is possible for on-premises Domain Controllers to use the password protect functionality in Azure AD and thus block the possibility to use weak passwords in your on-premises environment. Let’s see how it works.

The password protection feature on-premises uses a Password Protection Agent that’s running on the on-premises Domain Controllers. When a user initiates a password change, the new password is validated by the Azure AD Password Protection agent, which request a password policy from the Azure AD Password Protection proxy service. This Password Protection service requests a password policy from Azure AD. The new password is never sent to Azure AD. This is shown in the following picture (borrowed from the Microsoft website):

azure-ad-password-protection

After receiving the password policy, the agent returns pass or fail for the new password. In case of fail the user must try it again.

Installation of the password protect consists of two steps:

  • The Azure AD Password Protection Proxy service using the AzureADPasswordProtectionProxySetup.exe software installer. This is installed on a domain joined computer that has access to the Internet and proxies the password policy request to Azure Active Directory.
  • The DC Agent service for password protection by using the AzureADPasswordProtectionDCAgentSetup.msi package. This runs on the Domain Controllers and send the password policy requests to the server running the proxy service.

Both can be downloaded from the Microsoft download center on https://www.microsoft.com/en-us/download/details.aspx?id=57071

Password Protection Proxy Installation

The first step is to install the password protection service. This server should be able to access Azure AD and since the Domain Controller does not have an internet connection this should be installed on a separate server. In my lab environment I have installed the password protection service on the Azure AD Connect server.

Installation of the password protection proxy is straightforward; you can use the GUI or the command line setup with the /quit switch for unattended install (and Server Core). After installation use PowerShell to register the proxy in Azure AD by using the following commands:

[PS] C:\> Import-Module AzureADPasswordProtection
[PS] C:\> Register-AzureADPasswordProtectionProxy -AccountUpn 'administrator@tenant.onmicrosoft.com'

This command can work when you have MFA enabled for admin accounts, if you don’t require MFA on your admin accounts (which is a bad practice IMHO) you can use the following command:

[PS] C:\> $globalAdminCredentials = Get-Credential
[PS] C:\> Register-AzureADPasswordProtectionProxy -AzureCredential $globalAdminCredentials

The last step is to register the forest in Azure Active Directory. This is very similar to the registration process of the proxy service. You can use the following PowerShell commands to register the forest:

Register-AzureADPasswordProtectionForest

[PS] C:\> Register-AzureADPasswordProtectionForest -AccountUpn ‘yourglobaladmin@yourtenant.onmicrosoft.com’

Again, when MFA is not enabled you can use the following command to register your forest in Azure AD:

[PS] C:\> $globalAdminCredentials = Get-Credential 'yourglobaladmin@yourtenant.onmicrosoft.com'
[PS] C:\> Register-AzureADPasswordProtectionForest -AzureCredential $globalAdminCredentials

Note. A multi-forest scenario is supported for the Password Protection service, you can install multiple forest using these commands. Multiple domains against one tenant is supported, one domain against multiple tenants is a not-supported scenario.

Some remarks:

  • The server where the password proxy agent server is installed should have .NET Framework 4.7 or higher installed.
  • For high availability it is recommended to install the password protection agents on multiple servers
  • The password protection proxy supports an in-place upgrade, so a newer version can be installed without uninstalling the previous version.

So how does this work, and how does the password protection service find the proxy server (or servers)?

When the Password Protection Proxy is installed it is registered in Active Directory with a well-know GUID. The Password Protection Agent checks Active Directory for this well-know GUID and finds the server where the Password Protection Agent is installed.

You can use the following PowerShell commands to find the Password Protection Proxy:

$SCP = "serviceConnectionPoint"
$Keywords = "{ebefb703-6113-413d-9167-9f8dd4d24468}*"
Get-ADObject -SearchScope Subtree -Filter {objectClass -eq $SCP -and keywords -like $Keywords }

It returns the server, and you can use ADSIEdit to inspect the computer:

Azure AD Password Protection Proxy SCP

This is much like how domain-joined Outlook clients find the Autodiscover SCP in Active Directory.

Installing the DC agent service

When the proxy service is installed and registered the Domain Controller agent service can be installed. It is just an MSI package that can be installed (using the GUI, accept license agreement and click install) or you can install it on the command line using the following command (use elevated privileges):

C:\> msiexec.exe /i AzureADPasswordProtectionDCAgentSetup.msi /quiet /qn

Note. Installation of the DC agent requires a restart, but you can use the /norestart switch to reboot at a more convenient time.

After rebooting the Domain Controller the password protection service is ready for use.

Some remarks:

  • Azure AD Password protection service requires an Azure AD Premium P1 or P2 license.
  • Domain Controllers should be Windows 2012 or higher.
  • Domain Controllers should have .NET Framework 4.5 or higher installed.
  • You never know which Domain Controller is going to process a password change. Therefore, the Password Protection service need to be installed on all Domain Controllers. For a straightforward environment this should not be a problem, but for large enterprises with lots of DC’s it can be an issue (I deliberately do not that about security officers at this point :-))
  • Both the proxy service and the DC agent support an in-place upgrade, so a newer version can be installed without uninstalling the old version.

Testing the Azure AD Password Protection service

So, after installing the Password Protection Proxy and the DC agent it’s time to test which is relatively simple. Logon to a domain-joined workstation, use CTRL-ALT-DELETE to change the password. When using a simple password like “Summer2019” or something it fails with the following error message.

Unable to update the password

From this moment on it is no longer possible to use weak passwords, locally enforced by Azure Active Directory and again a step closer to a safer environment.

Choose a password that’s harder for people to guess

When you’ve implemented Self Service Password Reset and a cloud user (i.e. an account that only lives in the Microsoft cloud, not an on-premises Active Directory account) wants to change his password, there’s a chance the user will see the following error message:
“Choose a password that’s harder for people to guess”

pass1word-guess
The odd thing is, when the user changes his password in the SSPR it even says the user is using a strong password as shown in the following screenshot:

pass1word

Note. I tried this with several combinations, like Pass1word, P@ssW0rd and Spring2018.

A similar error message can be “Unfortunately, your password contains a word, phrase or pattern that makes it easily guessable. Please try again with a different password.” as shown in the following screenshot:

guessable

The ‘problem’ here is that the user is hitting the ‘banned password list’ in Azure Active Directory. This banned password list is a list of over 1,000 passwords that can easily be guessed, and as such vulnerable for password spray attacks. These passwords are simple words like spring, summer, autumn, winter, football, company name, qwerty, 123456, welcome, zaq1zaq1 etc etc etc. There’s a list of most common passwords on WikiPedia. Of course there are several variations of passwords, password, Pass1word, Pass!word, Passw0rd, you name it, but Microsoft is using normalization techniques to filter out all replaced characters and thus block these passwords.

Banned passwords are part of the Azure AD Password Protection feature, a feature that’s still in preview at the time of writing (October 2018). When you logon to the Azure Portal (https://portal.azure.com) and navigate to Azure Active Directory | Authentication Methods (in the security section) you’ll see the Azure AD Password Protection feature:

password_protection

The banned password list is enforced by default, there’s no way to disable it. If you have an Azure AD Premium license, you can also use a custom banned password list and maintain you own list of words or phrases that you don’t want to be used as a password.

Summary

If your users run into the Choose a password that’s harder for people to guess error message when changing their password in Azure AD or Office 365, they are hitting the banned password list as part of the Azure AD Password protect feature. A feature that’s enforced by default, and implemented by Microsoft as a means to improve security.
This feature is available for cloud users only by default, but if you have implemented self service password reset (SSPR) with password writeback it also works. The nice thing is, it can also be extended to on-premises Active Directory for password changes on-premises. Nice topic for an upcoming blog.

Improved Secure Score in Office 365 tenant

In a previous blogpost I explained about the Microsoft Secure Score and how this indicates the level of security in your Office 365 tenant.

My initial score was only 70, which is pretty low. By implementing Self Service Password Reset and MFA for Admin Acccounts the Secure Score was increased to 122. It could have been a couple of point higher when enabling MFA for all users, but not all users have licenses in Office 365.

I’m curious to see what improvements I can make in the Exchange Online part and how this will influence the Secure Score. Stay tuned 🙂

secure-score-122