Most of my customers are in one way or another moving to Office 365. Not only Exchange Online, but also OneDrive for Business, SharePoint Online, Teams and other cloud services.
SharePoint Online a great solution of collaboration solutions, when multiple people are working on multiple documents in a department, group or project style.
One of my clients has a department with two employees, but with approx. 4TB of primarily static data. They store data on a file share and store it there for 20 years or more. The directory structure reflect the organization, but also the timeframe, so the directory structure is deep and filenames are typically long. Combine this with the 256 character URL limit in SharePoint and there’s the challenge, you can not simple move this to SharePoint Online. Restructuring the data would be a solution when moving to SharePoint Online, but that would be a massive project.
Another solution would be the use of Azure Files, where a file share is created in Azure and where the users can access the files directly in Azure, just like a regular share on the on-premises fileserver. And if you have a low bandwidth and high latency Internet connection, you can always implement a caching server on-premises, where an offline copy is stored on-premises. Compare this to OneDrive for Business where a copy of the data can be stored on your workstation.
To create an Azure file share, follow these steps:
In the Azure Portal, create a new Resource Group (or use an existing one).
To create a new storage account, select All Services in the Azure Portal, and in the all services blade type storage accounts. Click on Storage Accounts and click +Add to create a new storage account. Select your subscription, the Resource Group, enter a unique name, select the location/region closest to your own location and the performance characteristics, like in the following screenshot:
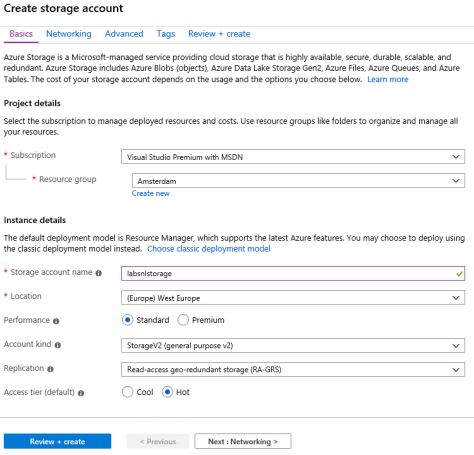
Click Review + Create, and after reviewing click Create to create the new storage account.
When the storage account is created you can create the file share. Select the storage account and under File service, select Files and click + File Share. In the upper right corner, enter a name and quota, and click on Create.
The file share is now created and can be viewed in the Azure Portal:

When you click the Connect icon, commands are shown for Windows, Linux en MacOS to connect the clients to the new file share. When using PowerShell, pay attention to the -Global and -Persist switch to make sure the connection will be kept after you close the PowerShell window and after rebooting. You can use tools of your choice (Storage Explorer, Windows Explorer, XCopy, RoboCopy etc) to copy data from the old location to the Azure File Share.
On the client, you can see the newly created file share in Windows explorer:

Summary
In some scenarios it is not always feasible to use SharePoint Online for storing files, and in such scenarios Azure Files can be a good candidate. In this blog I’ve showed you how to create a storage account and an Azure File Share to be used within (Windows) clients.
In my next blog I’ll discuss Azure files and backup, since there’s no Recycle Bin in Azure Files like there is in SharePoint Online or OneDrive for Business.

What about NTFS permissions?
LikeLike
The problem with Azure Files is permissions. It does not support NTFS permissions. You can work with SAS keys but this is for file sahres with different permissions etc a pain in the *. Also port 445 needs to be open. Clients on public internet cannot connect cause most provider block port 445.
LikeLiked by 1 person
So I guess a S2S VPN to Azure is the best solution. Not NTFS is quite limited but for this scenario (a few users, lots of data) I think it’s great! Otherwise Azure File Sync but then you still need that (though smaller) local machine on-premises.
LikeLike
Or use Azure Files with AAD Domain Services then NTFS permissions are supported. See https://github.com/MicrosoftDocs/azure-docs/blob/master/articles/storage/files/storage-files-active-directory-overview.md
LikeLike