Category Archives: Office365

Microsoft Teams The request is not properly formatted

Every now and then we get a call from end users that they cannot login at Microsoft Teams and they get an error message “The request is not properly formatted” and “The parameter ‘login_hint’ is duplicated.“, especially after changing the user password. The error message is shown in the following screenshot:

This error message is recurring, so it’s not possible to logon anymore. It looks like there’s something stored in a cache related to the user’s old credentials. To resolve this, you can follow these steps:

  • Exit the Teams client, and make sure Outlook is also closed since Outlook can have open add-ins related to teams.
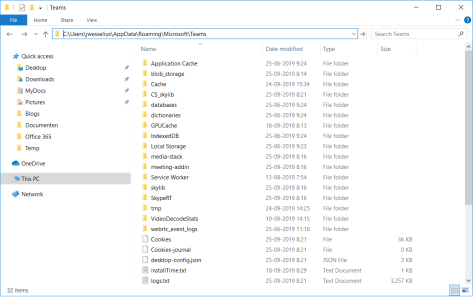
  • Go to the directory C:\Users\<username>\Appdata\Microsoft\Teams (shown below) and delete all files and directories found there. If any files cannot be deleted, most likely Outlook is still locking files.

AppData Microsoft Teams

When all files are deleted you can start the Teams client again and it should logon successfully.

Now, I’ve seen a couple of times where the solution mentioned above is not working and the error keeps appearing. I’ve found the most strange, weirdest and (at this moment) unexplainable workaround 🙂

When the error occurs, close the Windows and the following We’re sorry – we’ve run into an issue window will appear:

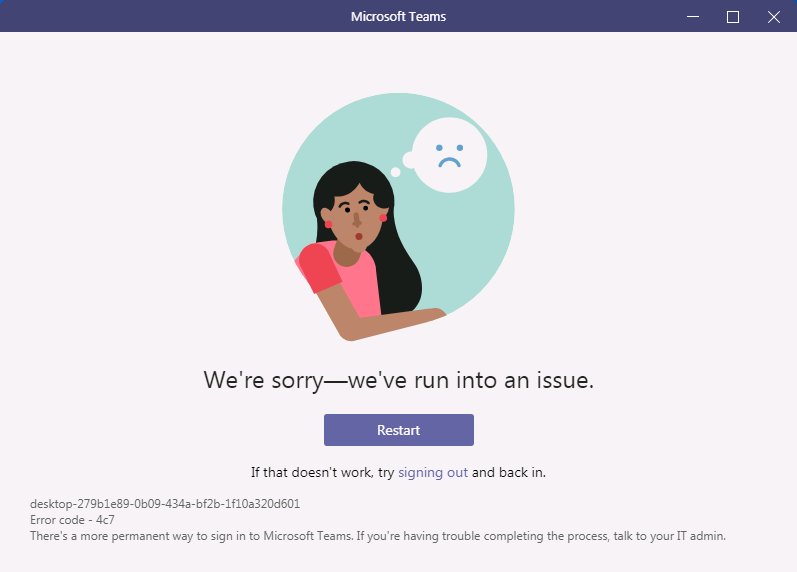
Click signing out and try to sign-in again, but with a deliberate wrong domain, for example jaap@contoso.comm. Of course it will fail since it does not recognize the domain. Try again with the correct name (i.e. jaap@contoso.com) and it signs in successfully.

I think (but I’m not sure) the login caches some information somewhere, but I have no idea where. If you do, please let me know in the comments.

Azure Files instead of SharePoint Online

Most of my customers are in one way or another moving to Office 365. Not only Exchange Online, but also OneDrive for Business, SharePoint Online, Teams and other cloud services.

SharePoint Online a great solution of collaboration solutions, when multiple people are working on multiple documents in a department, group or project style.

One of my clients has a department with two employees, but with approx. 4TB of primarily static data. They store data on a file share and store it there for 20 years or more. The directory structure reflect the organization, but also the timeframe, so the directory structure is deep and filenames are typically long. Combine this with the 256 character URL limit in SharePoint and there’s the challenge, you can not simple move this to SharePoint Online. Restructuring the data would be a solution when moving to SharePoint Online, but that would be a massive project.

Another solution would be the use of Azure Files, where a file share is created in Azure and where the users can access the files directly in Azure, just like a regular share on the on-premises fileserver. And if you have a low bandwidth and high latency Internet connection, you can always implement a caching server on-premises, where an offline copy is stored on-premises. Compare this to OneDrive for Business where a copy of the data can be stored on your workstation.

To create an Azure file share, follow these steps:

In the Azure Portal, create a new Resource Group (or use an existing one).

To create a new storage account, select All Services in the Azure Portal, and in the all services blade type storage accounts. Click on Storage Accounts and click +Add to create a new storage account. Select your subscription, the Resource Group, enter a unique name, select the location/region closest to your own location and the performance characteristics, like in the following screenshot:

Create Storage Account

Click Review + Create, and after reviewing click Create to create the new storage account.

When the storage account is created you can create the file share. Select the storage account and under File service, select Files and click + File Share. In the upper right corner, enter a name and quota, and click on Create.

The file share is now created and can be viewed in the Azure Portal:

Azure File Share

When you click the Connect icon, commands are shown for Windows, Linux en MacOS to connect the clients to the new file share. When using PowerShell, pay attention to the -Global and -Persist switch to make sure the connection will be kept after you close the PowerShell window and after rebooting. You can use tools of your choice (Storage Explorer, Windows Explorer, XCopy, RoboCopy etc) to copy data from the old location to the Azure File Share.

On the client, you can see the newly created file share in Windows explorer:

Azure File Share Explorer

Summary

In some scenarios it is not always feasible to use SharePoint Online for storing files, and in such scenarios Azure Files can be a good candidate. In this blog I’ve showed you how to create a storage account and an Azure File Share to be used within (Windows) clients.
In my next blog I’ll discuss Azure files and backup, since there’s no Recycle Bin in Azure Files like there is in SharePoint Online or OneDrive for Business.


Block creation of Office 365 Groups

I’m an old school IT guy, in my world provisioning is done via the IT department or via a provisioning tool. What I don’t want is that regular users create all kinds of objects in my environment, whether it be Active Directory, Azure Active Directory or Office 365.

In Office 365 everything is different, multiple services (Outlook, Teams, Planner, SharePoint, PowerBI and others) are using Office 365 Groups under the hood. So, when users create a new plan in Planner or a new team in Teams, they also create an Office 365 Group in Azure Active Directory.

I’m currently working in a 12,000-user environment, and the last thing I want to happen is 12,000 users randomly creating all kinds of groups, ending up in a total mess where nobody can find information and where it is impossible to delete anything without hurting other people.

The solution for this is to assign the creation of new Office 365 to a security group in Azure Active Directory (this can be a cloud object or a synchronized object). To create a new security group in Azure Active Directory you can use the following PowerShell command:

New-AzureADGroup -DisplayName "O365 Group Creators" -SecurityEnabled:$True -MailEnabled:$False -MailNickName "Nothing"

New-AzureADGroup

Note. It is also possible to create a security group in the Azure AD Portal.

The next step is to assign the permission to create Office 365 Groups to this new security group. This can only be achieved using PowerShell and the Azure AD Preview Module, using the following script:

$GroupName = "O365 Group Creators"
$AllowGroupCreation = "False"
Connect-AzureAD
$settingsObjectID = (Get-AzureADDirectorySetting | Where-object -Property Displayname -Value "Group.Unified" -EQ).id
if(!$settingsObjectID)
{
  $template = Get-AzureADDirectorySettingTemplate | Where-object {$_.displayname -eq "group.unified"}
  $settingsCopy = $template.CreateDirectorySetting()
  New-AzureADDirectorySetting -DirectorySetting $settingsCopy
  $settingsObjectID = (Get-AzureADDirectorySetting | Where-object -Property Displayname -Value "Group.Unified" -EQ).id
}
$settingsCopy = Get-AzureADDirectorySetting -Id $settingsObjectID
$settingsCopy["EnableGroupCreation"] = $AllowGroupCreation
if($GroupName)
{
  $settingsCopy["GroupCreationAllowedGroupId"] = (Get-AzureADGroup -SearchString $GroupName).objectid
}
Set-AzureADDirectorySetting -Id $settingsObjectID -DirectorySetting $settingsCopy
(Get-AzureADDirectorySetting -Id $settingsObjectID).Values

When you run this script, you will see a similar output:

GroupCreators

The first box corresponds to the objectID of the security group we’ve created in the first step, just compare with the ObjectID shown in the first screenshot.

The second box shows $false for the EnableGroupCreation property, indicating no other groups are allowed to create Office 365 Groups.

All members of the security group we just created are allowed to create Office 365 groups. There are some exceptions though, Exchange admins, SharePoint admins, Teams admins and User Management admins are by default allowed to create Office 365 groups as well, but typically these are not regular users.

This way you can control who is able to create Office 365 Groups in your environment, and make sure group creation doesn’t explode in your tenant.

More information

Office 365 Group Based Licensing

If you have a smaller organization and you want to assign Office 365 licenses that’s no big deal. Open the user properties in the Microsoft Online Portal and assign the proper license. If needed you can assign only specific services without too much hassle. Besides using the Portal it is also possible to use PowerShell to assign licenses as discussed in an old blog: https://jaapwesselius.com/2014/09/04/assign-office-365-license-via-powershell/

For larger organizations this can be cumbersome and prone to error. Also, when using a dedicated provisioning solution it can be tricky. An interesting solution is to use Group based licensing. You can assign Office 365 licenses to a security group and when a user is added to this group, the user automatically gets the assigned licenses.

In this example we’re going to implement Group based licensing. First we are going to create a baseline where only the basic features of Office 365 E3 are implemented. Next we are going to create another option where additional features are added.

  • Labs_O365_E3_Base
  • Labs_O365_E3_TeamsAndPlanner

License Security Group Active Directory

After synchronization these groups will show up in Azure Active Directory:

License Security Group Azure Active Directory

The next step is to assign the licenses to these security groups.

In the Azure Portal, select Azure Active Directory | Licenses | Office 365 E3 and click + Assign. In the Users and Groups box select the first group (Labs_O365_E3_Base in this example) and in the Assignment Options box select the options you want to assign to this group:

License Options

Use the same steps to assign additional options to the second group:

additional license options

When you create a new user in Active Directory and add this user to the base security group, you’ll see that the user will receive only the licenses assigned to the group. If you want to assign more license options, just add the user to the additional group. This way you are very flexible in assigning licenses, and chances on errors are minimized.

Note. You can assign licenses directly on the user object or using security groups, it is not possible to combine both. So, if you use groups to assign licenses it is not possible to add additional licenses directly on the users object in the Office 365 Portal.

More information

Openspf.org disappeared

I used to use the openspf.org website as a valuable resource for every SPF question I had, especially around creating SPF records. For some reason, most like funding related the openspf.org website disappeared early 2019.

Another valuable resource with information regarding SPF records is:

And for checking SPF records you can use the following sites:

If you know any other site with valuable SPF information, please leave them as a comment.