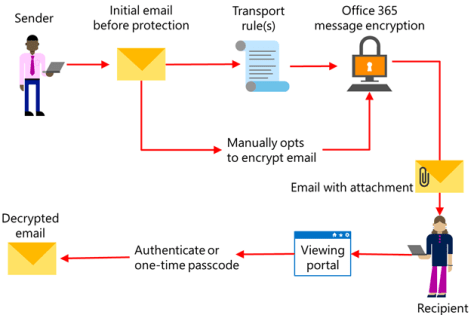
Office 365 Message Encryption (OME) is a Microsoft solution to send mail safely, fully encryption with multiple layers of protection. Instead of sending an email to a recipient via SMTP, the message is encrypted and stored on a Microsoft viewing portal. An informational message is sent to the recipient with a one-time password which the recipient can use to logon to the viewing portal and read the (decrypted) message as shown in the following picture:
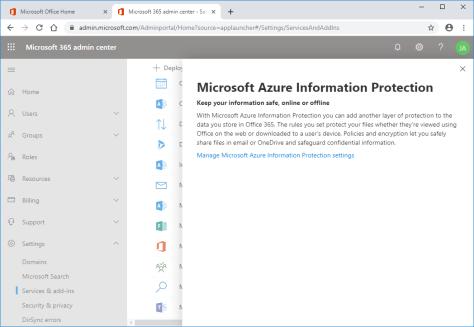
To configure OME you have to enable Azure Rights Management first. To do this, open the Office 365 Admin portal and select Settings | Services & Add-ins. In the details pane select Microsoft Azure Information Protection. Click Manage Microsoft Azure Information Protection Settings as shown in the following screenshot:
Click Activate and after a few moments you will see a confirmation.

If you open Exchange Online Powershell and execute Get-IRMConfiguration you will see that AzureRMS is enabled as shown in the screenshot below. Please note that the LicensingLocation is empty, this is important in subsequent steps.

According to Microsoft documentation you should now be able to test the IRM configuration using the Test-IRMConfiguration command, but this will fail with a “Failed to acquire RMS templates” error as shown in the following screenshot:

The reason for this (took me some time to figure out) is that the LicensingLocation property is empty. To populate this property, we can retrieve the correct value from the Azure AD Right Management service using PowerShell. This can be installed using the Install-Module AIPService command.
After installing, open the Exchange Online PowerShell module and execute the following commands:
PS C:\> $RMSConfig = Get-AadrmConfiguration
PS C:\> $RMSConfig
PS C:\> $LicenseUri = $RMSConfig.LicensingIntranetDistributionPointUrl
PS C:\> $LicenseUri
PS C:\> Set-IRMConfiguration -LicensingLocation $LicenseUri
PS C:\> Set-IRMConfiguration -InternalLicensingEnabled $true
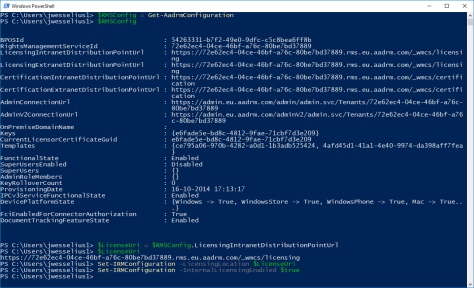
Note. The only reason for executing the $RMSConfig and $LicenseUri commands is to check is there are any values in these variables. The output is shown in the following screenshot:
When you execute the Test-IRMConfiguration command again you will see it succeeds:

So how do you know this works?
The easiest way is to use OWA. To create an additional “encrypt” button in OWA, execute the following command in the Exchange Online PowerShell window:
PS C:\> Set-IRMConfiguration -SimplifiedClientAccessEnabled $true
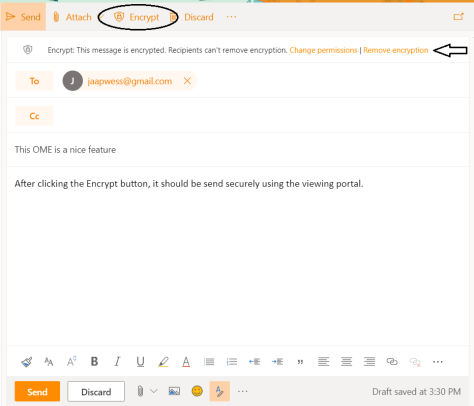
Now when creating a new message in OWA this button is clearly visible. Send a new message (to your own test account for example in Gmail) and click the Encrypt button. A message will appear that this message is encrypted, nice to know, the recipients cannot remove the encryption, only the sender of the message can change this. You can use the change permissions button to change it from encrypt only to do not forward or confidential.
After a few second the email will appear in Gmail, but not directly. You have to open the decrypted message on the viewing portal. A one-time password can be used (which is sent to the same email address, i.e. the Gmail address we used here) or you can use the Gmail account to logon. The latter is also true if the recipient is a hotmail mailbox or even nicer, an Office 365 mailbox.

When you click Read the message it will be opened on the viewing portal.

A message is displayed again that this is an encrypted message. When you reply to the message, an encrypted message is returned to the original sender. If you have selected do not forward in the permissions drop down box earlier, the recipient does not have this option and can only reply to the message.
It also works fine in Outlook (I have tested this with Outlook 2016 Click-2-Run, still have to test other versions). If you create a new message and select Options, you can select Connect to Rights Management Server and get templates under Permissions as shown in the following screenshot:

This will retrieve the RMS templates from Exchange Online that were created earlier in this blog post. In a few seconds you will see the following options:
- Encrypt Only
- Do not forwards
- Confidential
- Confidential View Only

When you select Encrypt Only as shown in the following screenshot an encrypted message will be sent to the intended recipient:

From this point the behavior will be the same as with Outlook Web App as discussed earlier in this blog post.
Summary
Outlook Message Encryption as outlined in this blog post is a way to send encrypted messages to recipients. It’s not encryption in transit like TLS or S/MIME, but the encrypted message is stored on a Microsoft server. The recipient will receive an email that an encrypted message is waiting, and the recipient can logon to a special website using a one-time password (or using a Microsoft or Gmail account).
Since the RMS (Rights Management Service) templates are used it is also possible to use additional features like do not forward (the forward button is greyed out) or tag a message as confidential. This can be used in combination with transport rules to add additional features or mail flow when it comes to confidential information, functionality that’s not available when using good old email.

Your article helped a lot. Thanks for sharing this! There are some guides talking about setting the LicenseLocation to a generic URL which doesn’t work, so getting that information from the AADRM configuration was what I needed. Only thing I would add is that it takes about 10 minutes for the settings to propagate, so Test-IRMConfiguration would fail if executed immediately after making the changes.
LikeLike
how do I resolve the error Set-IRMConfiguration… is not recognized as a cmdlet in the Exchange Online Powershell??? I get stuck at:
Set-IRMConfiguration -LicensingLocation $LicenseUri
LikeLike
How are you logging in? When I use the Microsoft Exchange Online PowerShell Module (downloaded from the Exchange Admin Center) and logon using modern authentication and MFA I can use this command.
LikeLike
Thank you very much man!
LikeLike
Thanks, what a drama. I had to do some additional steps: http://www.edugeek.net/forums/office-software/194109-activating-mail-encryption-users.html
LikeLike
Yes, it can be horrible, I agree
LikeLike
Don’t forgot to connect to Azure Information Protection after installing the aipservice module. After running install-module aipservice you need to run connect-aipservice in order to view/make changes to your Azure Information Protection services.
LikeLike
I had to use this today on a tenant that seemingly never had RMS/OME used before – thank you!
LikeLike