All posts by jaapwesselius

Office 365 Group Based Licensing

If you have a smaller organization and you want to assign Office 365 licenses that’s no big deal. Open the user properties in the Microsoft Online Portal and assign the proper license. If needed you can assign only specific services without too much hassle. Besides using the Portal it is also possible to use PowerShell to assign licenses as discussed in an old blog: https://jaapwesselius.com/2014/09/04/assign-office-365-license-via-powershell/

For larger organizations this can be cumbersome and prone to error. Also, when using a dedicated provisioning solution it can be tricky. An interesting solution is to use Group based licensing. You can assign Office 365 licenses to a security group and when a user is added to this group, the user automatically gets the assigned licenses.

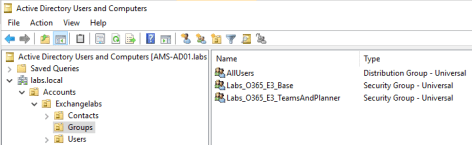
In this example we’re going to implement Group based licensing. First we are going to create a baseline where only the basic features of Office 365 E3 are implemented. Next we are going to create another option where additional features are added.

  • Labs_O365_E3_Base
  • Labs_O365_E3_TeamsAndPlanner

License Security Group Active Directory

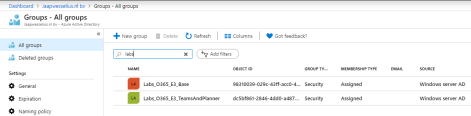
After synchronization these groups will show up in Azure Active Directory:

License Security Group Azure Active Directory

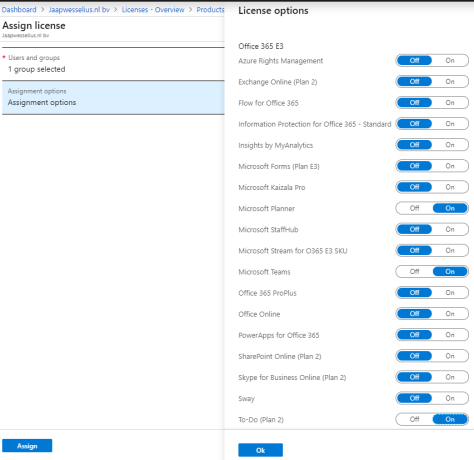
The next step is to assign the licenses to these security groups.

In the Azure Portal, select Azure Active Directory | Licenses | Office 365 E3 and click + Assign. In the Users and Groups box select the first group (Labs_O365_E3_Base in this example) and in the Assignment Options box select the options you want to assign to this group:

License Options

Use the same steps to assign additional options to the second group:

additional license options

When you create a new user in Active Directory and add this user to the base security group, you’ll see that the user will receive only the licenses assigned to the group. If you want to assign more license options, just add the user to the additional group. This way you are very flexible in assigning licenses, and chances on errors are minimized.

Note. You can assign licenses directly on the user object or using security groups, it is not possible to combine both. So, if you use groups to assign licenses it is not possible to add additional licenses directly on the users object in the Office 365 Portal.

More information

Openspf.org disappeared

I used to use the openspf.org website as a valuable resource for every SPF question I had, especially around creating SPF records. For some reason, most like funding related the openspf.org website disappeared early 2019.

Another valuable resource with information regarding SPF records is:

And for checking SPF records you can use the following sites:

If you know any other site with valuable SPF information, please leave them as a comment.

Webinar: Top 5 Exchange hybrid considerations

This Thursday (May 16th) I’ll be doing a webinar on the Top 5 Exchange Hybrid Considerations with Jeff Guillet, MVP and MCM and well known for this ExPTA blogs.

The webinar will be hosted by Nicole Silva from Enow Software and will take approx 35 minutes, there is Q&A at the end and also the possibility to ask questions using a chat window during the call.

Topics are:

  • Identities.
  • Synchronization.
  • Authentication.
  • En two more 🙂

There are still a few seats left, you can register on the Enow website: https://enow.software/2WbwIQJ

Prepopulate mobile phone for multi-factor authentication

I am working with a customer where we want to enable multi-factor authentication for their users as a measure to secure their environment. But when you enable MFA and a user logs on for the first time, the user has to enter his mobile phone number, even if the mobile phone number is populated in on-premises Active Directory and synchronized to Azure Active Directory (which is default).

additional security verification

When you check the user account in the Azure AD portal, you can see that the mobile phone number is synchronized, but the authentication phone number is empty.

authentication contact info

This is not a desired solution, if a user can set a new mobile phone during logon, a malicious user can do this as well. A typical user will logon shortly after the MFA is set, but especially when doing bulk changes this might not be the case. And when a user account that is MFA enabled, but hasn’t set the authentication phone property is compromised you’re screwed.

Out of the box there’s no easy way to prepopulate the authentication phone number. The authentication phone number is not store in on-premises Active Directory, it’s an Azure AD property. The property to control the strong authentication is called StrongAuthenticationMethods and you can set this using PowerShell. When you set this, the authentication phone number is still prepopulated, but when the mobile phone number is synchronized, this is used in the first place.

To set this StrongAuthenticationMethods property you can use the following PowerShell commands:

Connect MsolService 
$UserPrincipalName = "j.brown@exchangelabs.nl"
$SMS = New-Object -TypeName Microsoft.Online.Administration.StrongAuthenticationMethod
$SMS.IsDefault = $true
$SMS.MethodType = "OneWaySMS"
$Phone = New-Object -TypeName Microsoft.Online.Administration.StrongAuthenticationMethod
$Phone.IsDefault = $false
$Phone.MethodType = "TwoWayVoiceMobile"
$PrePopulate = @($SMS, $Phone)
Set-MsolUser -UserPrincipalName $UserPrincipalName -StrongAuthenticationMethods $PrePopulate

Now when the user logs on for the first time with MFA enabled, he’s presented the enter code dialog box, without having to enter a mobile number first.

we texted your phone

If you do this, and the mobile phone number is not set in on-premises Active Directory, MFA will still try to use the mobile phone number, but nothing will happen as shown in the following screenshot:

we are having trouble verifying your account

Since there’s no mobile phone number to use, and no option to add this anymore directly by the user you’re stuck here (until the mobile phone number is added to on-premises Active Directory of course).

Note. If you want to enable MFA using PowerShell, you can use the following commands (and maybe combine them with the commands mentioned earlier):

$Strong = New-Object -TypeName Microsoft.Online.Administration.StrongAuthenticationRequirement
$Strong.RelyingParty = "*"
$Strong.State = "Enabled"
$MFA = @($Strong)
Set-MsolUser -UserPrincipalName j.smith@exchangelabs.nl -StrongAuthenticationRequirements $MFA

More information

Exchange Hybrid TLS negotiation failed with error NoCredentials

Recently I ran the Hybrid Configuration Wizard in an Exchange 2016 and Exchange 2019 environment. There were also two Edge Transport servers in this environment. One Exchange 2016 CU12 Edge Transport server is used for internet communication, one Exchange 2019 CU1 Edge Transport server (running on Windows 2019 Server Core) is used for hybrid communication. This server was selected in the Hybrid Configuration Wizard, proper certificate was selected etc. and the Hybrid Configuration Wizard finished successfully.

When the wizard finished the Receive Connector on the Edge Transport server was modified for hybrid mail flow. Validating the Send Connector from Exchange Online to Exchange on-premises revealed no issues, the test message was successfully sent and received in my mailbox.

But message flow from Exchange on-premises to Exchange Online was not working and mail was stuck in the Queue on the Edge Transport server. Looking at the Queue it seems there’s a time-out issue since it says:

LastError : [{LED=451 4.4.395 Target host responded with error. -> 421 4.4.1 Connection timed out};{MSG=};{FQDN=exchangelabsnl-mail-onmicrosoft-com.mail.protection.outlook.com}; {IP=104.47.10.36};{LRT=5/2/2019 6:32:14 AM}]

421 4.4.1 connection timed out

It is not a firewall issue, I can use Telnet to connect on port 25 and send a message to myself (which arrives in the junk mail folder, but it arrives).

Opening the Send Connector protocollog file (enable in on the outbound connector first) shows a different error. When trying to execute the TLS handshake it fails with TLS negotiation failed with error NoCredentials.

TLS Negotiation failed with error NoCredentials

This is strange since the same certificate is used by the Receive Connector (you can check this using https://checktls.com and entering the FQDN of the Exchange server holding the Receive Connector).

The “TLS negotiation failed with error NoCredentials” looks like a private key issue with the certificate (according to Microsoft kb article KB4495258) but PowerShell shows it does have a private key:

Has Private Key

When going back to the protocol logfile you can see the certificate thumbprint in the data field, and this thumbprint didn’t match the thumbprint of the certificate that Get-ExchangeCertificate returned.

Certificate Thumbprint

But, Get-ExchangeCertificate only returns certificates that have a private key, if there isn’t a private key nothing is returned.

When opening the certificate store using PowerShell using the following commands:

CD Cert:
Cd LocalMachine
Set-Location my
Get-ChildItem

All certificates in the store are shown, and when checking the certificate with the thumbprint we got from the protocol log, this one does not have a private key:

Check private key

That explains the NoCredentials error messages. Use the following command to remove the wrong certificate:

Get-ChildItem | ?{$_.Thumbprint -like “B79*”} | Remove-Item

After restarting the Transport service cross-premises mail flow works again.

The main question is of course how this happened. I’m not sure, but I do remember requesting several certificates at the same time (a few weeks ago) and there were a few errors. I didn’t pay too much attention to this since everything seemed to work fine. But in the end it turned out to be not the case, and I didn’t notice in the first place because of inbound SMTP working fine. Sigh…. 😊