In my previous blog post I’ve explained more about the Exchange resource forest model where user accounts are located in a dedicated forest with only the user account (and their regular resources) and where Exchange is installed in a resource forest. There’s a forest trust between the resource forest and the account forest, and the mailboxes are configured as linked mailboxes. This is shown in the following figure:

In this blogpost we will add an Azure AD Connect server to enable synchronization between the on-premises Active Directories and Office 365.
Exchange Resource forest and Azure AD Connect
If we want to create a hybrid scenario with our resource forest and Exchange Online we have to implement Azure AD Connect first. Azure AD Connect will synchronize account information from the account forest, and linked mailbox information from the resource forest. To achieve this, we have to setup a multi-forest synchronization model (which is also fully supported by Microsoft).
The Azure AD Connect server will be installed in the account forest. To retrieve the information about the mailboxes from the resource forest, a service account will be used as shown in the following figure:

In a typical environment there’s only one Active Directory containing both user accounts and exchange servers. As such, the user accounts have the corresponding Exchange properties. In a Resource Forest scenario there are two user accounts, where the user account in the Resource Forest is disabled and this disabled account contains the Exchange properties.
The Azure AD Connect server (which is running in the Account Forest) combines the two accounts based on the objectSID and MSExchMasterAccountSid and synchronizes this ‘joined’ account information to Azure Active Directory, as shown in the following figure:

The prerequisites for Azure AD Connect is a Resource Forest scenario are the same as for a regular environment, so I won’t go into too much detail about this. Of course you need an internet routable domain for your accounts (i.e. don@accounts.local won’t work, so this needs to be changed to don@exchangefun.nl), your accounts need to be checked for inconsistencies with the IDFix tool and of course you have to configure your tenant in Office 365. For more information regarding the process, please check my blog Implementing Directory Synchronization. It’s a somewhat older blog, but the steps remain the same.
You can download the latest version of Azure AD Connect from the Download Azure AD Connect. I will only show the most important screenshots when running the Azure AD Connect wizard.
Azure AD Connect can be installed using an Express setup, this is the default setting and is sufficient if you have a single forest environment with less than 100,000 objects in Active Directory and where using SQL Express is sufficient. In our Resource Forest environment we have multiple Active Directory forest, so a custom setup is needed, so select Customize in the Express Settings window:

Continue with the wizard until you reach the User Sign-in window. Here you have to select which authentication method is used when users sign-in into Office 365. Make your selection and click Next to continue.

After entering the (Global) tenant administrator credentials, the forests need to be added to the Azure AD Connect wizard. In the Connect your directories window the Active Directory forest where your Azure AD Connect server resides will appear. To add this directory, click Add Directory:

The Add Forest Account window will appear. Here you can select if a new service account for Azure AD Connect will be created, or that an existing service account will be used. An Enterprise Admin Account will be used to create this service account, and configure Azure AD Connect for first use. It must be an Enterprise Admin account because information is written into the Configuration partition of Active Directory. Enter the credentials of the Enterprise Admin (in your Account Forest) and click OK to continue.

Repeat these steps for the Resource Forest, so enter the forest name, select the radio button to create a new service account and enter the Enterprise Admin credentials in the Resource Forest as shown in the following two figures:


Continue with the wizard, select the Domain/OU filtering options for both Forest and make sure you select the containers containing the user accounts in the Account Forest and the corresponding Mailboxes in the Resource Forest as shown in the following two figures:


The Uniquely identifying your users is the most important window in the Azure AD Connect wizard. This is where the user account in the Account Forest and the corresponding mailbox in the Resource Forest are tied together. In the previous blogpost I’ve explained the objectSID and the msExchMasterAccountSID, so this option is selected.

Continue the Azure AD Connect wizard, and in the Optional Features select the Exchange Hybrid Deployment checkbox and click Next to continue.

You’re now ready with the Azure AD Connect wizard. In the Ready to configure window you can chose to start the synchronization immediately, or enable the Azure AD Connect server in staging mode. In this mode it will collect all information and fill the SQL Express database with data, but it won’t write any data to Azure Active Directory until you’ve checked everything. Select the option you want and click install to finish the wizard and install/configure Azure AD Connect.

At the configuration complete window there are some recommendations and/or remarks for your reference, click Exit to stop the Azure AD Connect wizard.

Now, when you logon to the Microsoft Portal you’ll see that synchronization has occurred:

And when you expand the users option you’ll see which users are synchronized.

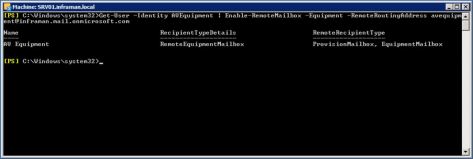
When you logon to the Exchange Admin Console in Exchange Online and check the Recipients | Contacts folder, you’ll see the users appear here. This makes sense, since the on-premises Mailboxes are represented as Mail-Enabled Users in Exchange Online.

Summary
In this blogpost I’ve showed you how to implement Azure AD Connect in an existing Exchange Resource Forest model. The Azure AD Connect server combines the user account from the Account Forest with the mailbox from the Resource Forest and synchronizes this to Azure Active Directory.
In my next blog I’ll create a hybrid environment based on the Exchange resource forest model.
Ps. a special thanks to ‘Trekveer Harry’ for his continuous brainstorm sessions and good ideas ![]()


You must be logged in to post a comment.