Tag Archives: Exchange 2019

Exchange Quarterly Updates: Exchange 2019 CU11 and Exchange 2016 CU22

On September 28, 2021 Microsoft released their quarterly updates for Exchange server, Exchange 2019 CU11 and Exchange 2016 CU22. Despite earlier communications a new CU for Exchange 2016 is released as well.

Besides normal fixes, a new feature is introduced in these CUs as well, the Exchange Emergency Mitigation Server or EEMS. EEMS is a new service that can mitigate new security breaches when they arise. EEMS connects to a Microsoft endpoint (https://officeclient.microsoft.com/getexchangemitigations) and when needed, downloads and installs available mitigations. It performs a check once an hour. If you don’t feel comfortable with this, it is possible to disable this on an organization level 😉

Also new in Exchange 2019 CU11 and Exchange 2016 CU22 is telemetry regarding the mitigation service. When configured, it will automatically upload mitigation related service to Microsoft. Again, this can be disabled as well using the license agreement (enabled by default).

When installing this update you will see change in the License Agreement:

The default is I accept the license agreement and will share diagnostics data with Microsoft (recommended), but you can select other as well of course.

When using the unattended install, a new switch is used for accepting the License Agreement.

  • /IAcceptExchangeServerLicenseTerms_DiagnosticDataON – when you allow to upload diagnostics data to Microsoft
  • /IAcceptExchangeServerLicenseTerms_DiagnosticDataOFF – when you do not allow to update diagnostics data to Microsoft.

There are also two new prerequisites when installing Exchange 2019 CU11 or Exchange 2016 CU22. Prerequisite software contains now the ‘IIS URL Rewrite Module’ which needs to be installed. The second one is connectivity to the internet for accessing the mitigation service endpoint.

The setup application will check for these prerequisites and will generate an error when they are not met:

Note. The internet connectivity is not shown in this screenshot.

The ‘IIS URL Rewrite Module’ can be downloaded from https://download.microsoft.com/download/1/2/8/128E2E22-C1B9-44A4-BE2A-5859ED1D4592/rewrite_amd64_en-US.msi

Using PowerShell you can download the module, store it in the C:\Install directory and install it unattended using the following commands:

Start-BitsTransfer -Source "https://download.microsoft.com/download/1/2/8/128E2E22-C1B9-44A4-BE2A-5859ED1D4592/rewrite_amd64_en-US.msi" -Destination C:\Install
Start-Process -FilePath "C:\Install\ rewrite_amd64_en-US.msi " -ArgumentList "/q" -Wait

Updating the Exchange server to this latest CU is not different compared to earlier versions (except for the license agreement switch):

Setup.exe /PrepareSchema /IAcceptExchangeServerLicenseTerms_DiagnosticDataON
Setup.exe /PrepareAD /IAcceptExchangeServerLicenseTerms_DiagnosticDataON
Setup.exe /PrepareDomain /IAcceptExchangeServerLicenseTerms_DiagnosticDataON

Setup.EXE /Mode:Upgrade /IAcceptExchangeServerLicenseTerms_DiagnosticDataON

Note. There are no schema changes when upgrading from Exchange 2019 CU10 or Exchange 2016 CU21, but there are changes when upgrading from previous releases.

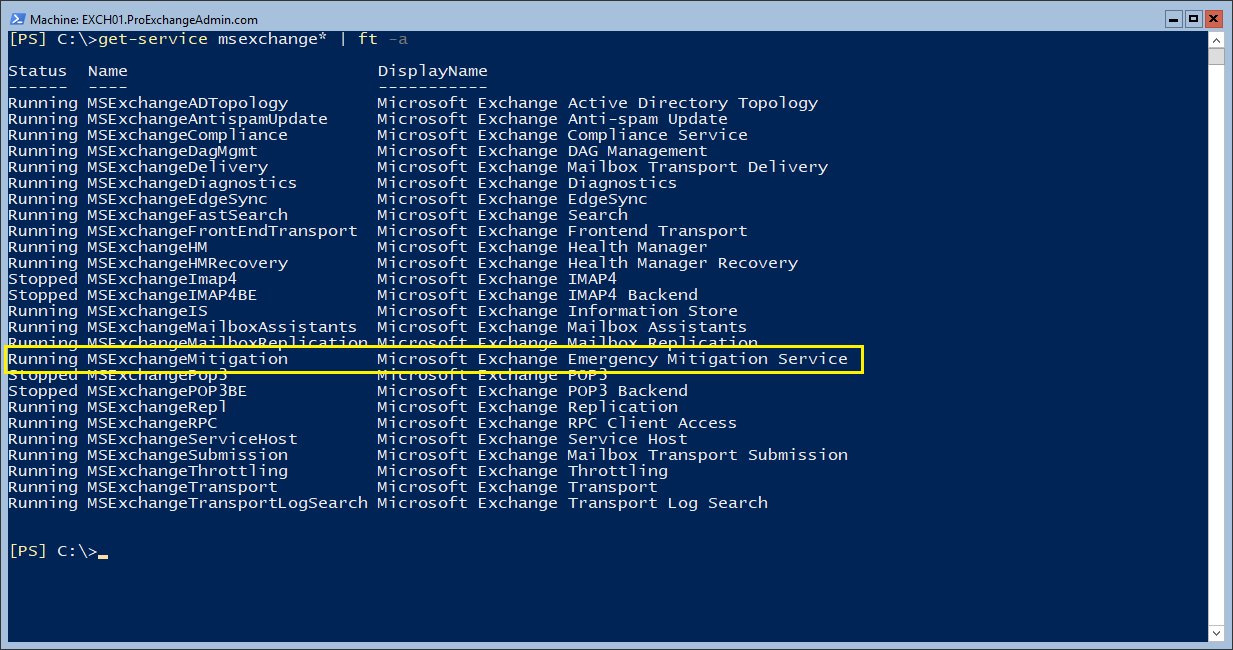
After installing the updates, you will see the new services when opening the services MMC snap-in:

Or when using the Get-Service MSExchange* PowerShell command:

To check the status in the Exchange organization, you can use the Get-OrganizationConfig | Select mitigations command:

To disable the mitigation service, execute the following command:

Set-OrganizationConfig -MitigationsEnabled:$False

By default, only one mitigation is installed, this is the EEMS heartbeat probe. You can check the installed mitigations by navigating to the Exchange scripts directory and execute the Get-Mitigations.ps1 script:

As with any Cumulative Update, please test this CU in your lab to see if all works well for your environment. Also have a look at the telemetry configuration (is that allowed in your organization?) and at the automatic configuration changes made by the EEMS (I can hear CISO starting to complain).

More information and downloads regarding the Cumulative Updates can be found here:

Check Server Core for Exchange 2019 Security Updates

When you want to check which updates are installed on an Exchange server you can navigate to Control Panel | Programs | View Installed Updates and you will see a list of installed updates, including the Exchange Security Updates.

When running Exchange 2019 on Windows 2019 Server Core there is no Control Panel and you can view the registry to check which updates are installed. Use the following command to view all installed Updates:

Get-ItemProperty HKLM:\SOFTWARE\Microsoft\Windows\CurrentVersion\Uninstall\*| select-object displayname

Or more specifically for Exchange Server:

Get-ItemProperty HKLM:\SOFTWARE\Microsoft\Windows\CurrentVersion\Uninstall\*| ?{$_.DisplayName -like "*Exchange Server*"} | Select DisplayName

This will show all software and updates for Exchange as shown in the following screenshot:

Get-DatabaseAvailabilityGroupNetwork Misconfigured

When installing a Database Availability Group in Exchange 2019 running on Windows 2019 Server Core, I got IP address configuration errors when creating the DAG. It did succeed, but when running the Get-DatabaseAvailabilityGroupNetwork command in EMS is get a ‘Misconfigured’ warning:

Or in plain text:

Get-DatabaseAvailabilityGroupNetwork
Identity ReplicationEnabled Subnets
-------- ------------------ -------
DAG01\MapiDagNetwork True {{10.38.96.0/24,Misconfigured}, {192.168.0.0/24,Misconfigured}}

This will be a DAG with two networks. One Mapi network (10.38.96.0/24) for clients, and one replication network (192.168.0.0/24).

The requirements for an additional replication network in a DAG are:

  • No default gateway configured
  • No DNS servers configured
  • IP address must not be registered in DNS

When using Windows 2019 Server Core, the first two can be configured using the SCONFIG utility, but the last one is not that simple (but in Windows 2019 Desktop Experience it is just a matter of deselection the “Register this connection’s address in DNS” option when configuring the network interface).

When using Windows Server Core, you can use the Set-DnsClient command to configure this setting, combined with the Get-NetAdapter command.

Execute the Get-NetAdapter command to retrieve the network interfaces. In the following screenshot “Ethernet” is the regular Mapi network interface, “Ethernet 2” is the replication network interface.

To configure the DNS registration option, execute the following command:

Get-NetAdapter -Name "Ethernet 2" | Set-DnsClient -RegisterThisConnectionsAddress $False

When you run the Get-DatabaseAvailabilityGroupNetwork command again, both DAG networks will show up correctly.

Microsoft Teams and Exchange 2016 connectivity

More than a year ago I wrote a blogpost regarding Teams calendaring and Exchange 2016 integration: https://jaapwesselius.com/2020/04/07/microsoft-teams-and-exchange-2016/.

Currently I am working with a customer on this specific scenario, and to my surprise I ran into this Teams/Exchange connectivity test on the Microsoft Remote Connectivity Analyzer (https://aka.ms/exRCA). Open the Remote Connectivity Analyzer, select Microsoft Teams and click the Teams Calendar Tab button. Login with the account you want to test (in this example I have an on-premises mailbox on Exchange 2019, but works for Exchange 2016 as well) and click Perform Test.

Within seconds you will see if connectivity from Microsoft Teams to your Exchange server is working properly. Very nice!

Office Online server – Sorry there was a problem and we can’t open this document

For a current project I am working with Exchange 2019 and for OWA we want to implement Office Online Server. I did this in the past and blogged about it (Install Office Online Server 2016) so I thought it should not be a big deal.

Installed Windows 2016, installed prerequisite software, configured an SSL certificate, installed Office Online Server and created a new Office Web Apps farm.

After testing the https://fqdn/hosting/discovery and configured the organization configuration everything must be good.

When opening an attachment in OWA I do see the OOS environment, it tries to open a document and then generates this error:

“Sorry, there was a problem and we can’t open this document. If this happens again, try opening the document in Microsoft Word.”

When opening an Excel attachment, I get the following error message:
“Unable to open the file. We couldn’t find the file you wanted. It’s possible the file was renamed, moved or deleted.”

I know Office Online Server is sensitive for SSL certificates, but this was a regular Digicert certificate. Name resolution was fine as well. But the check https://fqdn/op/generate.aspx failed as well with the following (pretty useless) error:

“Server Error. We’re sorry. An error has occurred. We’ve logged the error for the server administrator.”

Unfortunately, nothing useful in the eventlog, or in the ULS logging on the Office Web Apps server. Asked colleagues, but they had only experience with Exchange 2016 and OOS.

After two days of searching, fiddling with the server, checking .NET versions (Windows 2016 comes with a newer version of .NET then required by Office Online Server), rebuilding the Office Online Server several times I realized it might be a TLS 1.2 issue. Exchange 2019 is using TLS 1.2 only by default, whereas Exchange 2016 can use multiple versions of TLS.

So, on the Windows 2016 server with OOS, I enabled strong cryptography in .NET and disabled older versions of TLS on Windows to fix the issue.

To enable strong cryptography in the .NET Framework, add the following registry key:

[HKEY_LOCAL_MACHINE\SOFTWARE\Microsoft.NETFramework\v4.0.30319]
"SchUseStrongCrypto"=dword:00000001

To disabled older versions or TLS, add the following registry keys:

[HKEY_LOCAL_MACHINE\SYSTEM\CurrentControlSet\Control\SecurityProviders\SCHANNEL\Protocols]

[HKEY_LOCAL_MACHINE\SYSTEM\CurrentControlSet\Control\SecurityProviders\SCHANNEL\Protocols\PCT 1.0]
@="DefaultValue"

[HKEY_LOCAL_MACHINE\SYSTEM\CurrentControlSet\Control\SecurityProviders\SCHANNEL\Protocols\PCT 1.0\Server]
@="DefaultValue"
"Enabled"=dword:00000000

[HKEY_LOCAL_MACHINE\SYSTEM\CurrentControlSet\Control\SecurityProviders\SCHANNEL\Protocols\SSL 2.0]
@="DefaultValue"

[HKEY_LOCAL_MACHINE\SYSTEM\CurrentControlSet\Control\SecurityProviders\SCHANNEL\Protocols\SSL 2.0\Server]
@="DefaultValue"
"Enabled"=dword:00000000

[HKEY_LOCAL_MACHINE\SYSTEM\CurrentControlSet\Control\SecurityProviders\SCHANNEL\Protocols\SSL 3.0]
@="DefaultValue"

[HKEY_LOCAL_MACHINE\SYSTEM\CurrentControlSet\Control\SecurityProviders\SCHANNEL\Protocols\SSL 3.0\Server]
@="DefaultValue"
"Enabled"=dword:00000000

[HKEY_LOCAL_MACHINE\SYSTEM\CurrentControlSet\Control\SecurityProviders\SCHANNEL\Protocols\TLS 1.0]
@="DefaultValue"

[HKEY_LOCAL_MACHINE\SYSTEM\CurrentControlSet\Control\SecurityProviders\SCHANNEL\Protocols\TLS 1.0\Server]
@="DefaultValue"
"Enabled"=dword:00000000

[HKEY_LOCAL_MACHINE\SYSTEM\CurrentControlSet\Control\SecurityProviders\SCHANNEL\Protocols\TLS 1.1]
@="DefaultValue"

[HKEY_LOCAL_MACHINE\SYSTEM\CurrentControlSet\Control\SecurityProviders\SCHANNEL\Protocols\TLS 1.1\Server]
@="DefaultValue"
"Enabled"=dword:00000000

After rebooting the Office Online Server, it worked as expected.