All posts by jaapwesselius

Remove Million Log Files from Exchange Server

Customer is running Exchange 2010 with NetBackup for backup. At some point the backup stalled and the Exchange server (passive node) froze. Only hard reboot turned the node back to life.

After lots of troubleshooting it turned out that there were several million (small) log files located in C:\Program Files\Veritas\NetBackup\online_util\ which caused the backup to freeze.

The problem is… how do you remove so many files from a (local) hard disk? A command prompt or Windows Explorer is generally speaking not a good idea, but you can do this with PowerShell.

First load the file into an array with this command:

$Logfiles = [System.IO.Directory]::GetFiles("C:\Program Files\VERITAS\NetBackup\online_util\_fi_cntl", "*.*")

It took approx. 3 minutes to load all files in the $Logfiles array.

To remove the first 100,000 files and determin the time needed the following commands was used:

a=get-date;$Logfiles[0..99999]|%{[System.IO.file]::delete($_)};
$b=get-date

This took only 61 seconds. Disk activity never came over 15%

As a side note: The admins also tried it using a command prompt and a standard del command, this took approx. 53 minutes to remove 100,000 files.

A second batch with 2,000,000 logfiles took 1500 seconds (15 minutes) to remove. Disk activity however kept raising during this 15 minutes up to 100%. To prevent too many issues with (disk) performance customer decided to remove the logfiles in batches of 500,000 items until all logfiles are removed.

Special thanks to Kees de Groot (Big-IT.nl and ex2013.com)

Enable File History in Windows 8.1

This blog post is more a ‘note to self’, but for my work I write a lot of documents and a proper backup of my documents is key for me. The last thing I want to happen is a crash of my hard disk and lose valuable data. So, at home I have a Synology NAS (with 5 disks in RAID-5) and I want to store backups on this device.

To configure File History (which let you create backups) open Control Panel, select System and Security and select File History. File History is disabled by default:

image

Continue reading Enable File History in Windows 8.1

Implementing Directory Synchronization

Updated: November 11, 2015,
Updated: April 20, 2018

In an earlier blog I explained the differences between Cloud Identities, Linked Identities and Federated Identities. The source of authority (i.e. where the accounts are managed) for Cloud Identities is Microsoft Online and for Linked and Federated Identities the source of authority is your on-premises Active Directory. To get these accounts in Azure Active Directory (Office 365) you have to setup a directory synchronization between Active Directory and Azure Active Directory.

As explained earlier I prefer to use a dedicated DirSync server instead of installing DirSync on your Domain Controller (which is possible and supported). When using a dedicated DirSync server, you can keep your Domain Controllers identical and work on your Domain Controllers while not affecting your DirSync server. We now will build a configuration like this:

Implemented DirSYnc server

There are two options when setting up Directory Synchronization between your on-premises Active Directory and Windows Azure Active Directory:

  • DirSync as a tool that can be downloaded from the Microsoft Online Portal. This is the ‘original’ DirSync tool which can be installed on a Domain Controller or on a dedicated DirSync server. This tool will be decommissioned somewhere in the (near) future.
  • Microsoft Azure Active Directory (WAAD) Sync Services, the new DirSync tool that can be downloaded from http://www.microsoft.com/en-us/download/details.aspx?id=44225. This tool has the option to synchronize a multi-forest topology with one tenant in Office 365.

Note. On June 24, 2015 Microsoft has released the Azure AD Connect & Connect Health. Azure AD Connect is the latest version of the Directory Synchronization. This blog is based on the previous Azure AD Sync, but I strongly recommend you look into the Azure AD Connect tool (there are a lot of similarities) which you can download from the Download center.

Added note on April 20, 2018. Azure AD Connect is now the only supported version for implementing directory synchronization. It is updated on a regular basis and available via the Azure AD Connect download. If you perform a default installation, Azure AD Connect will automatically update itself when a new version is available.

Continue reading Implementing Directory Synchronization

Upgrade Lync 2013 to Skype for Business 2015 Step-by-Step

Now that Microsoft has released Skype for Business 2015 it’s time to have a look at the upgrade possibilities. I’m running Lync 2013 Standard Edition in my environment (Lync 2013 Front-End Server, Lync 2013 Edge server and Lync 2013 Mediation server), and lucky enough there is an in-place upgrade possibility. A downtime if required, but when scheduling off business hours this should not be a problem. In this blog post I’ll discuss a step-by-step upgrade from Lync 2013 Standard edition to Skype for Business 2015.

Requirements

Before the servers can be upgraded to Skype for Business 2015 a number of requirements need to be met, depending of the underlying Operating System:

  • Microsoft Lync Server 2013 CU5 (February 2015 update) or above
  • PowerShell RTM version (6.2.9200.0) or later
  • SQL Server 2012 SP1 or later
  • Kb2533623 Windows Server 2008 R2
  • Kb2858668 Windows Server 2012
  • KB2982006 Windows Server 2012 R2

I’m running Windows Server 2012 R2 on all my servers, so the only updates I have to apply is the Cumulative Update for Lync (to be safe, the May 2015 Cumulative Update (https://support.microsoft.com/en-us/kb/3051949) and the SQL Server 2012 SP1 update.

Continue reading Upgrade Lync 2013 to Skype for Business 2015 Step-by-Step

Creating an Exchange 2013 Hybrid environment

Updated: November 11, 2015

In a series of blog posts we will create an Exchange hybrid environment, where the on-premises environment consists of Exchange 2013 multi-role servers. Creating such an environment consists of several steps:

  • Implementing Directory Synchronization.
  • Running the Hybrid Configuration Wizard.
  • Creating Migration Endpoints.
  • Moving Mailboxes to Exchange Online.

Current Infrastructure

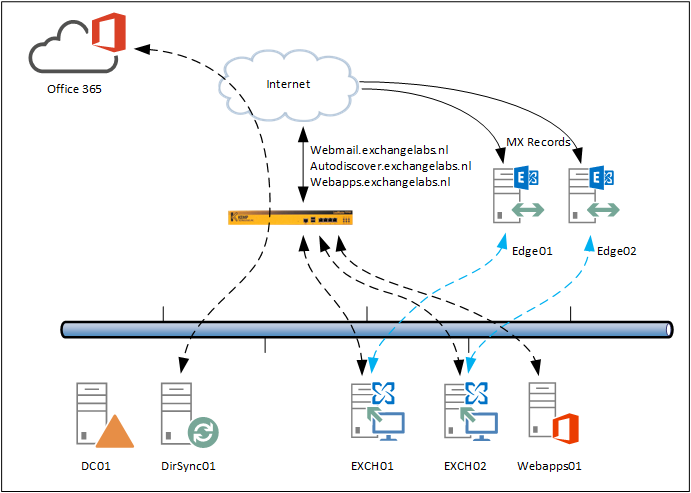
The current infrastructure consists of two Exchange 2013 multi-role servers and two Exchange 2013 Edge Transport servers, all of which are fully patched and running the latest version of Exchange 2013 (i.e. Exchange 2013 CU8). An Office Web Apps 2013 servers is also involved for rendering attachments in Outlook Web App.

A Kemp LM3600 LoadMaster is used for distributing incoming client requests from the Internet across both servers. SMTP is directed to two Exchange 2013 Edge Transport servers, which are subscribed to the internal Exchange 2013 servers, as shown in Figure 1.

image

Figure 1. The starting point when creating a new Hybrid environment.

In Office 365 we have are using a tenant called ExchangeLabsNL, for Exchange Online the tenant name is not important, but for SharePoint Online it is important. The corresponding SharePoint Online environment is accessible via Exchangelabs.nl.sharepoint.com, so the tenant name is important after all.

Note. The tenant name cannot be changed later on, so don’t choose any silly names for your tenant. One day you will regret this.

Directory Synchronization Server

In our on-premises environment we are going to install a dedicated Directory Synchronization server. This is not really a hard requirement since DirSync can be installed on a Domain Controller as well. Personally I prefer to use a dedicated DirSync server and keep all Domain Controllers identical.

Exchange Hybrid Server

There’s a lot of confusion about the Exchange Hybrid server when creating an Exchange Hybrid environment and to be honest, it took quite some time for me as well to get rid of the confusion.

A true hybrid server does not exist, but in Microsoft terminology, the hybrid server is the Exchange server where the Hybrid Configuration Wizard (or HCW) is run to configure a Hybrid Configuration. And the Hybrid Configuration is nothing more than some information written in Active Directory so it can be easily found and used by all Exchange servers in the organization. In Figure 1, the hybrid server can be either server EXCH01 or server EXCH02.

An additional Exchange 2013 server can be added as a hybrid server. You can even use a dedicated FQDN like hybrid.contoso.com for this to separate SMTP and migration traffic from/to Office 365 form regular client traffic accessing the normal Exchange servers EXCH01 and EXCH02.

Free/busy information in this scenario for example is not using the dedicated hybrid server, since it is not possible to designate this kind of traffic to dedicated servers. When users in Exchange Online are creating new meetings with users in Exchange on-premises, the free/busy information is found using the normal Exchange EWS virtual directory. This information in turn is found using normal Autodiscover requests.

So, before you start building your Exchange Hybrid environment you have to make absolutely sure your starting point is working flawlessly, internally and externally. If you run into issues with AutoDiscover, free/busy, out-of-office or Certificate errors you have to fix these first before continuing with the hybrid configuration. One great tool to test your existing environment is the Remote Connectivity Analyzer (www.testexchangeconnectivity.com) and of course your own Outlook clients Glimlach 

Note. If you are running Exchange 2010 you can also use the existing Exchange 2010 servers to create a hybrid environment without adding Exchange 2013 servers (although you have to be absolutely sure about this, Exchange 2010 is no longer in mainstream support). If you want to use Exchange 2013 in your existing Exchange 2010 environment you have to start a coexistence project first. When this is fully functioning (without error of course) you can continue with the DirSync and hybrid configuration.

When all is running fine you can continue with implementing the DirSync solution, as outlined in the following blogpost: https://jaapwesselius.com/2015/05/13/implementing-directory-synchronization/