When uninstalling an Exchange server that is part of a Database Availability Group, you perform several steps to remove the server from the DAG and maybe even delete the DAG itself.
So, after decommissioning the DAG I wanted to uninstall Exchange, but the readiness check failed with the following error message:
Unfortunately this link has not been updates since 2015, and does not contain any useful information.
I decommissioned the DAG earlier as you can see in the following screenshot, but it still failed the readiness check:
When using the Get-DatabaseAvailabilityGroup command nothing showed up, and also when checking Active Directory with ADSI Edit (CN=Organization, CN=Administrative Groups, CN=Exchange Administrative Group (FYDIBOHF23SPDLT), CN=Database Availability Groups) nothing is shown.
The DAG is using bits of Windows failover clustering, so the culprit must be there. When executing the Get-ClusterNode and Get-Cluster commands in PowerShell, some DAG leftovers (on this particular machine) showed up:
Something must have gone wrong during decommissioning of the DAG, although no error were shown on the console.
To remove the cluster node (and thus the cluster) from this machine, execute the following command in PowerShell:
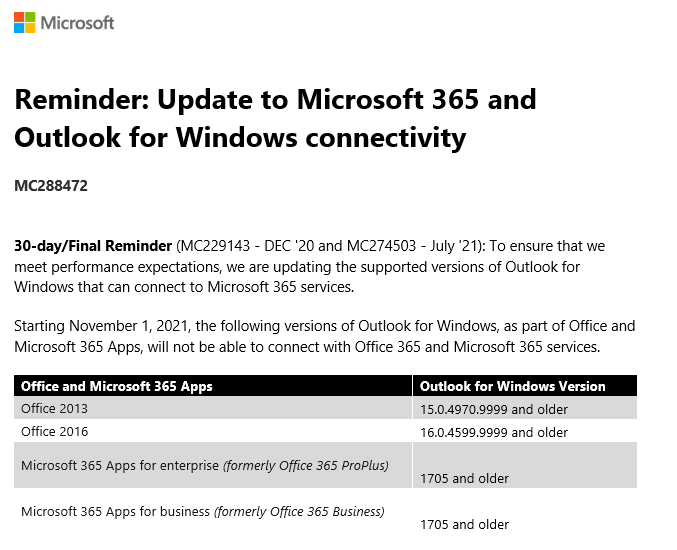
In short, all clients older than Outlook 2013 SP1 with the latest fixes are no longer able to connect to Exchange Online. And yes, this includes Outlook 2010 (I know there are still clients out there running Office 2010!).
More detailed version numbers of Outlook that will not connect anymore:
Office version
Outlook version
Office 2010
All versions
Office 2013
15.0.4970.9999 and older
Office 2016
16.0.4599.9999 and older
Office 365 ProPlus
1705 and older
To check the version of Outlook you are using, select File –> Office Account –> About Outlook. It will show something like Microsoft® Outlook® for Microsoft 365 MSO (16.0.14326.20384) 64-bit.
Please be aware that this is completely independent from the Basic Authentication strategy that Microsoft is following. Older versions will just stop connecting to Exchange Online.
For more information, check MC288472 in the Microsoft 365 Message Center.
On September 28, 2021 Microsoft released their quarterly updates for Exchange server, Exchange 2019 CU11 and Exchange 2016 CU22. Despite earlier communications a new CU for Exchange 2016 is released as well.
Besides normal fixes, a new feature is introduced in these CUs as well, the Exchange Emergency Mitigation Server or EEMS. EEMS is a new service that can mitigate new security breaches when they arise. EEMS connects to a Microsoft endpoint (https://officeclient.microsoft.com/getexchangemitigations) and when needed, downloads and installs available mitigations. It performs a check once an hour. If you don’t feel comfortable with this, it is possible to disable this on an organization level 😉
Also new in Exchange 2019 CU11 and Exchange 2016 CU22 is telemetry regarding the mitigation service. When configured, it will automatically upload mitigation related service to Microsoft. Again, this can be disabled as well using the license agreement (enabled by default).
When installing this update you will see change in the License Agreement:
The default is I accept the license agreement and will share diagnostics data with Microsoft (recommended), but you can select other as well of course.
When using the unattended install, a new switch is used for accepting the License Agreement.
/IAcceptExchangeServerLicenseTerms_DiagnosticDataON – when you allow to upload diagnostics data to Microsoft
/IAcceptExchangeServerLicenseTerms_DiagnosticDataOFF – when you do not allow to update diagnostics data to Microsoft.
There are also two new prerequisites when installing Exchange 2019 CU11 or Exchange 2016 CU22. Prerequisite software contains now the ‘IIS URL Rewrite Module’ which needs to be installed. The second one is connectivity to the internet for accessing the mitigation service endpoint.
The setup application will check for these prerequisites and will generate an error when they are not met:
Note. The internet connectivity is not shown in this screenshot.
Note. There are no schema changes when upgrading from Exchange 2019 CU10 or Exchange 2016 CU21, but there are changes when upgrading from previous releases.
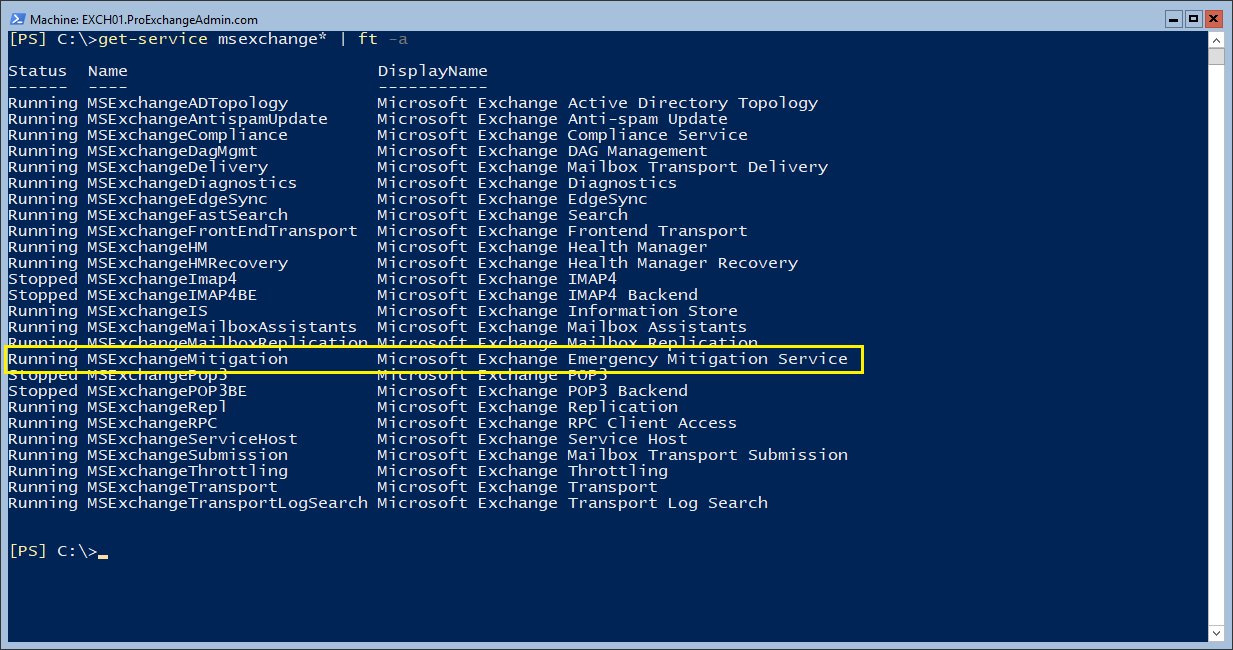
After installing the updates, you will see the new services when opening the services MMC snap-in:
Or when using the Get-Service MSExchange* PowerShell command:
To check the status in the Exchange organization, you can use the Get-OrganizationConfig | Select mitigations command:
To disable the mitigation service, execute the following command:
Set-OrganizationConfig -MitigationsEnabled:$False
By default, only one mitigation is installed, this is the EEMS heartbeat probe. You can check the installed mitigations by navigating to the Exchange scripts directory and execute the Get-Mitigations.ps1 script:
As with any Cumulative Update, please test this CU in your lab to see if all works well for your environment. Also have a look at the telemetry configuration (is that allowed in your organization?) and at the automatic configuration changes made by the EEMS (I can hear CISO starting to complain).
More information and downloads regarding the Cumulative Updates can be found here:
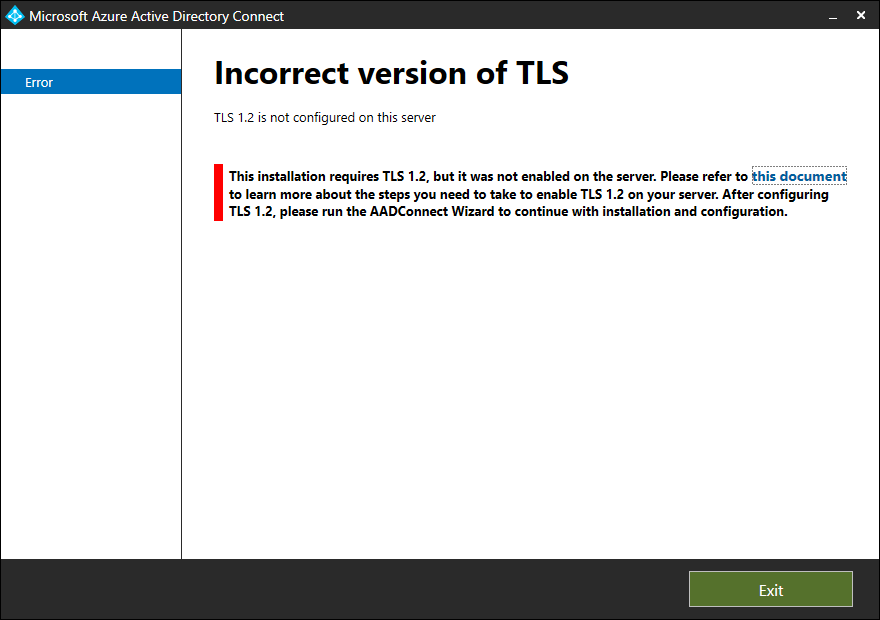
So, I installed a brand-new Windows 2019 server where I wanted to install Azure AD Connect version 2.x. Or better, I wanted to upgrade an existing Azure AD Connect version 1.x server to version 2.x. After starting I got the following error message:
This installation requires TLS 1.2, but it was not enabled on the server. Please refer to this document to learn more about the steps you need to take to enable TLS 1.2 on your server. After configuring TLS 1.2, please run AADConnect Wizard to continue with installation and configuration.
Luckily it’s not that difficult to enable TLS 1.2 on a Windows 2019 server (although I am wondering why this is not enabled by default) by using the following registry keys:
Microsoft has announced that it starts to disable basic authentication for customers that do not use basic authentication (for new Office 365 basic authentication is disabled by default).
I have disabled basic authentication is my tenant long ago and last week I got an email from Microsoft (MC274505, which can also be found in the admin portal) announcing basic authentication will be disabled in my tenant:
“We’re making some changes to improve the security of your tenant. We announced in 2019 we would be retiring Basic Authentication for legacy protocols and in early 2021 we announced we would begin to retire Basic Authentication for protocols not being used in tenants.
30 days from today we’re going to turn off Basic Authentication for POP3, IMAP4, Remote PowerShell, Exchange Web Services, Offline Address Book, MAPI, RPC and Exchange ActiveSync protocol in your tenant, and will also disable SMTP AUTH completely.
Note: Based on our telemetry, no users in your tenant are currently using Basic Authentication with those protocols and so we expect there to be no impact to you.”
If disabling basic authentication causes issues for your tenant, you can always re-enable basic authentication as outlined in the Microsoft link in the beginning of this blogpost. But please remember that basic authentication will be disabled permanently some day!


You must be logged in to post a comment.